In this guide we’ll cover the steps to migrate from an integrated CRM system to using AccessAlly Managed. This is a detailed process for changing your site.
We recommend taking the quiz below before proceeding.
ARTICLE CONTENT:
⚠️ Critical: Backup Admin Access Before Starting
Before you begin the migration process, it’s essential to understand how AccessAlly Managed handles passwords and ensure you don’t lose admin access to your site.
How AccessAlly Managed Manages Passwords
When you migrate to AccessAlly Managed, password management changes:
- Before migration: Your CRM stores contact passwords (or contacts log in via CRM authentication)
- After migration: AccessAlly Managed stores passwords locally in WordPress
- During migration: The migration tool resets all user passwords and sends new login credentials via email
How to Protect Admin Access
Option 1: Use a separate admin account (Recommended)
- Create a new WordPress admin user with a different email address
- This email should NOT exist in your CRM contact list
- Keep this admin account logged in on a separate browser/device
- Run the migration using your regular admin account
- If locked out, use the backup admin to reset your password
Option 2: Database access backup
- Ensure you have phpMyAdmin or direct database access through your hosting provider
- Know how to manually reset a WordPress password via database
- Keep your hosting login credentials handy
Option 3: FTP/SFTP access
- Have FTP credentials ready
- Know how to access wp-admin via emergency password reset methods
Before You Click “Start Migration”
✅ Checklist:
- [ ] Backup admin account created and tested
- [ ] Database access confirmed via hosting panel
- [ ] FTP credentials accessible
- [ ] Migration being tested on staging site (not live)
- [ ] All backups completed and verified
💡 Pro Tip: Run your first migration on a staging site to see exactly how the password reset process works before touching your live site.
Take the quiz!
The quiz below helps determine if migrating from your CRM to AccessAlly Managed is a good fit for your business.
Before Migrating to AccessAlly Managed
Within AccessAlly Managed all content (pages/posts/modules) are placed within Offerings.
AccessAlly Managed works to give access by orders placed on AccessAlly Order Forms or AccessAlly Opt-in Forms to release the content (and send emails) from within your Offerings.
What the Migration Tool Does Automatically
AccessAlly includes a built-in migration tool that automates most of the migration process. Understanding what happens automatically versus what requires manual work helps set proper expectations.
✅ What the Migration Tool Handles Automatically
- Contact migration: Imports all contacts from your CRM into WordPress as users
- Tag preservation: Maps CRM tags to AccessAlly’s local tag system
- Password generation: Creates new passwords for all users
- Email notifications: Sends login credentials to all migrated contacts
- Page access preservation: Maintains existing page protection rules based on tags
- Course structure: Your AccessAlly course pages and content structure stays intact
You do NOT need to manually rebuild:
- Course pages or lesson structures
- Page protection settings
- Member dashboards or navigation
- Progress tracking or quiz data
⚠️ What Requires Manual Work
- Email sequences: You’ll need to recreate email automations (AccessAlly Managed doesn’t have automation capabilities like full CRMs)
- Order forms: Update to use AccessAlly order forms instead of CRM order forms
- Payment processor integration: Configure Stripe within AccessAlly
- Advanced CRM automations: Any complex workflows need to be rebuilt or replaced
- Email marketing: Set up a separate email service provider if needed (Mailchimp, ConvertKit, etc.)
Common Misconception
Many customers think they need to “start from scratch” with AccessAlly Managed. This is not true. Your entire membership site structure remains exactly as it is. The migration tool simply shifts contact management from your CRM to AccessAlly’s local system.
💡 Think of it this way: You’re changing where member data is stored (CRM → WordPress), not rebuilding your membership site.
Recommendations
- Staging site – this allows you to migrate and make all needed changes and adjustments without impacting users on your live site.
- SMTP plugin & dedicated email delivery service – to ensure WordPress email deliverability.
- Review AccessAlly Managed vs CRM integration article – items covered in this article show what’s possible as a comparison guide.
- How to Migrate Subscriptions During a Membership Migration* – this process shows options for recurring subscriptions when using 3rd party order forms or CRM order forms to take payments.
CRM Information
*Contacting your CRM provider to negotiate your rates, if CRM pricing is a concern, is your best option. This keeps your existing site as is with no migration needed!
Order Form Information
Before planning a migration to AccessAlly Managed – it’s important to determine where orders are currently being placed.
If using CRM order forms (Keap or Ontraport) or 3rd party carts to take payments (like SamCart, Thrive Cart, or WooCommerce) – these payment types are not compatible with AccessAlly Managed.
Staging Site Review Items
Once you have your staging site setup it’s time to review and prepare BEFORE switching.
- Offering Module Release Timers – ensure all offerings have release timers set up to deliver modules
- AccessAlly Emails – ensure this feature is turned on and set up in your staging site
- AccessAlly Order Forms – all paid offerings will need an AccessAlly order form with a Release Custom operation (to release dripped content modules)
- AccessAlly Opt-in Forms – all free opt-in offerings will need an AccessAlly opt-in form
- Webhooks – are a thing of the past in AccessAlly Managed Contacts. Before switching you’ll want to review all webhooks on your webhooks log. Any webhooks run via the CRM will no longer function.
- Contacts – make a list of 10 contacts to spot check post-conversion. This list will have the following details (from WordPress > Users tab)
- First Name
- Last Name
- Contact ID Number
- Email Adddress
- Tags
- Referring Affiliate: If applicable
- Order ID numbers – for all order placed
- Subscription ID numbers – for recurring subscriptions & finite payment plans.
How to Test Your Migration Safely
Testing on a staging site allows you to verify the migration process works correctly before affecting live members. Here’s how to test thoroughly:
1. Set Up Proper Staging Environment
- Clone your live site to a staging subdomain (e.g., staging.yoursite.com)
- Ensure staging site has a separate database (not sharing with live)
- Contact AccessAlly to enable the 2-site license exception for your staging site
- Verify staging site is NOT indexed by search engines (use robots.txt)
2. Pre-Migration Testing
- Test admin login and verify you have backup access methods
- Document current member counts, active subscriptions, and key tags
- Create a test user in your CRM with all important tags
- Take a fresh backup of staging database before migration
3. Run the Migration
- Follow the migration steps exactly as documented
- Do NOT skip the verification step
- Monitor for error messages or warnings
- Note the total time the migration takes (helps plan live migration)
4. Post-Migration Testing Checklist
Contact & Access Testing:
- [ ] Verify total user count matches expected number
- [ ] Test login with migrated user credentials (check email for password)
- [ ] Confirm tags were preserved correctly in AccessAlly
- [ ] Test page access for different membership levels
- [ ] Verify course progress data is intact
Order Form Testing:
- [ ] Complete a test purchase with a real credit card (refund it later)
- [ ] Verify new purchase creates WordPress user correctly
- [ ] Confirm correct tags are applied after purchase
- [ ] Check that purchase email notifications are sent
- [ ] Test subscription billing (if applicable)
Admin & System Testing:
- [ ] Log in as admin (verify no lockout issues)
- [ ] Check AccessAlly dashboard shows correct member counts
- [ ] Verify email deliverability is working
- [ ] Test password reset functionality
5. Document Issues & Solutions
Keep notes of any issues you encounter and how you resolved them. These notes will be invaluable when you run the migration on your live site.
Common testing discoveries:
- Email delivery issues (check spam folders, email service settings)
- Missing tags (verify tags exist in CRM before migration)
- Order form configuration errors
- Payment processor authentication issues
💡 Pro Tip: Plan to spend 2-4 hours thoroughly testing your staging migration. Rushing this step leads to problems on the live site where fixing issues is much more stressful.
6. Practice Makes Perfect
If you find issues during testing:
- Restore staging site from backup
- Fix the underlying issue (missing tags, incorrect config, etc.)
- Run the migration again
- Test again
It’s completely normal to run 2-3 test migrations before you’re confident enough for the live migration.
Backup Your Site
Before converting your site to AccessAlly Managed Contacts make a full backup of your live AccessAlly site.
Converting Your Site
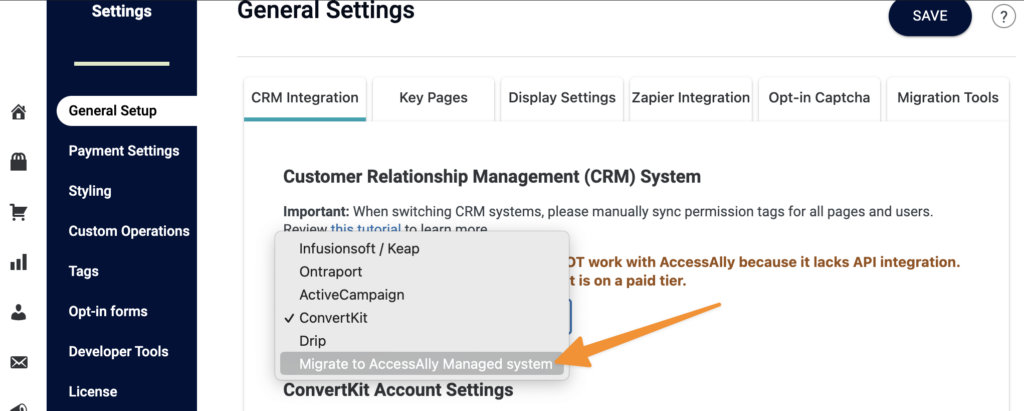
After completing the steps above it is time to convert your site. Go to AccessAlly > Settings > General Setup > CRM Integration > Select Migrate to AccessAlly Managed system from the dropdown. And… click the blue “Run Migration” button.
Step 1: Start Verification
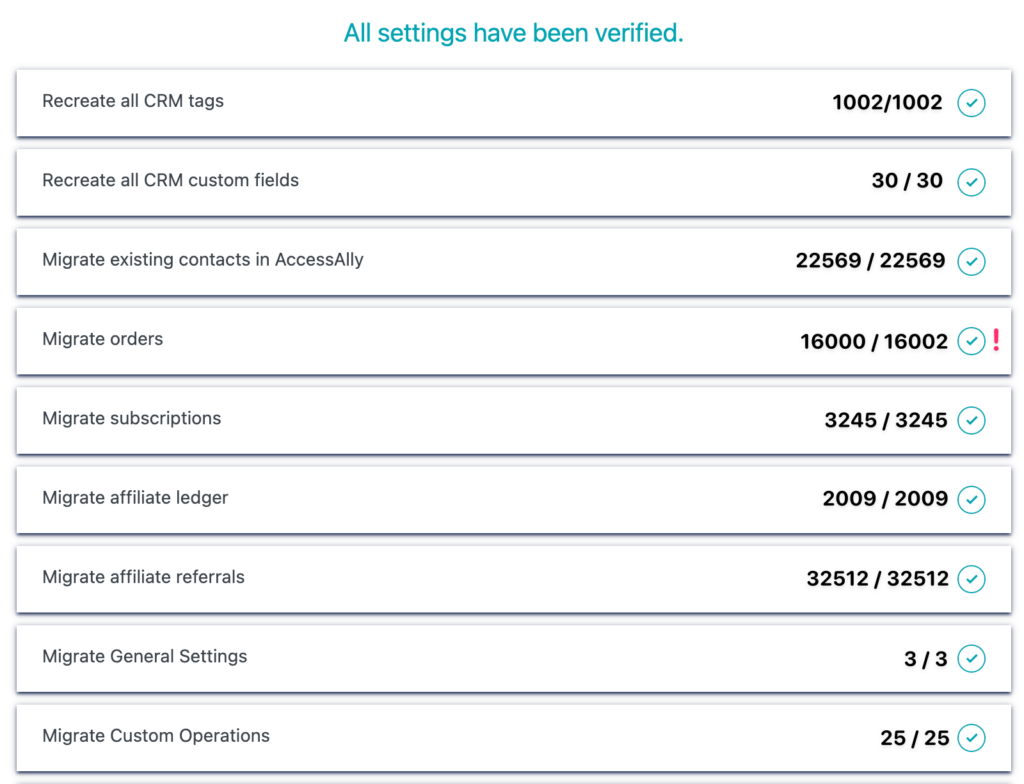
This step allows you to review everything before officially migrating to AccessAlly Managed Contacts. This step is displayed when the Migrate all records box is left UNCHECKED as shown in the image below.
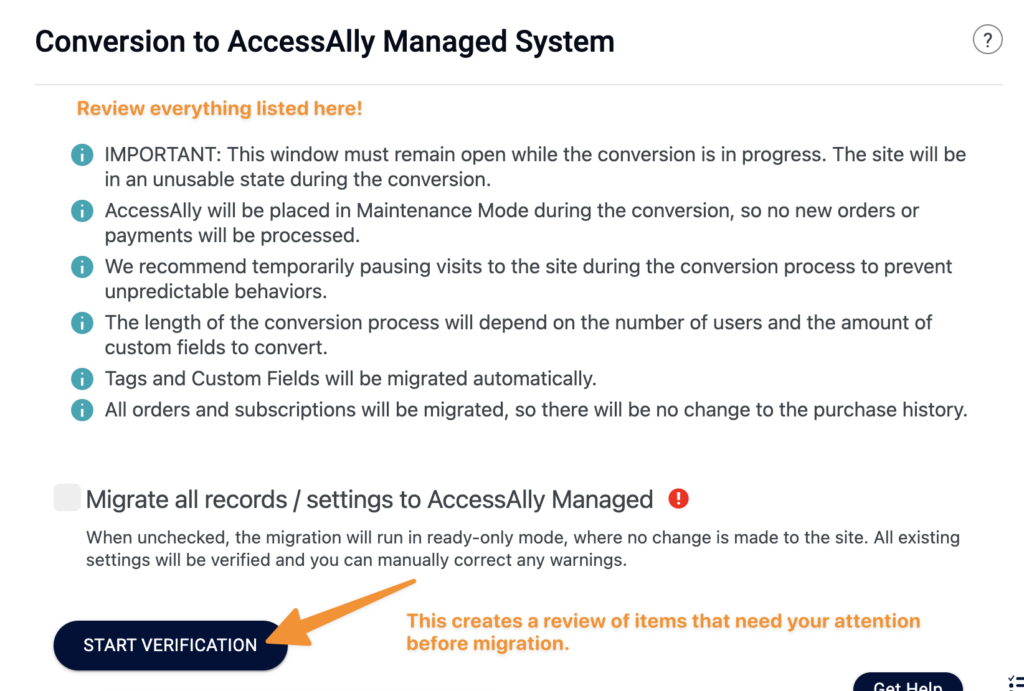
We recommend keeping your existing CRM integration if “0/0” subscriptions have been detected.

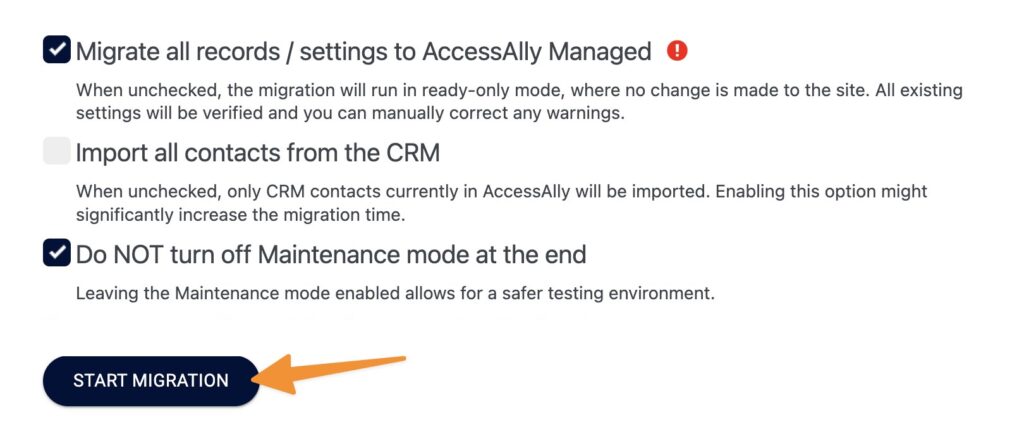
Step 2: Start Migration
Upon checking the “Migrate all records” box the wording will change and the button will display “Run Migration.”
If you select “Import all contacts” all contacts in your CRM will be brought into your AccessAlly site. *This option can drastically increase the time it takes for your site to be converted.
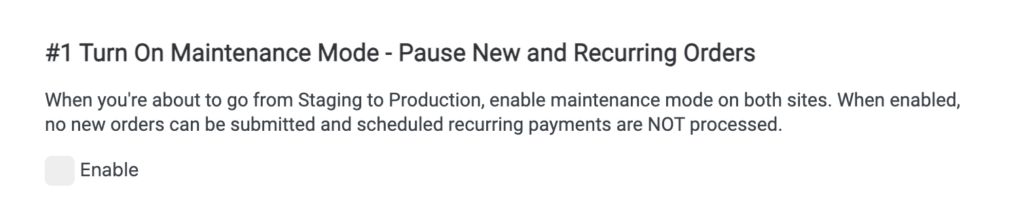
A check by “Do NOT turn off Maintenance mode at the end” will prevent payments from being processed on your site while you review the migration.
Step 3: Review Contacts
Now it’s time to review 10 contacts (from your list in the Staging Site Review steps above) from the WordPress Users tab to ensure the Contact ID number, name, email, and tags match.
Step 4: Take Site Out of Maintenance Mode
If you selected to keep your site in maintenance mode you can turn this off by going to AccessAlly > Settings > Migration Tools and removing the check box by this option.
Step 5: Make Test Purchase
Visit the order form for your offerings and make a test purchase. Confirm that:
- The order is successful
- You can see the expected Offering content
- You receive a welcome email
- A new user is created on your site
Step 6: Push staging site to live
Now it’s time to push the changes from your staging site to your live site. Before pushing the changes refer to this article about preventing duplicate payments.
Questions or Need Help?
If you need assistance with your migration, we recommend hiring a WordPress developer experienced with membership site migrations.
For questions about third-party systems (your CRM, email service, payment processor, hosting), connect with those providers directly.
For general AccessAlly questions unrelated to migrations, contact our support team.
FAQs
The biggest difference you’ll notice is with tags and webhooks.
CRM Integrated sites heavily use tags to move someone into automations and use webhooks to sync this data back to the site.
AccessAlly Managed uses Offering Releases on order forms and opt-in forms to send emails & deliver offering content. Tags are used to show page content, but tags do not send emails.
Some custom operations, like CRM activated coupon codes, are not available in AccessAlly Managed.
* If your Teams were created outside of a Team Center Offering, we’re working on a feature request that uses a custom operation to connect your existing teams to Offerings.
You can add existing teams to a Team Center Offering, while still connected to your CRM by following this article.
