This article will walk you through the steps to create a Gift Center. If you would like to sell an Offering for holiday gift giving, try this option!
Created for: AccessAlly Managed with AccessAlly Emails
ARTICLE CONTENT:
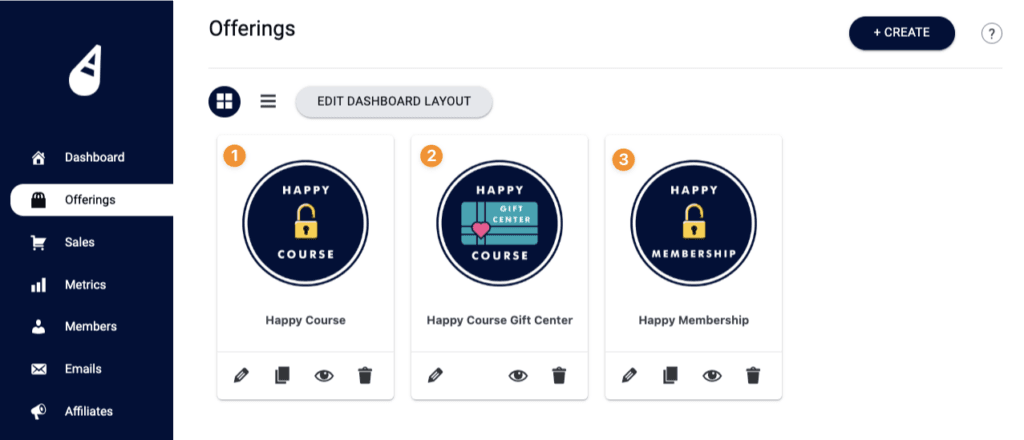
1. Offerings on Site
Here’s how the Gift Center works, in relationship to all Offerings on your site.
- Gift Offering – select the Offering you’ll give as a gift
- Gift Center Offering – connect Gift Giver & Gift Recipient (send & deliver the Gift Offering.)
- Any Offerings (outside of 1 & 2) = Cross-selling dashboard. Offerings available for purchase or free opt-in.
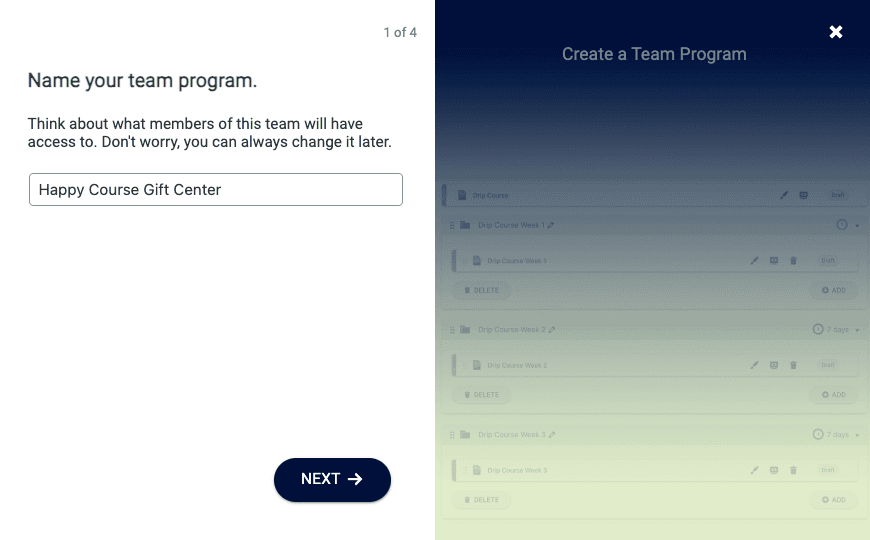
2. Create a Gift Center (Team Center Offering)
Go to AccessAlly > Offering > “+ CREATE” > Team Center Offering
Below you’ll see the steps for each part, these are screenshots of the same pieces from the video above.
Offering Name (Example: Happy Course Gift Center)
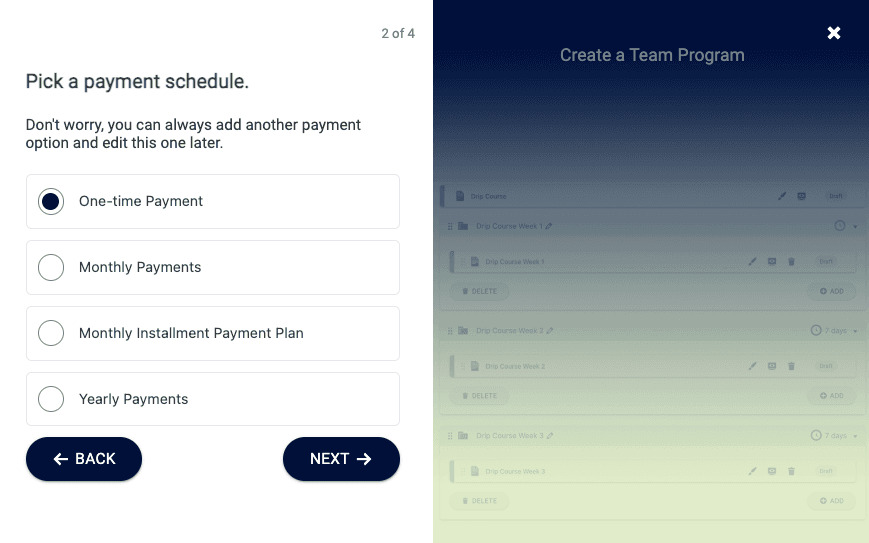
Pick a payment schedule (How many times the Gift Giver pays for the gift.)
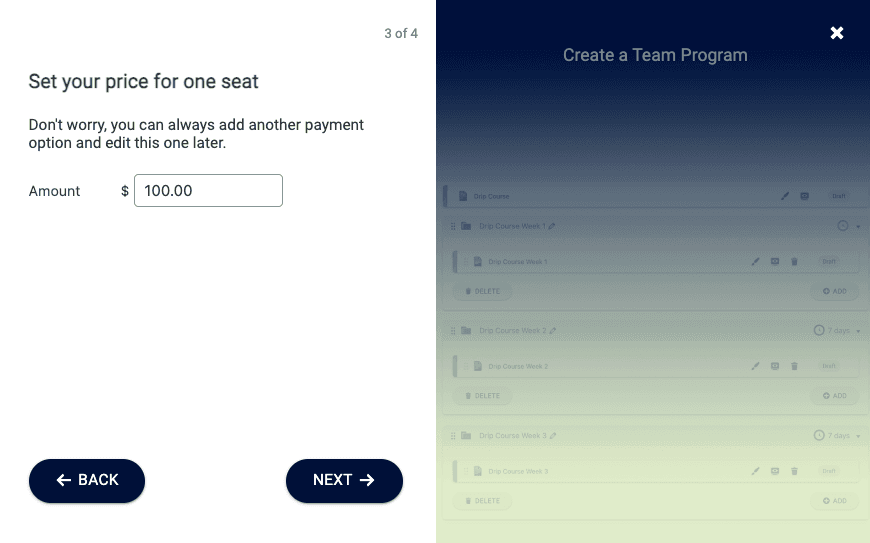
Price per seat (amount paid by Gift Giver for each Gift Recipient.)
Select “Yes, I’m ready to add my content”
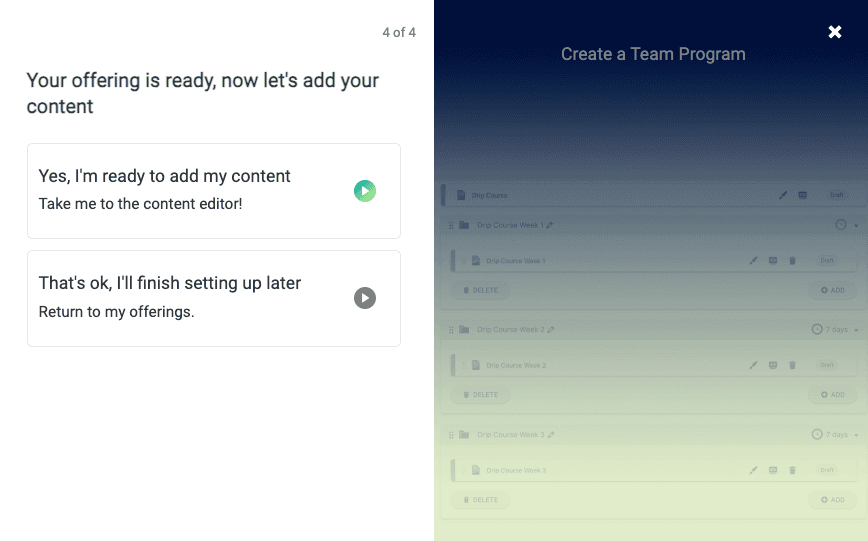
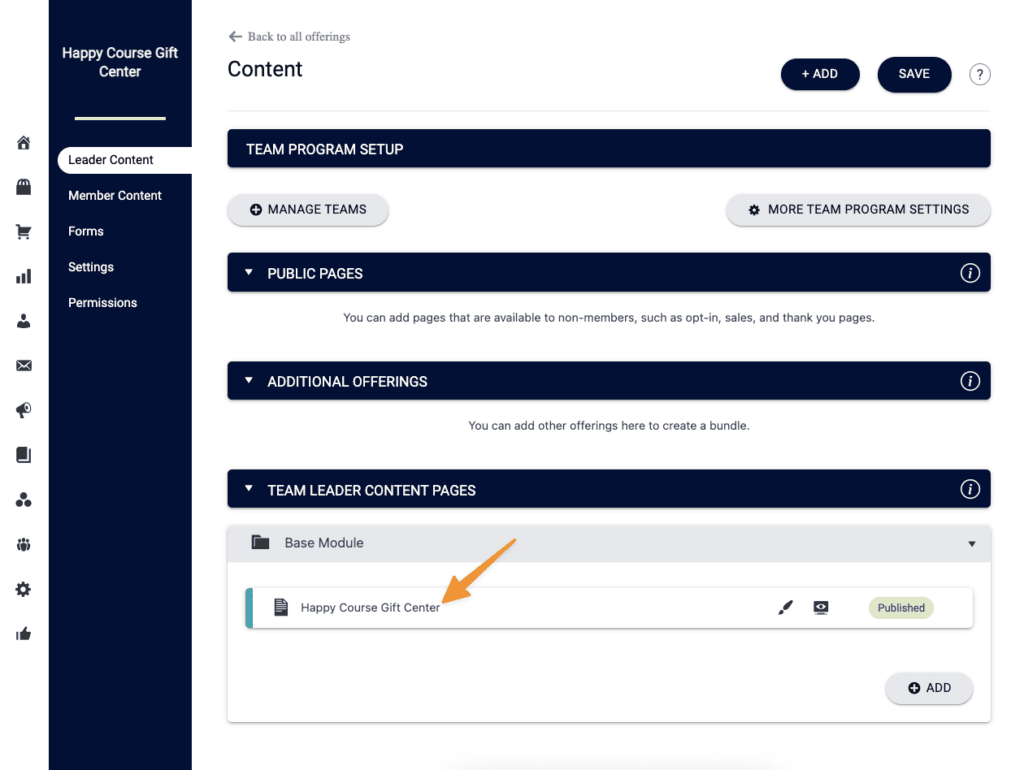
The Leader Content Tab contains a single Base Module Page.
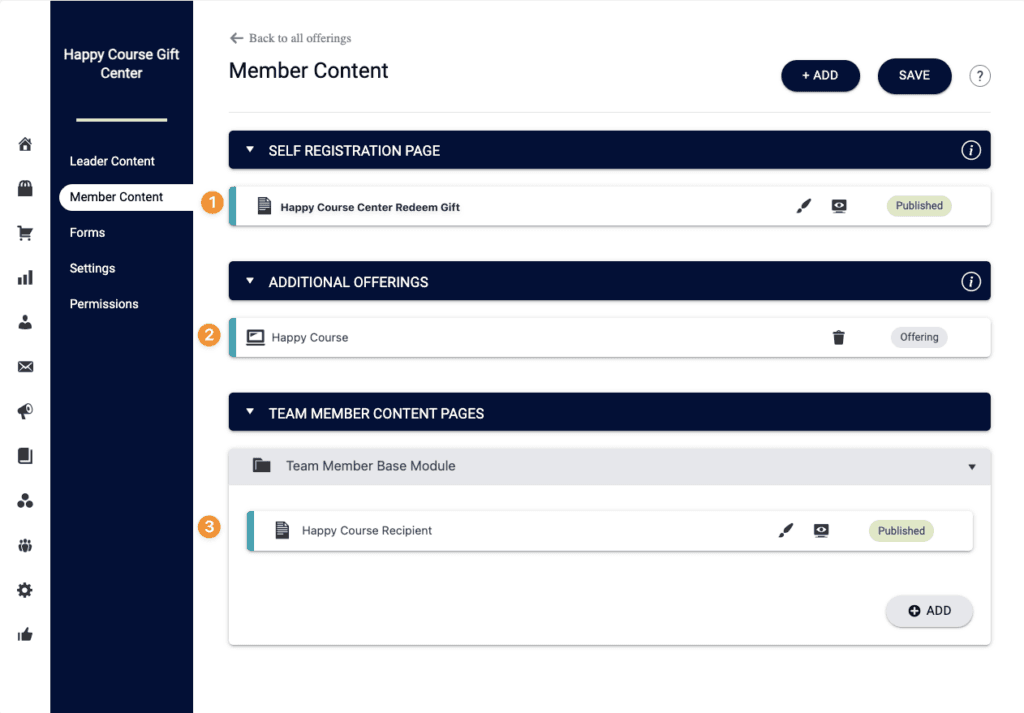
The Member Content Tab contains:
- Gift Redemption Page (Self-Registration)
- Additional Offering (The Gift Offering)
- Base Module Page (Gift Recipient Sees The Gift)
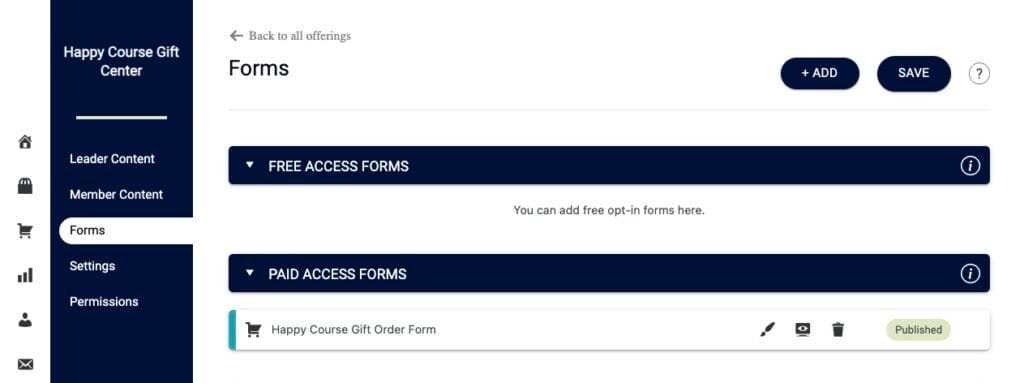
The Forms tab is where the order form is held for the Gift Giver to purchase.
3. Gift Program Settings (Team Program Settings)
Location: AccessAlly > Teams > Name of your Gift Center (dropdown)
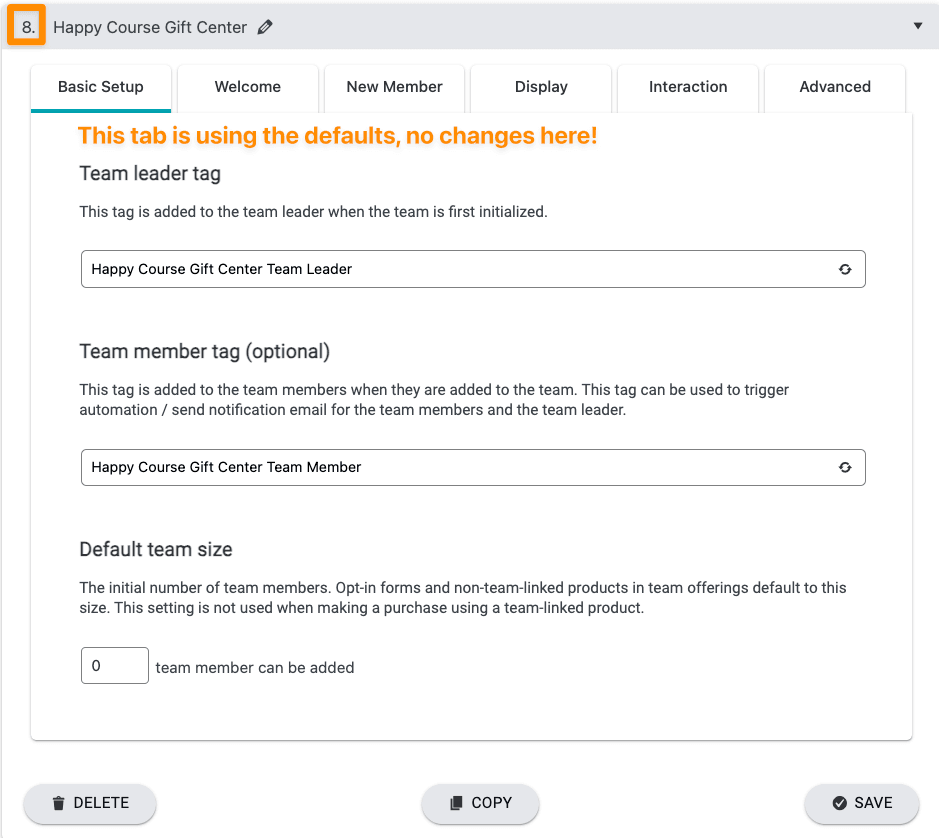
Basic Setup Tab
Note the Team ID number in top left corner. You’ll use this number when referenced in setup. All settings in Basic Setup use the default.
Welcome Tab
All settings stay at the default. These are pre-filled for you.
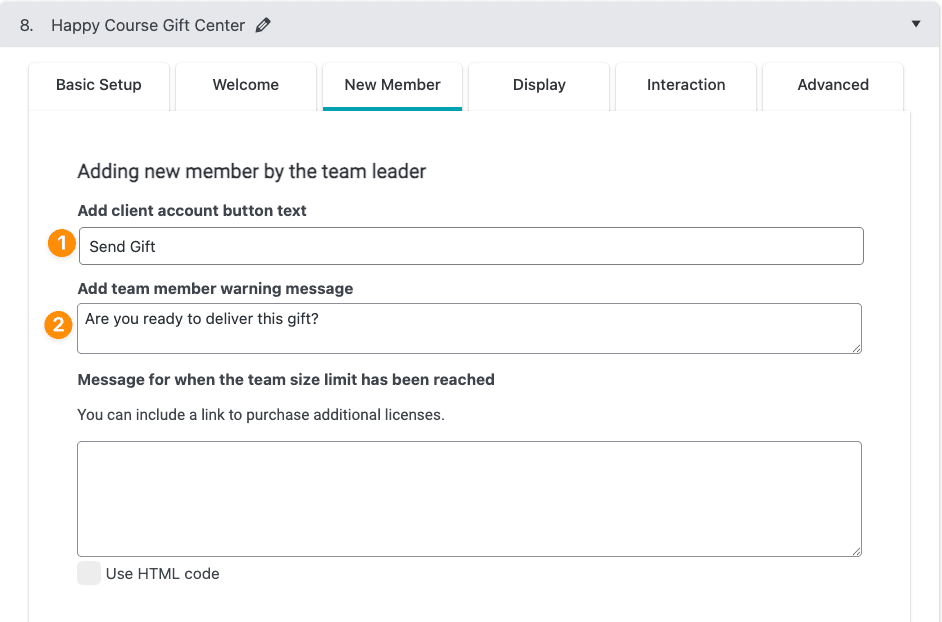
New Member Tab
Only the first two parts, are customized, the remaining uses the default.
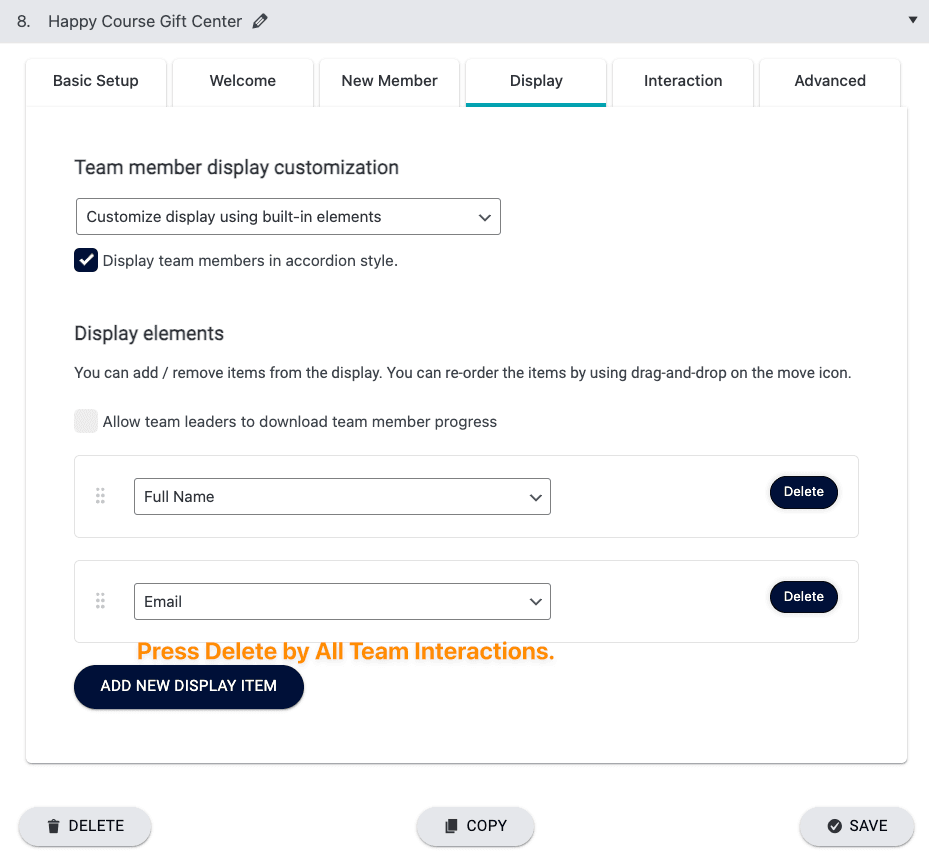
Display Tab
Add a check box to “Display team members in accordion style”
In this Display Elements section, you’ll have an extra part “Display Team Interactions” you can delete this and show only Full Name and Email.
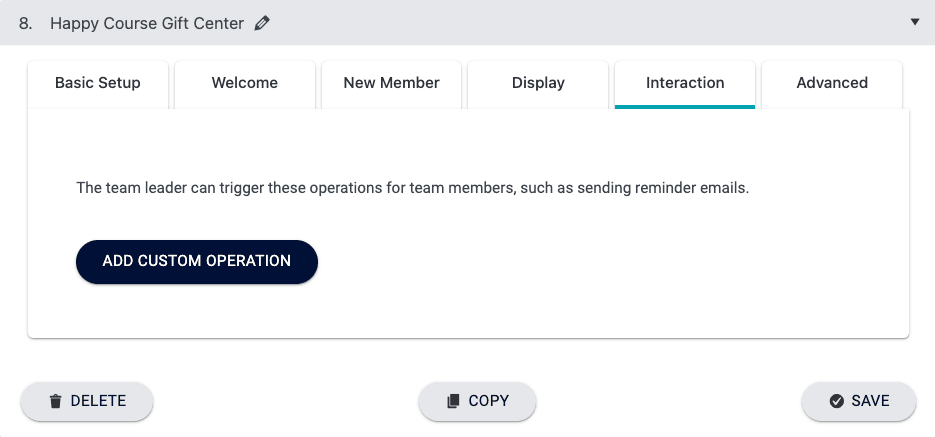
Interaction Tab
No interactions are needed.
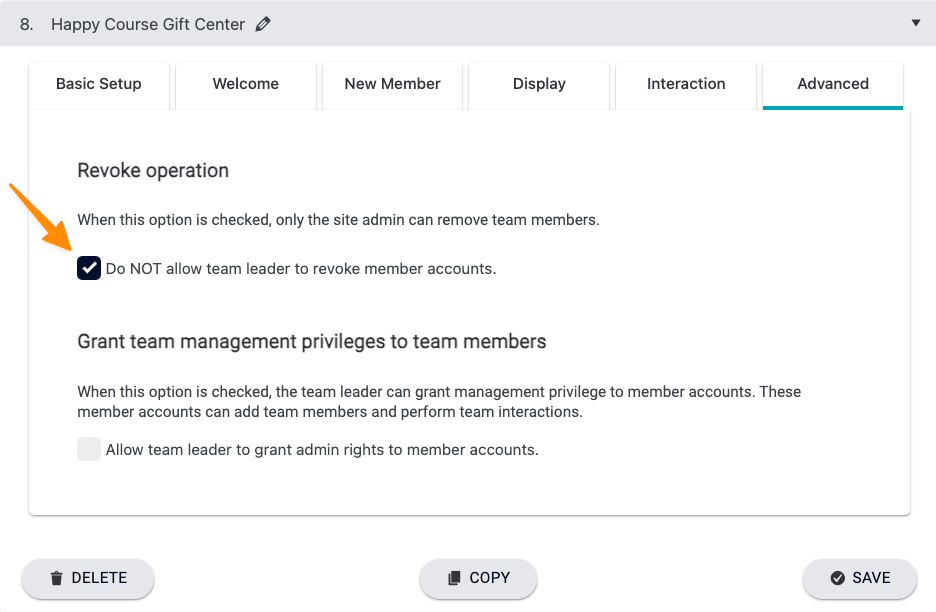
Advanced Tab
In this tab, check the box as shown below. This removes the button where a Gift Giver can remove a Gift Recipient. *This is helpful to prevent more gifts from being given than purchased.
4. Gift Giver Pattern Page Design (Leader Content Base Module Page)
The page pattern below, will give you an import file of the page built in the video. Patterns are imported into the Gutenberg editor in WordPress.
Not using Gutenberg?
Here’s the code used for each part. These are added using the Custom HTML option in your WordPress Theme (or page builder.) You can copy/paste these in, then watch the video to customize.
<center>[accessally_icon post_id='#' target='same' hide_disable='always' width="200px"]</center><h2><center>Gift Delivery</center></h2>[accessally_team_add_new_child team_id='1']<h2><center>Gifts You've Sent</center></h2>[accessally_team_child_list team_id='1']<script>
document.addEventListener('DOMContentLoaded', function() {
var searchInputs = document.querySelectorAll('.accessally-filter-input');
searchInputs.forEach(function(input) {
if (input.placeholder === 'Find team member') {
input.placeholder = 'Search recipients';
}
});
});
</script><script>
document.addEventListener('DOMContentLoaded', function() {
var noMemberMsg = document.querySelector('.accessally-team-no-member-message');
if (noMemberMsg) {
noMemberMsg.textContent = 'No gifts have been sent yet.';
}
});
</script>5. Gift Recipient Page Pattern (Member Content Base Module)
The page pattern below, will give you an import file of the page built in the video. Patterns are imported into the Gutenberg editor in WordPress.
Not using Gutenberg?
Here’s the code used for each part. These are added using the Custom HTML option in your WordPress Theme (or page builder.) You can copy/paste these in, then watch the video to customize.
<center>[accessally_icon post_id='#' target='same' hide_disable='always' width="200px" ]</center><h2><center>Your gift has arrived, [accessally_user_firstname]!</center></h2>Add a button with a link to the Offering that was purchased!6. Order Form
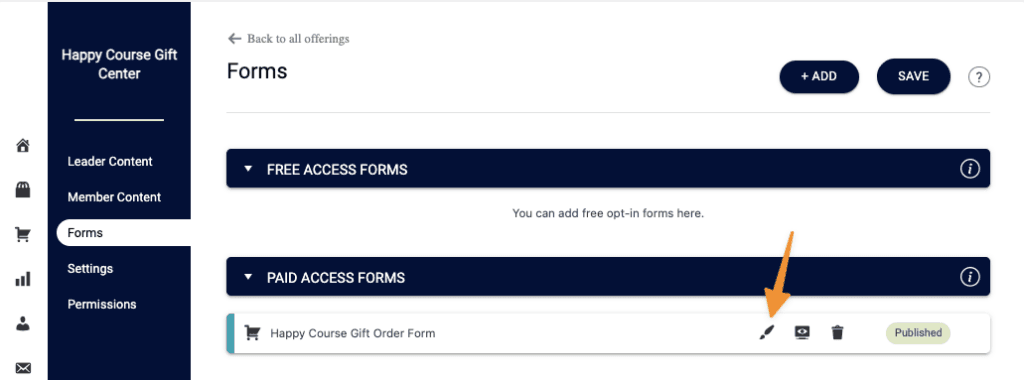
Now, it’s time to customize your order form. This is in your Gift Center Offering.
AccessAlly > Offerings > Your Gift Center Offering > Forms Tab
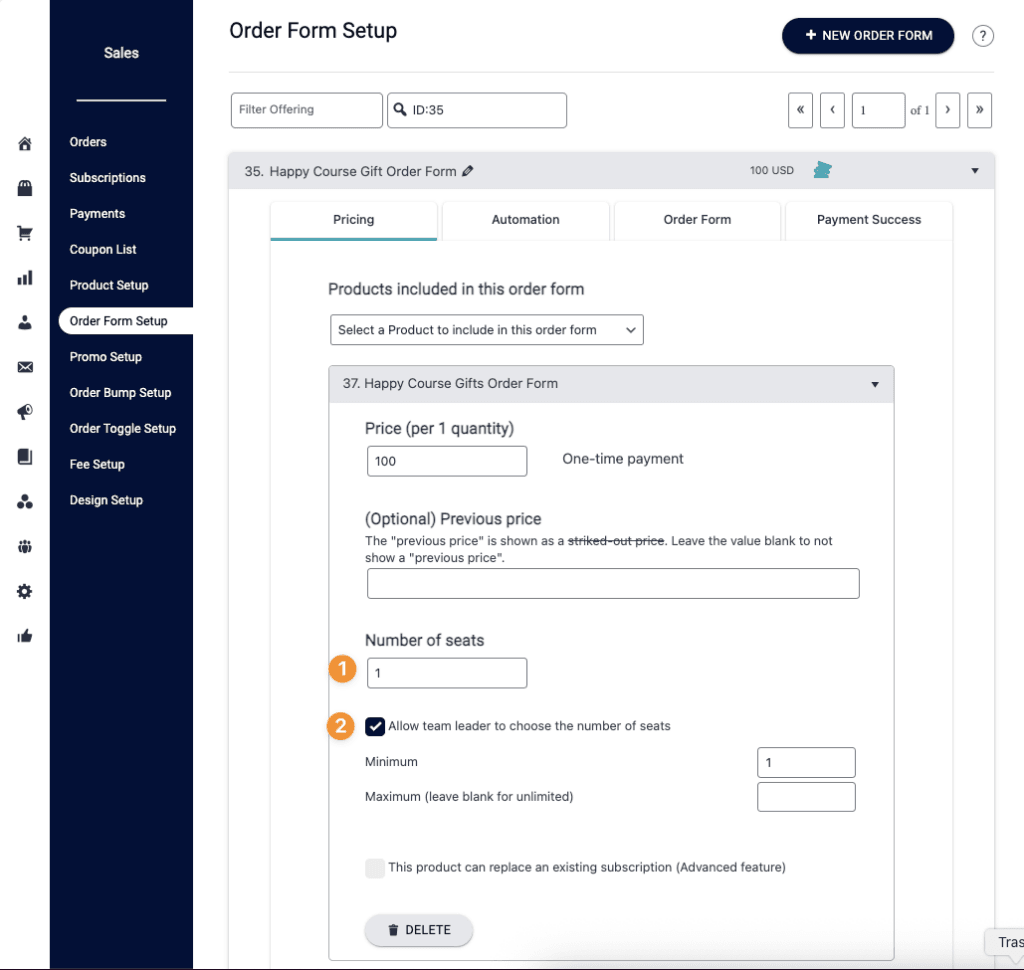
Here are the recommend settings for the Order Form Pricing tab.
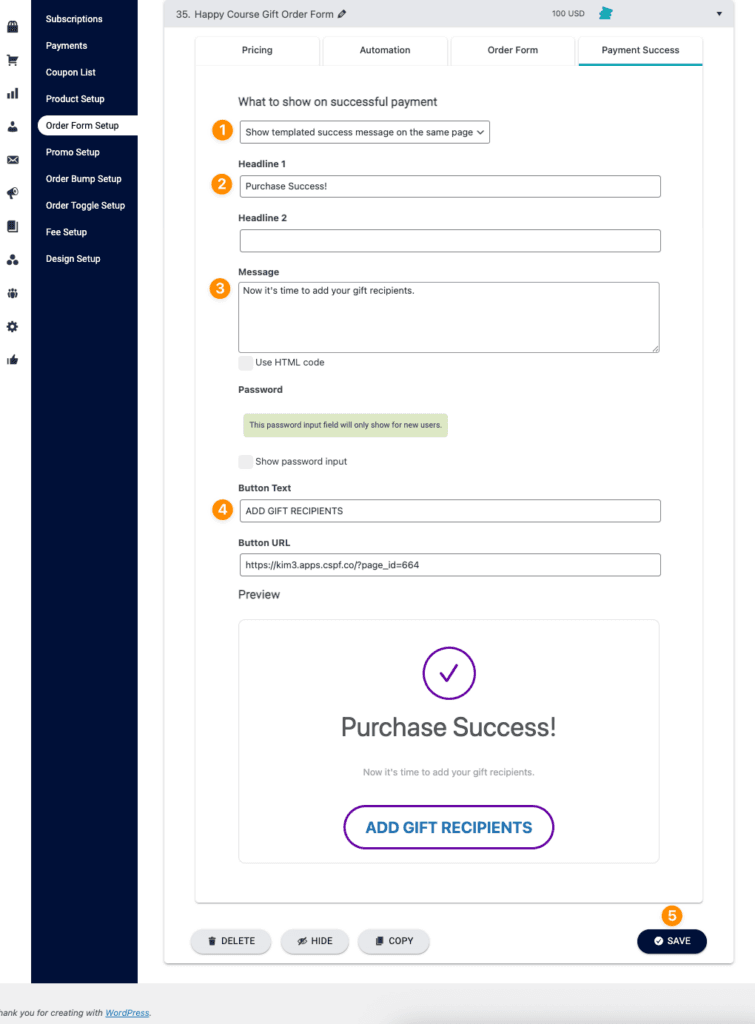
Next, select the “Payment Success” tab.
The Gift Giver will see this message & then add each Gift Recipient. Customize the numbered items below to your liking.
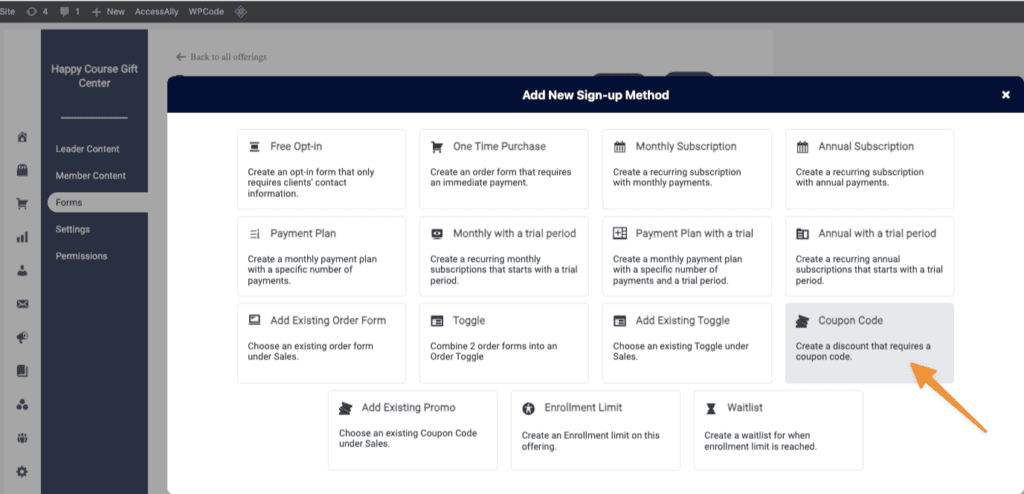
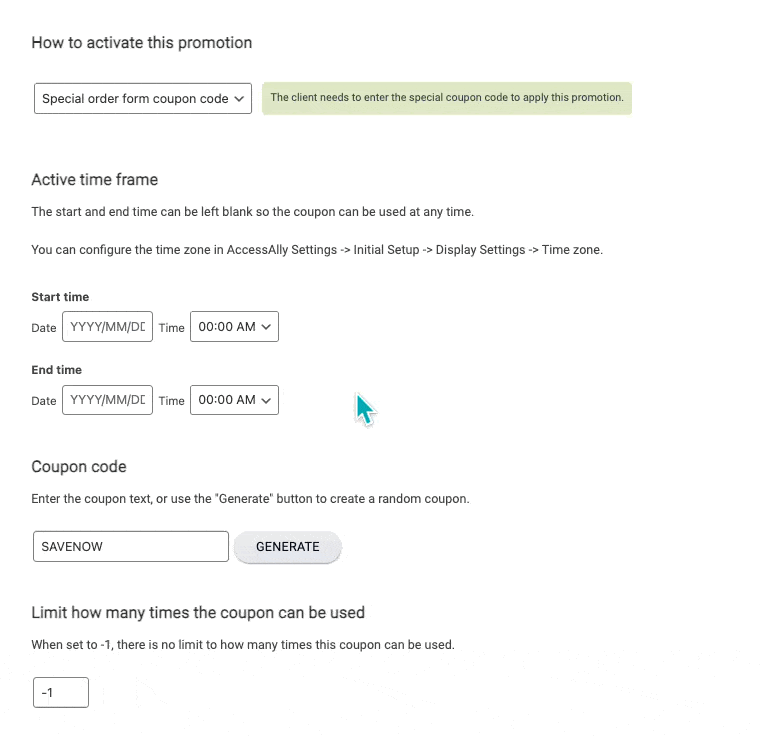
7. Coupon Code
Now, it’s time to customize your order form. For ease in testing, add a 100% off promo coupon.
AccessAlly > Offerings > Gift Center Offering > Forms tab > “+ ADD” > Coupon Code
The coupon code will be for your internal company order form testing.
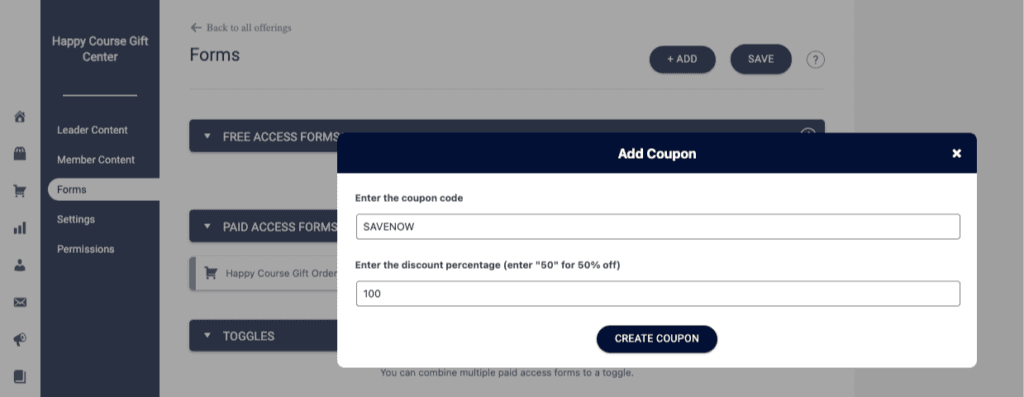
Next, you will “Save” the Forms tab, then edit the Coupon Code.
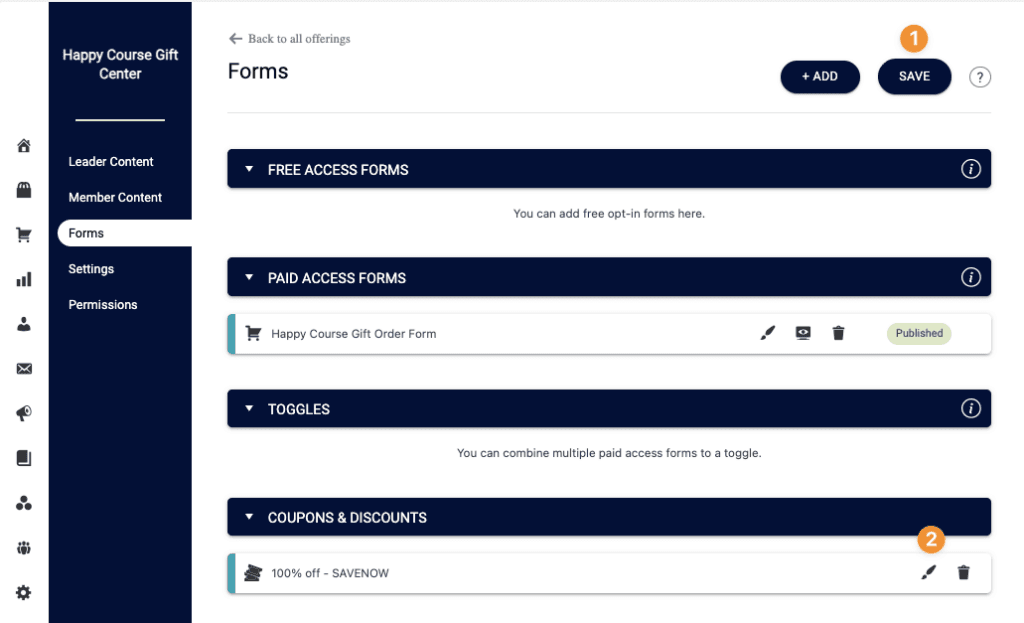
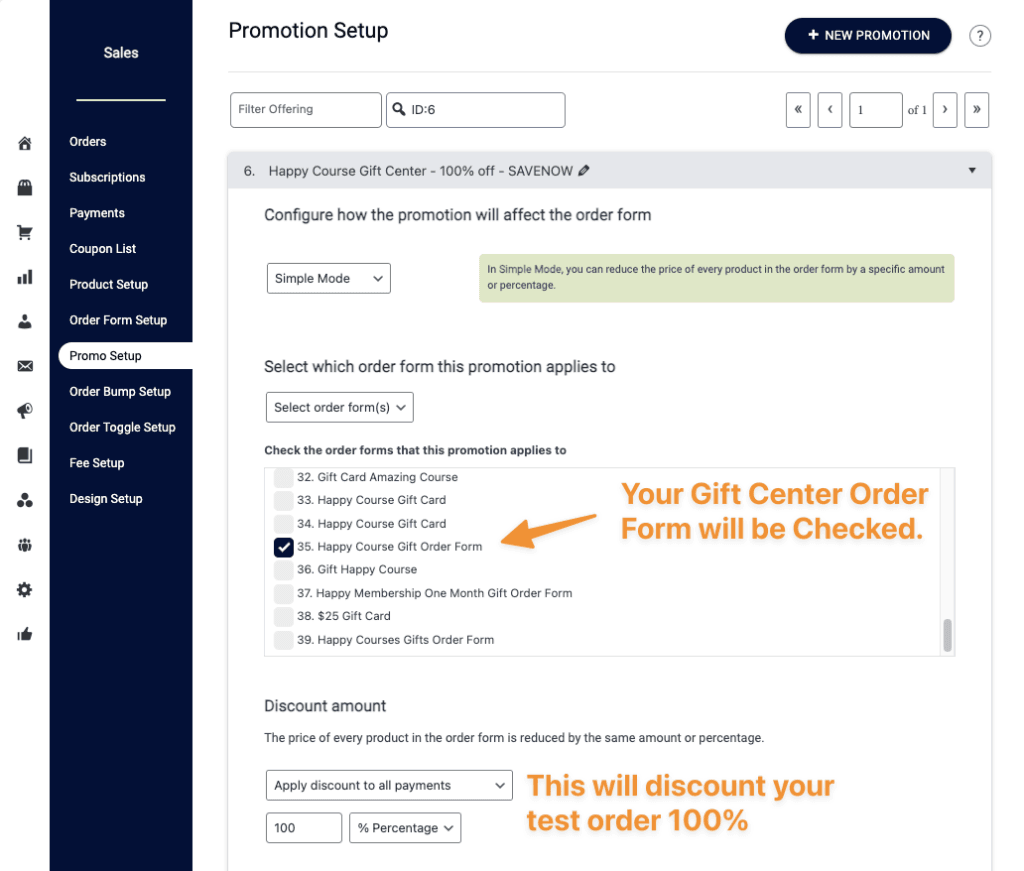
Your Gift Center order form will be checked and the discount is 100% (for all payments.)
In the coupon code section, remove SAVENOW and click Generate to create a promo code. After changing the coupon code, press “SAVE” to save your coupon code changes.
8. AccessAlly Welcome Email
This is a personalized email, sent to the Gift Recipient, upon being added by the Gift Giver.
AccessAlly > Emails > Welcome Email
- Select “+ NEW”
- Edit with pencil to name the Welcome Email
- Select “+ ADD NEW TRIGGER” > this is when a Team Member is added by a Team Leader to your Gift Center Team
- Send customized email (dropdown)
- Email subject – use Personalize to add Team Leader First & Last Name
- Select the body copy, and personalize, to add details
- Select “SAVE” to save changes.
Example of email copy used, with personalization.
Hi {{[firstname]}},

{{[team-leader-firstname]}} {{[team-leader-lastname]}} has sent you Happy Course as a gift!

{{[reset-password-link:Click here to reset your password.]}}

And, reach out to {{[team-leader-firstname]}}, if you'd like to confirm this is a real gift.

-{{[signature]}}
9. Test Your Gift Center
For testing purposes, you will need:
- Gift Giver Email Address (different from your admin email)
- Two Gift Recipient Email Addresses (different from your admin email)
- Link to Gift Order Form
- User Switching plugin (switch view from Gift Giver to Gift Recipients)
Frequently Asked Questions
Q: How do I expire a gifted month of a membership?
A: Inside your Gift Center, add a module with a timer set with a delay. There’s an option to run a custom operation when the module is released. Add the “Revoke Membership Offering” custom operation.
Here’s a video example:
Glossary of Terms
Below you’ll find a list of terms used in this guide. We’ll use an existing feature in a new way.
- Gift Center = Team Center Offering
- Gift Program Settings = Team Program Settings
- Gift Giver = Team Leader
- Gift Recipient = Team Member
- Gift = Additional Offering (Gift Recipient receives access to this Offering)
