This guide explains how AccessAlly integrates with your CRM and the steps to set up automations for content release, payment follow-ups, and user engagement.
For: CRM Integrated Sites – ActiveCampaign, Drip, Keap, Kit, and Ontraport
ARTICLE CONTENT:
Article Content
- When CRM Automation is Used
- Pre-built Automation Templates
- How AccessAlly and Your CRM Communicate
- Setting Up an Automation
- Additional Automation Examples
When CRM Automation is Used
AccessAlly includes built-in dripped content release and release emails. CRM automation is optional but provides access to more advanced automation capabilities available in your CRM platform.
Using AccessAlly Managed Contacts?
If you use AccessAlly Managed Contacts (AccessAlly’s built-in contact management), refer to the AccessAlly Emails Guide instead. This guide applies to external CRM integrations only.
Pre-built Automation Templates
Pre-built automation templates are available for Kit, Ontraport, and ActiveCampaign.
These templates require customization to match your specific setup. Update the tags and webhook details using the instructions in this guide.
How AccessAlly and Your CRM Communicate
AccessAlly and your CRM are separate systems that communicate in two ways:
Access Tags
AccessAlly uses your CRM’s tagging system to:
- Grant or revoke access to content
- Personalize user experiences
- Track user actions (purchases, logins, form submissions)
Tags can be as simple or complex as your site requires. Learn more about Access Tags
HTTP Posts/Webhooks
Webhooks sync information between your CRM and AccessAlly. When a tag changes in your CRM, a webhook notifies AccessAlly of the update.
Critical: Without webhooks, AccessAlly cannot detect changes made in your CRM. Every automation that modifies tags must include webhooks to update AccessAlly.
View the complete list of webhook commands
Automation Workflow
A standard automation follows this sequence:
- A user completes an action in AccessAlly (e.g., makes a purchase)
- AccessAlly applies the corresponding tag to the user and sends this information to the CRM
- The CRM receives the tag update and triggers the associated automation
- The CRM performs the automation steps:
- Adds desired access tags
- Sends a webhook to AccessAlly with tag changes
- Sends the contact an email
- AccessAlly receives the webhook and updates the user’s access permissions
Visual Reference
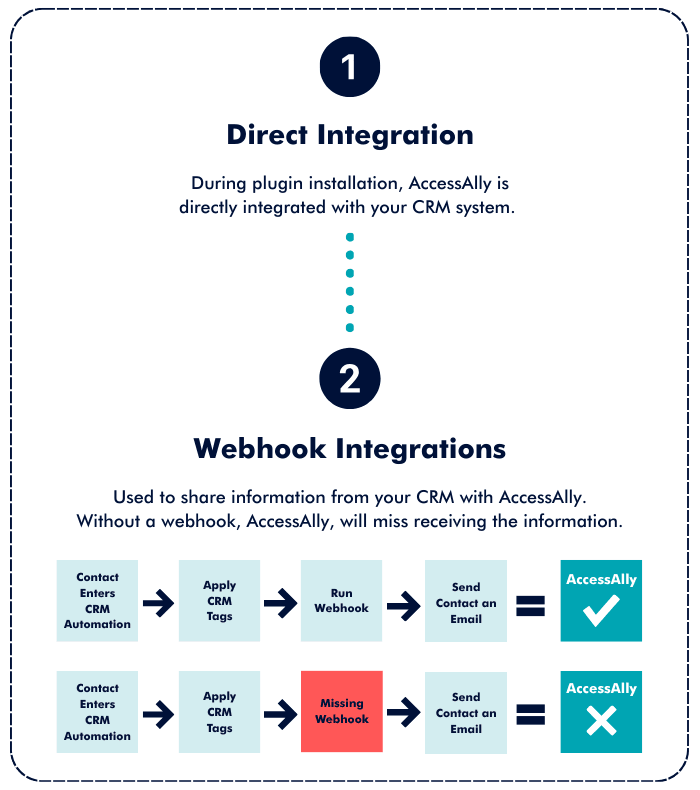
The diagram above shows how webhooks connect CRM contact actions to AccessAlly users. When webhooks are missing, this leads to additional support requests, as users are unable to access content on your site.
Setting Up an Automation
Step 1: Configure Your AccessAlly Offering
Create and configure your offering through the AccessAlly Offering wizard. This defines:
- Content structure and access requirements
- Purchase tags and access tags
- Payment processing settings
Complete this step before building your CRM automation.
Step 2: Build the CRM Automation
After completing the AccessAlly setup, create the corresponding automation in your CRM. Select your CRM platform for platform-specific instructions:
- ActiveCampaign Automation Guide
- Kit Automation Guide
- Drip Automation Guide
- Infusionsoft / Keap Automation Guide
- Ontraport Automation Guide
Each guide includes the specific steps and webhook configuration for that platform.
Additional Automation Examples
Login Reminder Automation
Send automatic reminders to course students who haven’t logged in recently. Requires AccessAlly Pro.
View Tutorial: Remind Your Students To Log In
Failed Payment Follow-Up
Send reminder emails when recurring payments fail to process successfully.
View Tutorial: Failed Payment Automation
Abandoned Cart Follow-Up
Follow up with users who started checkout but didn’t complete their purchase.
View Tutorial: Abandoned Cart Automation
