The billing credit card for recurring subscriptions can be rejected for a number of reasons.
Fortunately, AccessAlly can apply a tag to trigger a CRM automation to follow up with clients and get their subscriptions back on track.
ARTICLE CONTENT:
What happens when AccessAlly can’t collect a subscription payment?
Stripe Payment: If AccessAlly cannot charge a recurring payment, it will try once a day for three consecutive days (see Payment Due below.)
If payment is still unsuccessful the status will update to payment failed (see payment failed below.)
If the card is updated, AccessAlly will automatically charge the new card (unless you have canceled the subscription). However, it will only charge the regular recurring amount. If there are any “missed months” of payments, you must charge those manually.
PayPal Payment: PayPal may try to run a payment again if they fail to collect funds, but this retry is not controlled by AccessAlly and PayPal will email you directly if this happens. The status of the customer is moved to payment failed if PayPal is unable to collect payment.
Payment Statuses
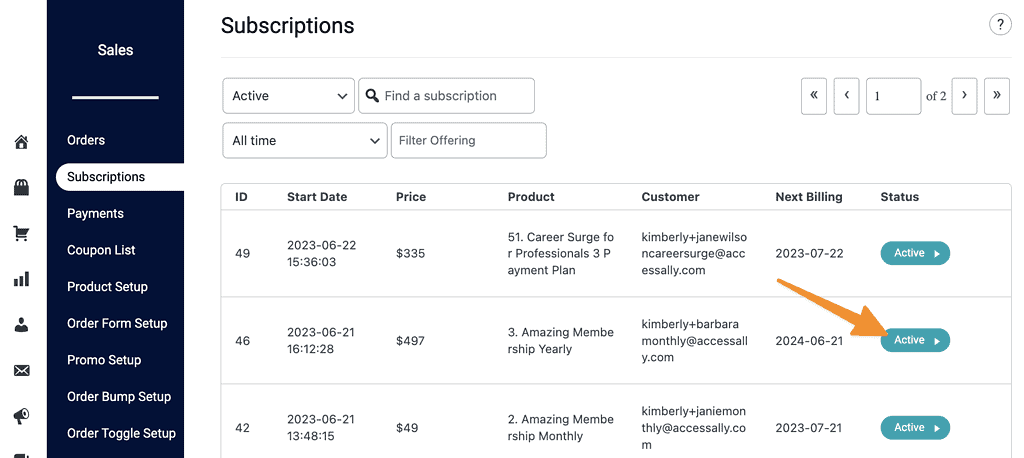
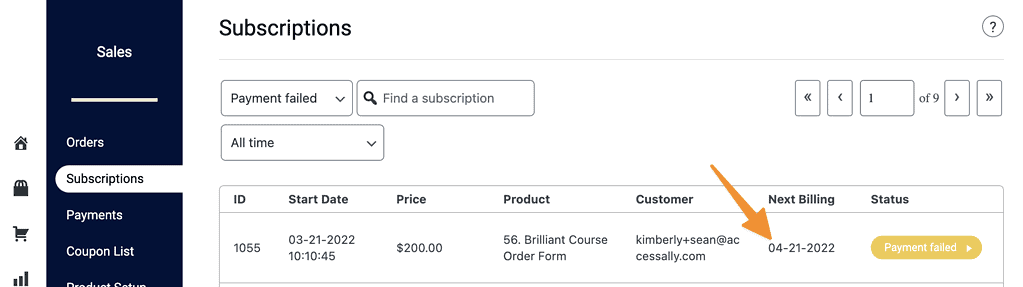
Go to AccessAlly > Sales > Subscriptions to see the status of all subscriptions.
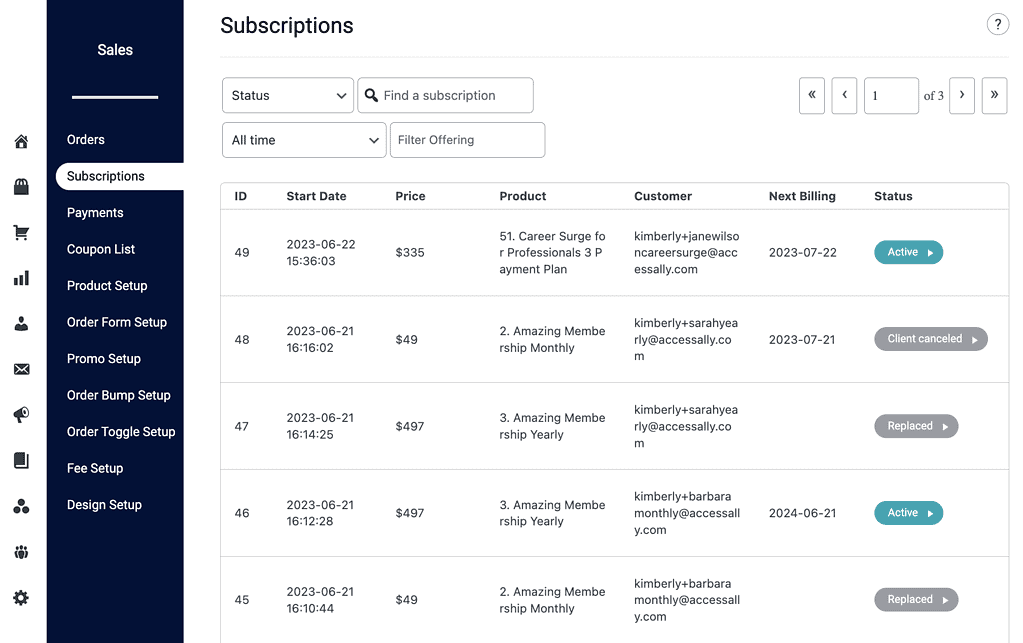
Active
The subscription is current and up to date. The next billing date is shown.
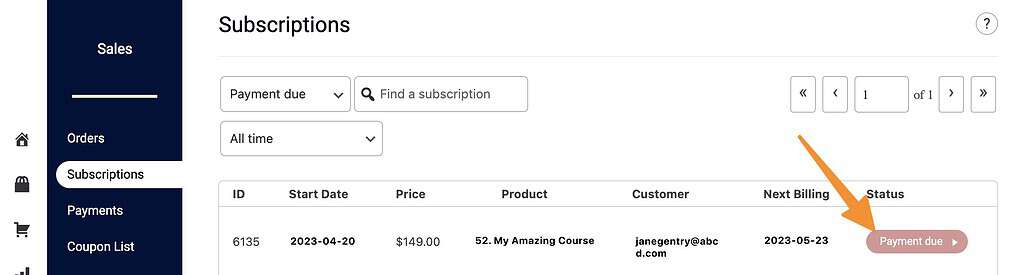
Payment Due
Assigned in a 3-day window as AccessAlly attempts to collect a payment that is due.
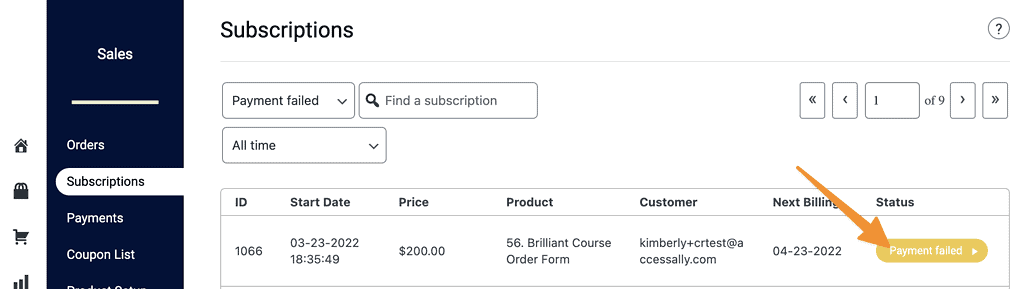
Payment Failed
After the payment due status ends the customer moves to payment failed. At this point the contact is tagged with the failed payment tag.
What happens in the payment failed status?
Your goal is to recapture the payment or to revoke access if the payment can not be collected by your desired timeframe. This process is different depending on if your site uses AccessAlly Managed Contacts or CRM Managed Contacts.
AccessAlly Managed Contacts
AccessAlly Managed Contacts
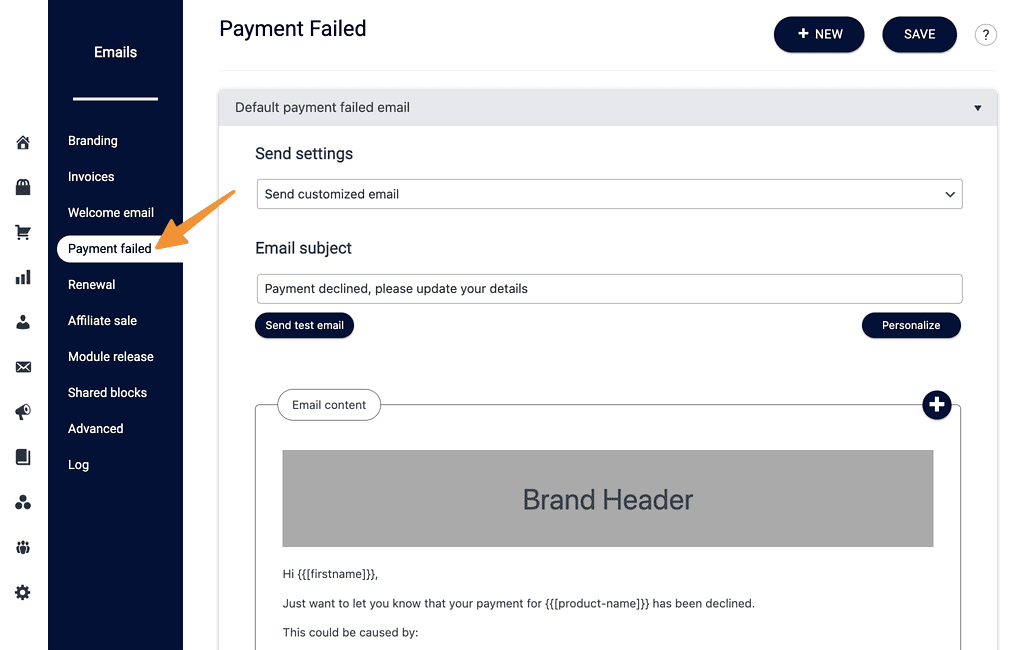
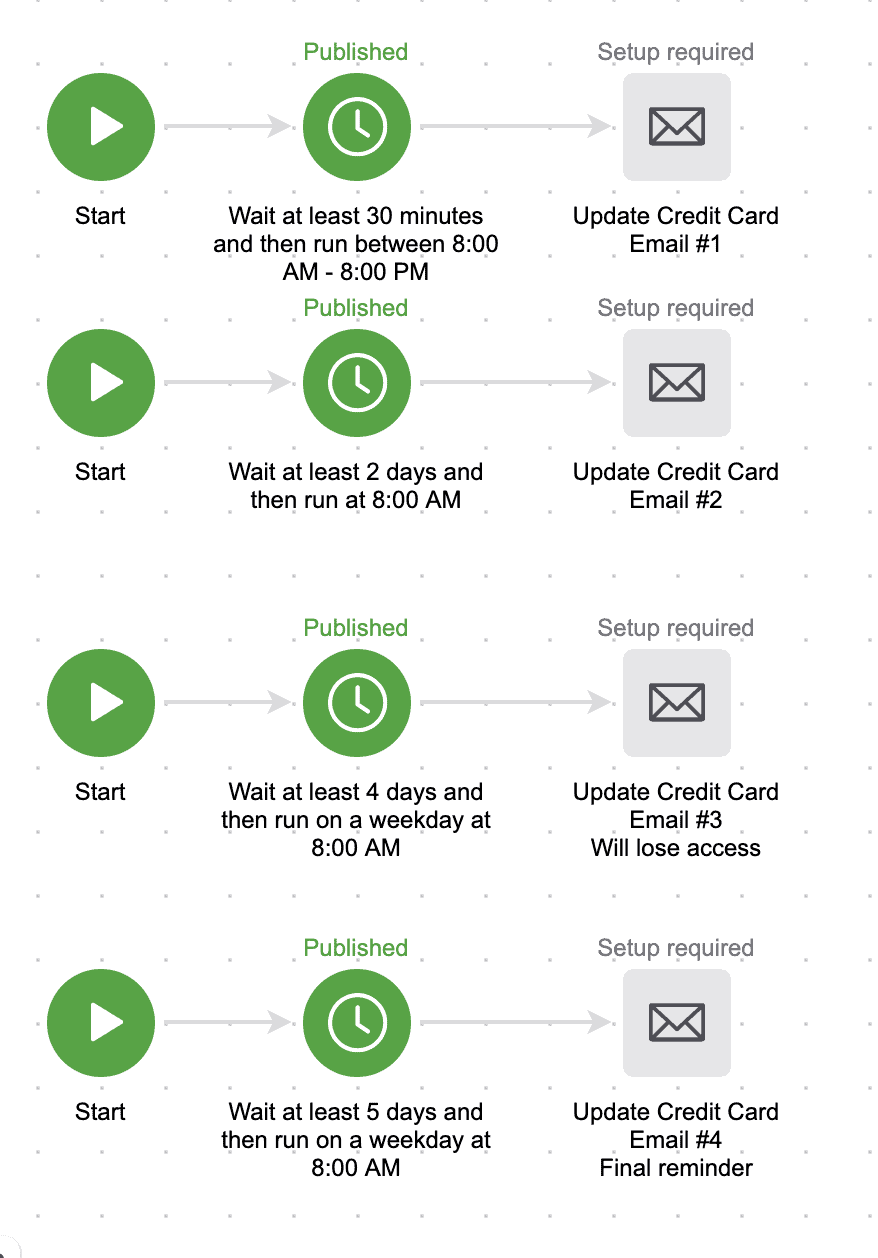
Step 1: Set up a payment failed AccessAlly Email.
This email is sent when a customer has the payment failed tag applied as a reminder to update their payment on the My Orders page on your site.
Step 2: Review failed payments
Create a reminder (in your favorite calendar tool) to periodically review your failed payments. You’ll decide how many days you’d like to give as a grace period.
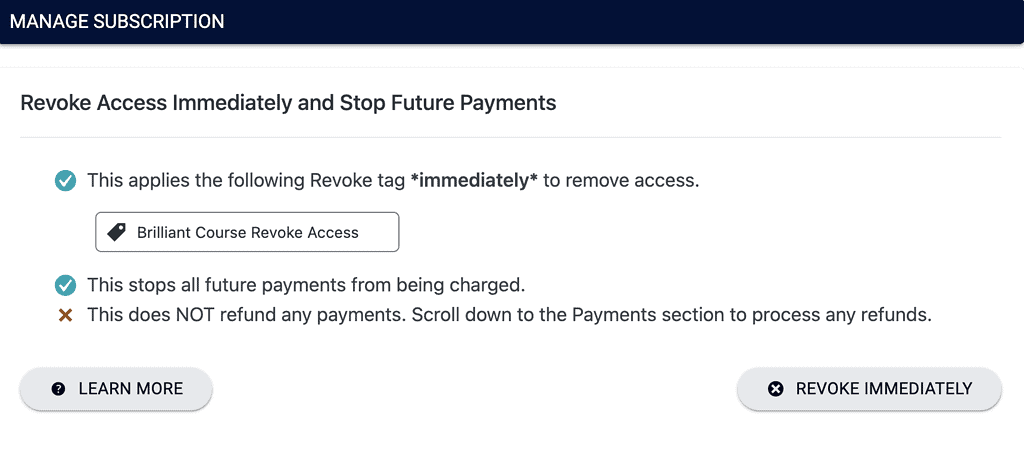
Step 3: Revoke access
If the amount of days in your grace period has passed click the Payment failed button, scroll to manage subscription section, and click revoke immediately.
This removes access to the offering and stops recurring payments.
CRM Managed Contacts
You’ll create an automation in your CRM to manage failed payments. The process is shown for each CRM below.
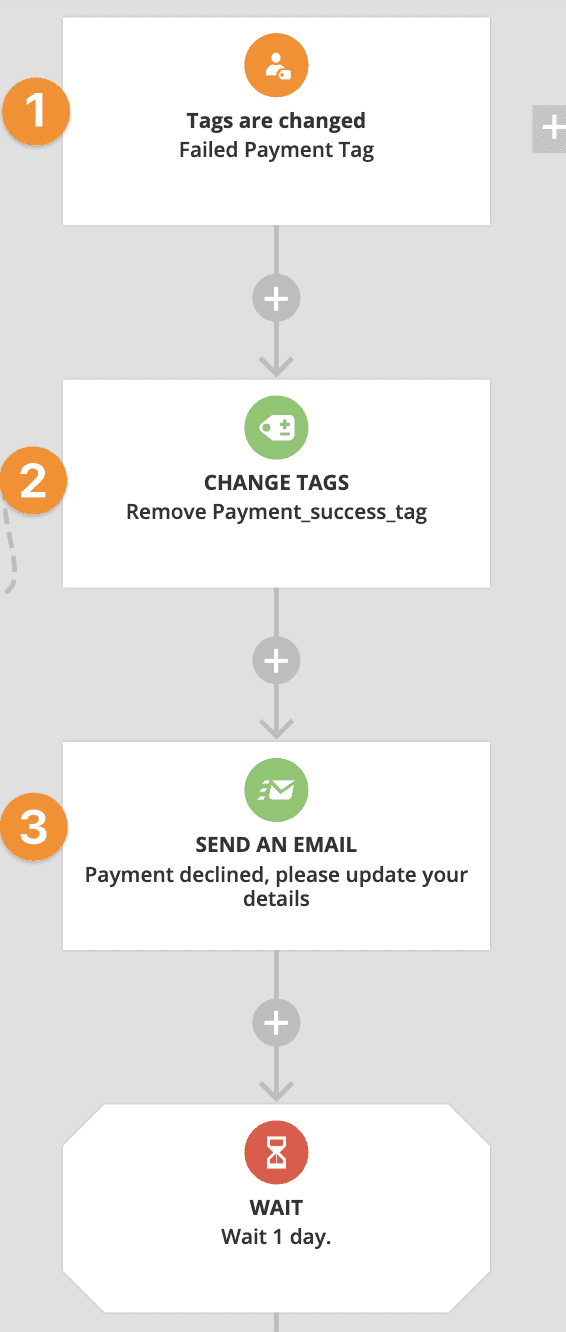
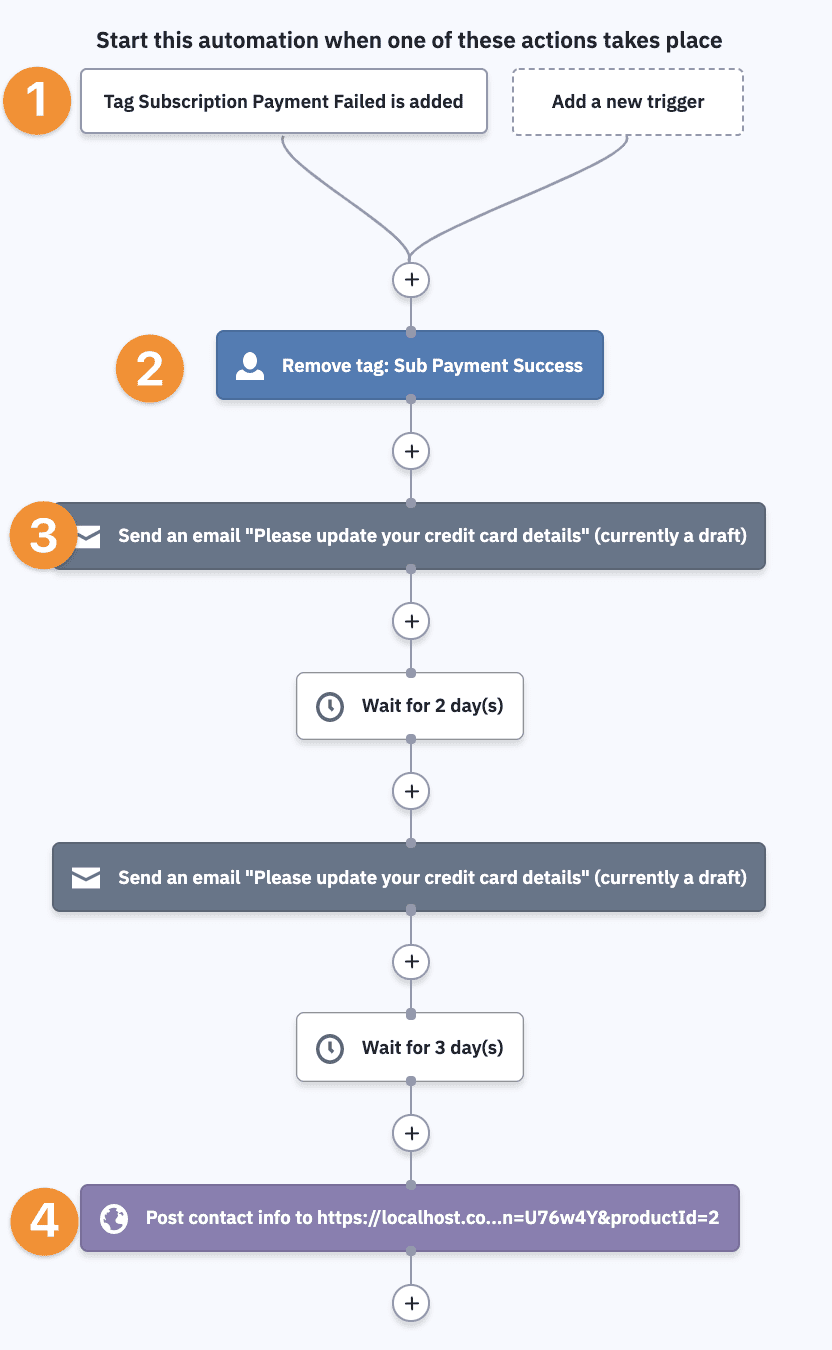
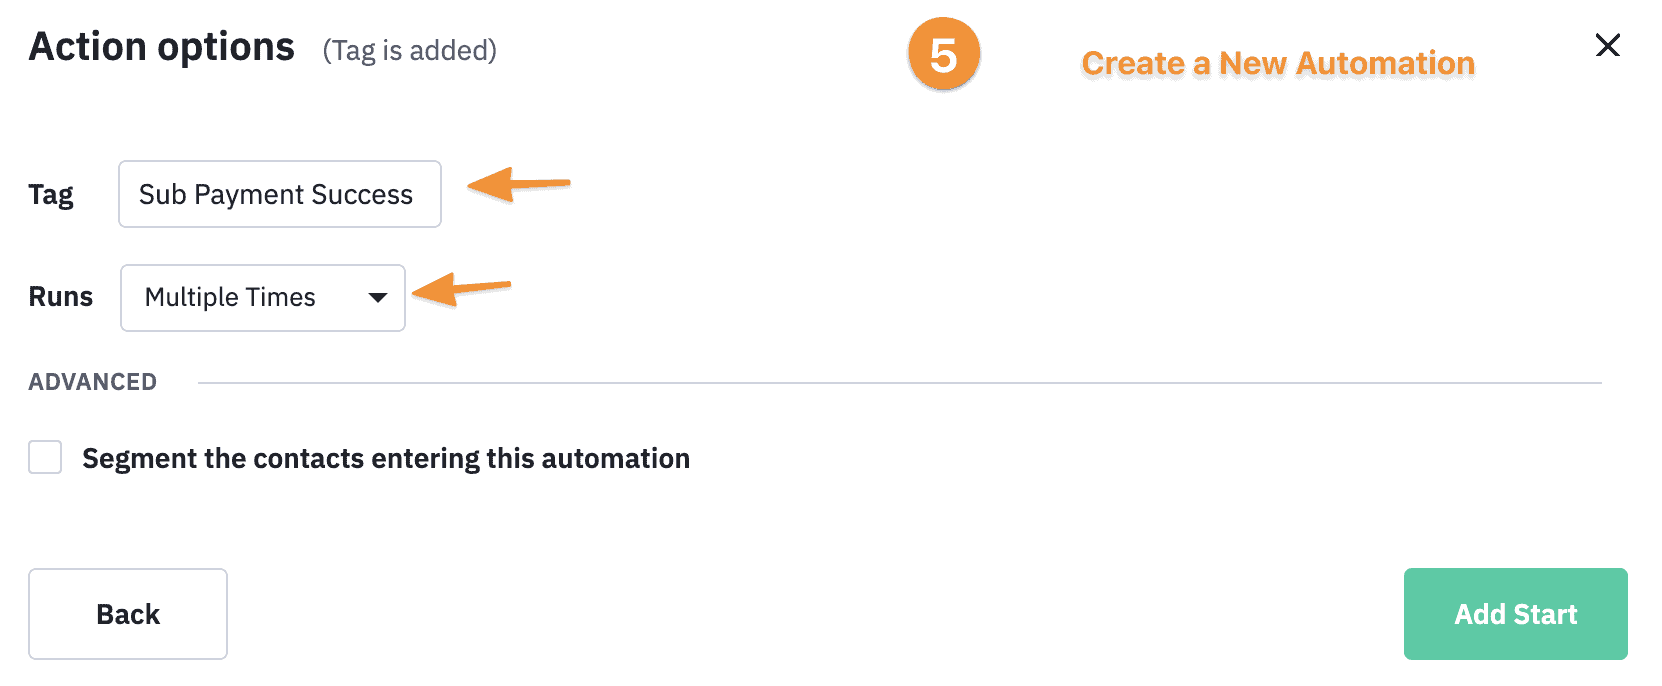
1. Create a new Infusionsoft/Keap campaign, where the trigger is the “Payment Failed” tag.
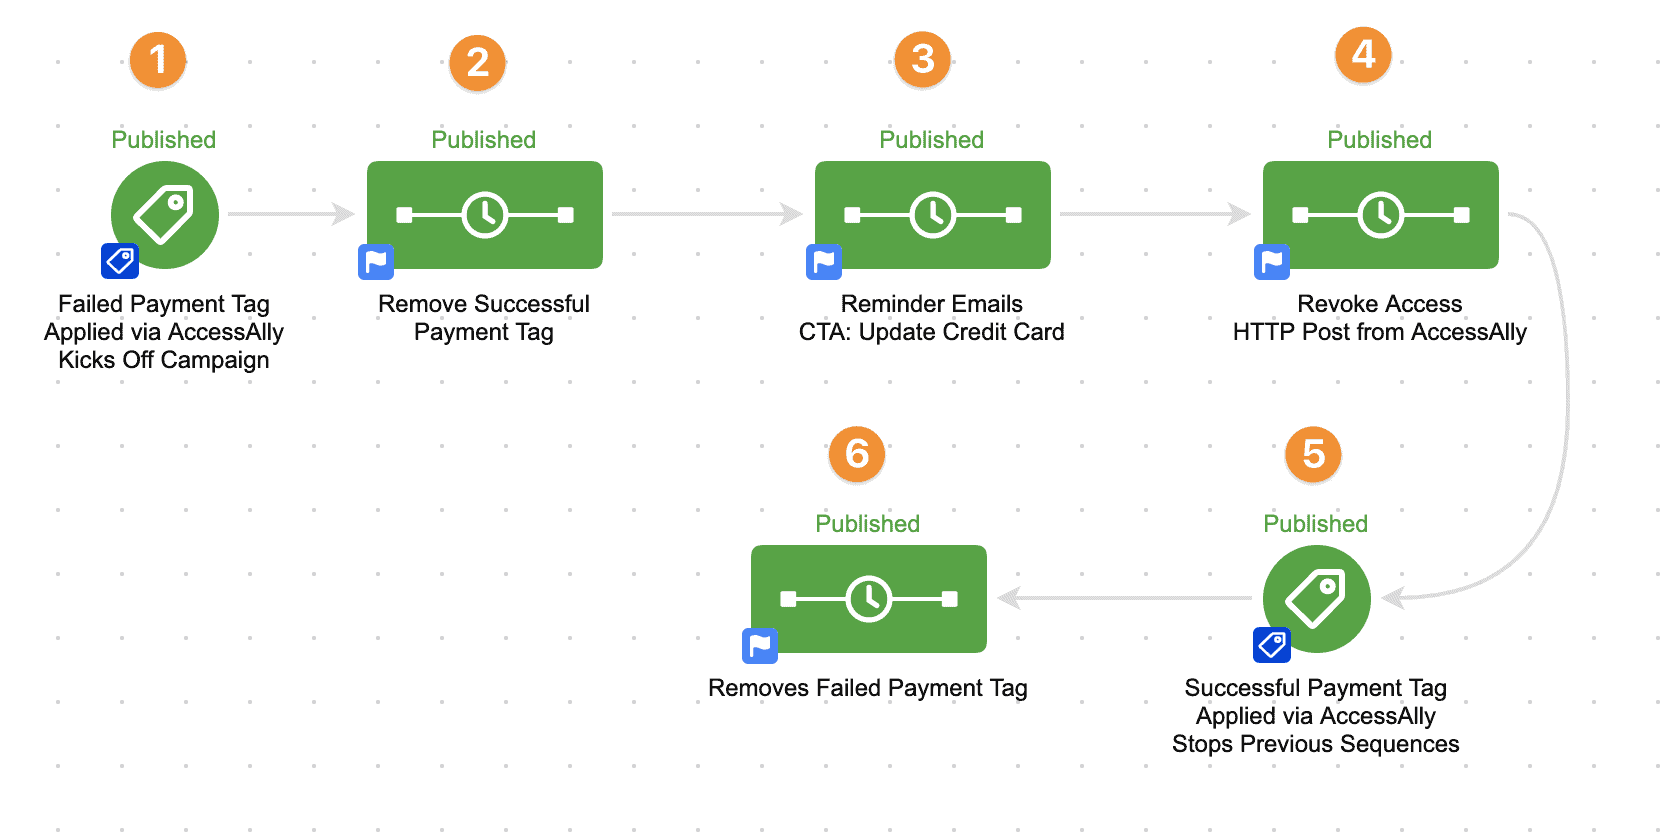
2. Remove the Payment Successful tag. This makes it possible to pull the contact out of the sequence when they do update their card and their payment goes through successfully.
3. Send as many emails as you’d like to send to remind people to log in and update their credit card on file.
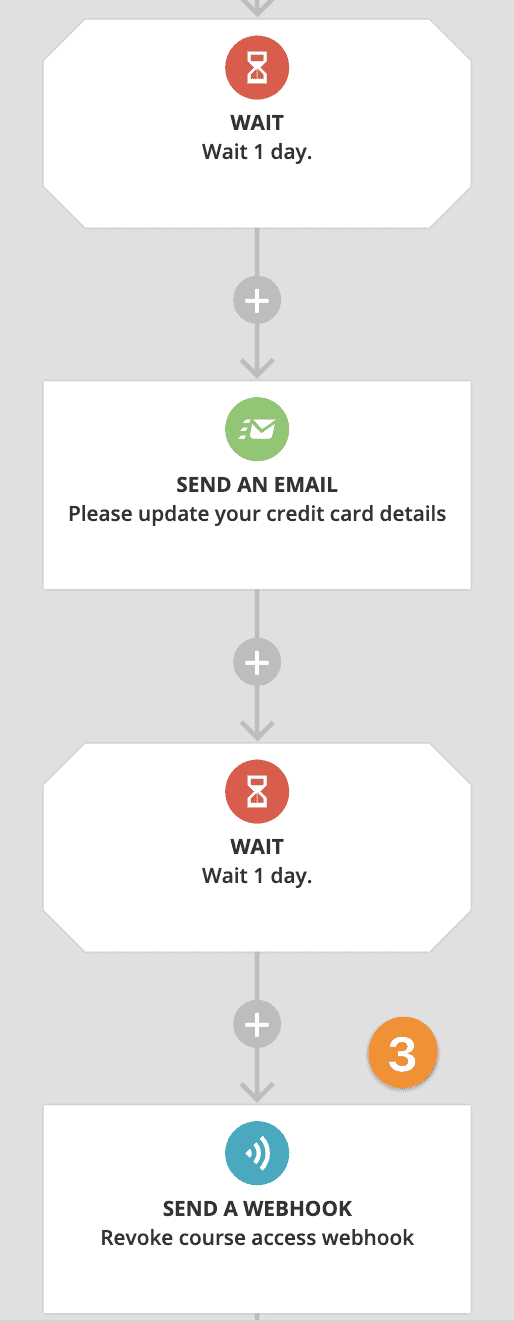
4. If you’d like to revoke access if they don’t successfully make a payment within a time period, then run the Revoke HTTP Post. (You’ll find the webhook URL in the Webhook generator.)
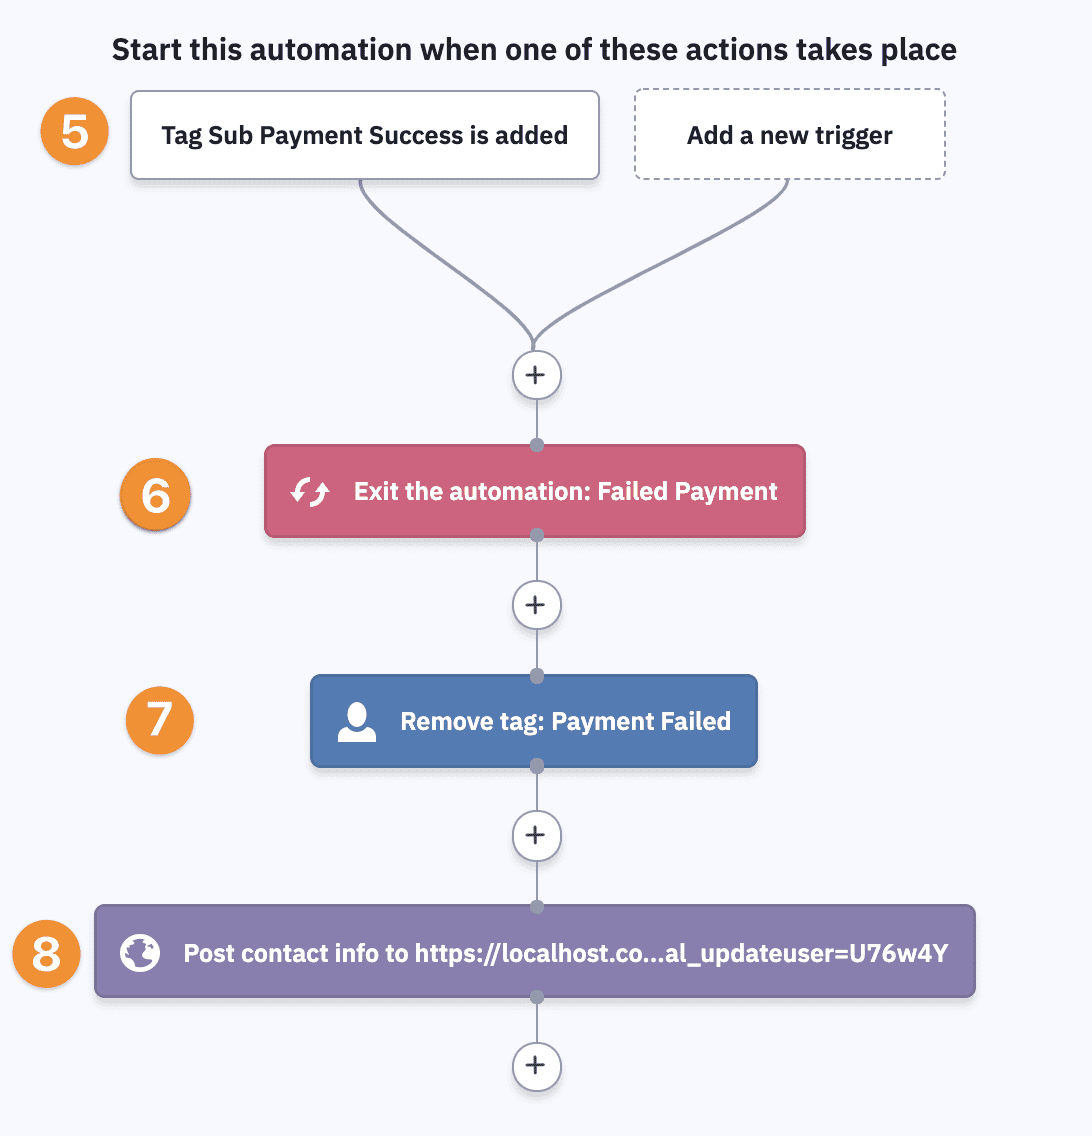
5. Add a “Goal” for the “Payment Success” tag. When the contact updates their credit card and the payment processes, it will pull them out of the campaign so they will stop getting notifications to update their card.
6. Remove the “Payment Failed” tag. This is important because it’s always possible that a payment will fail in future months, so this allows this automation to run again if that happens. Run an update user webhook to sync tag changes.
7. Send an update user HTTP Post to sync the changed tags.
1. Create a new Ontraport campaign, where the trigger is the “Payment Failed” tag.
2. Remove the Payment Success tag. This makes it possible to pull the contact out of the sequence when they do update their card and their payment goes through successfully.
3. Send as many emails as you’d like to send to remind people to log in and update their credit card on file.
* 3. If you’d like to revoke access if they don’t successfully make a payment within a time period, then run the Revoke Webhook. (You’ll find the webhook URL in the Webhook generator.)
4. Add a “Goal” for the “Payment Success” tag. When the contact updates their credit card and the payment processes, it will pull them out of the campaign so they will stop getting notifications to update their card.

5. Remove the Payment Failed tag. This is important because it’s always possible that a payment will fail in future months, so this allows this automation to run again if that happens.
6. Send an update user webhook to sync the changed tags.
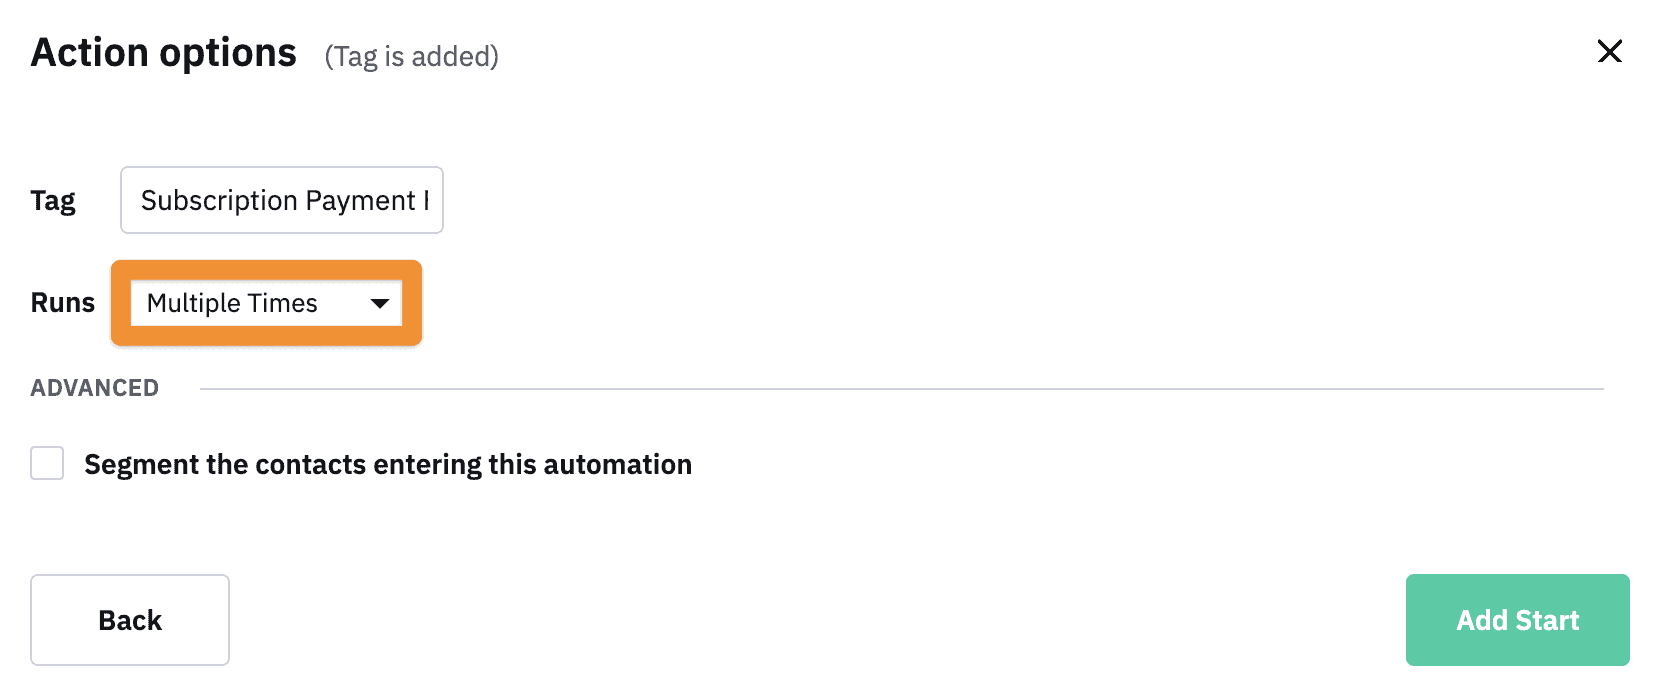
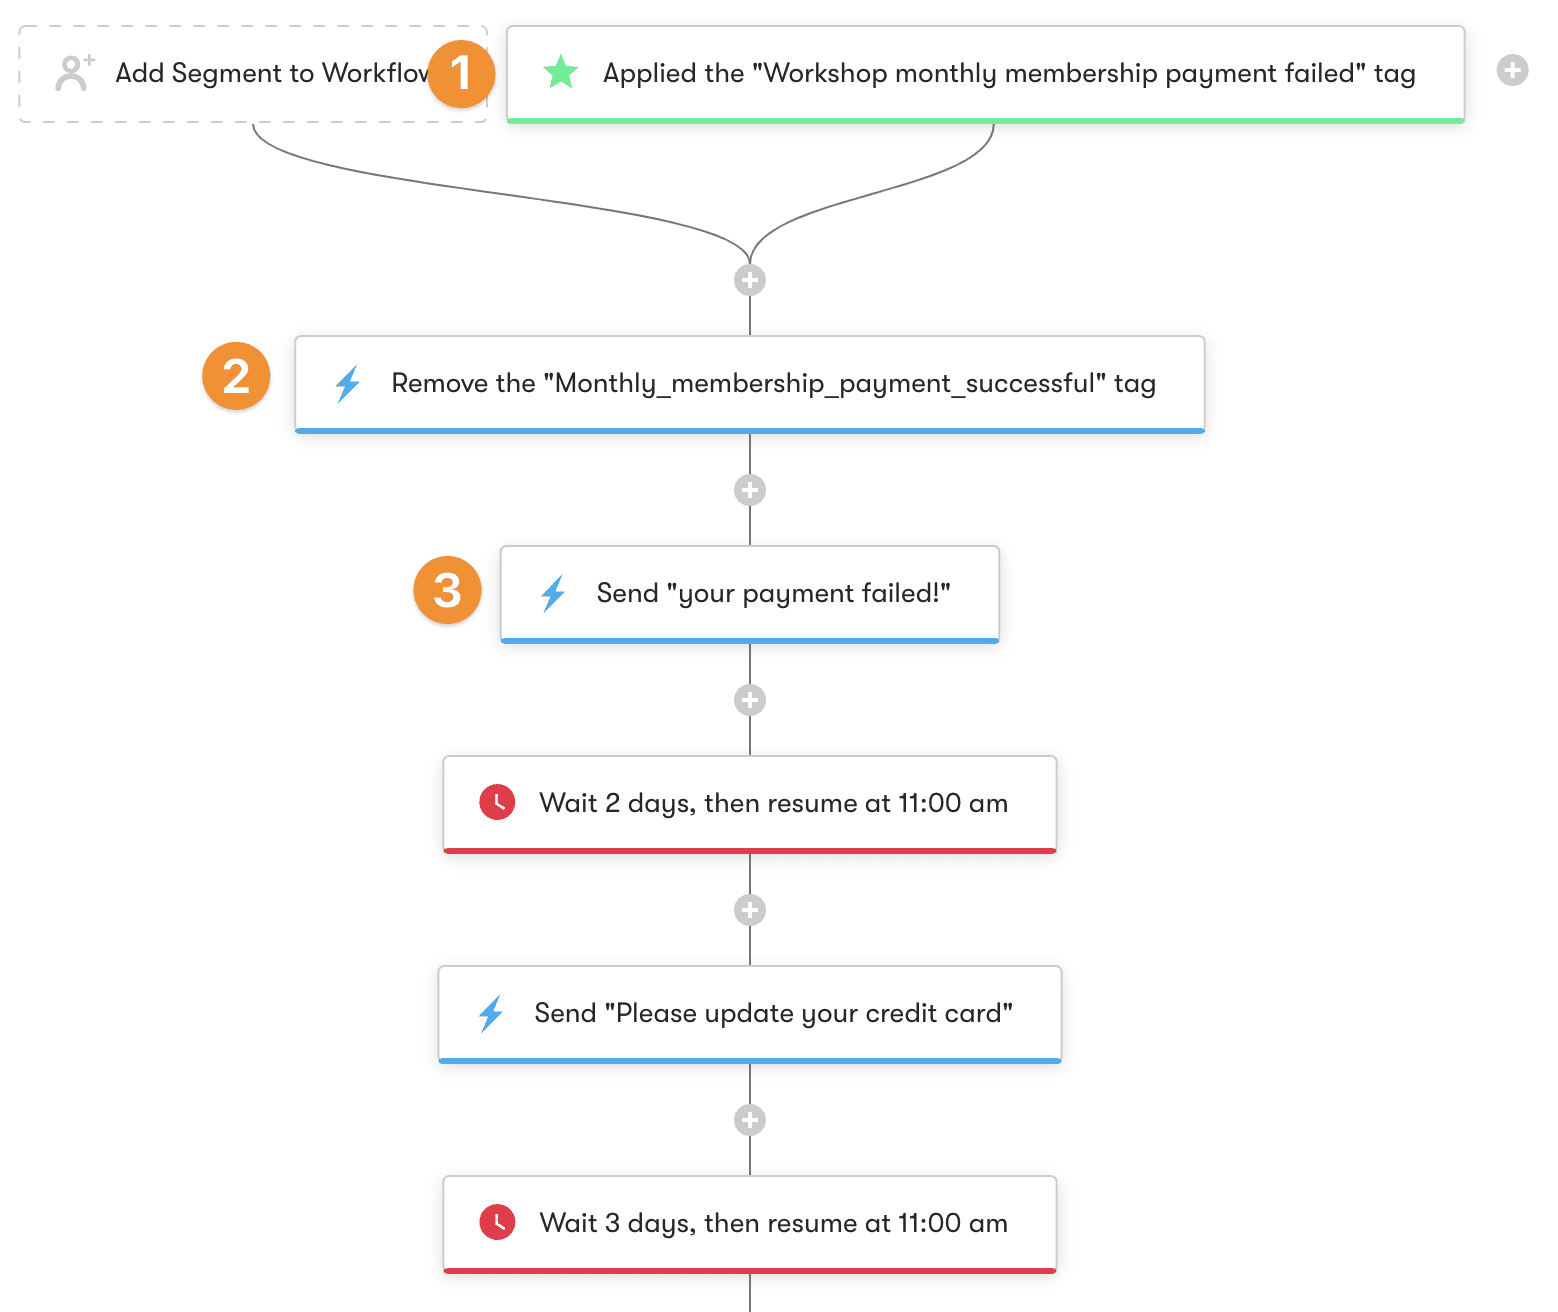
1. Create a new ActiveCampaign Automation, where the start trigger is the “Payment Failed” tag. Make sure that the option for allowing this automation to run more than once is selected.
2. Remove the Payment Successful tag. This makes it possible to pull the contact out of the sequence when they do update their card and their payment goes through successfully.
3. Send as many emails as you’d like to send to remind people to log in and update their credit card on file.
4. If you’d like to revoke access if they don’t successfully make a payment within a time period, then run the Revoke Webhook. (You’ll find the webhook URL in the Webhook generator.)
5. Create a brand new Automation, with the trigger being the “Payment Success” tag is added. When the contact updates their credit card and the payment processes, it will pull them out of the campaign so they will stop getting notifications to update their card.
6. Add a “flow” step to exit out of the Failed Payment automation.
7. Remove the “Payment Failed” tag. This is important because it’s always possible that a payment will fail in future months, so this allows this automation to run again if that happens.
8. Send an update user webhook to sync the changed tags.
1. Create a new Kit Automation, where the start trigger is the “Payment Failed” tag. Make sure that the option for allowing this automation to run more than once is selected.
2. Remove the Payment Successful tag. This makes it possible to pull the contact out of the sequence when they do update their card and their payment goes through successfully.

3. Send an update user webhook to sync the changed tags, by applying the tag you set up for it.
4. Send as many emails as you’d like to send to remind people to log in and update their credit card on file.
5. If you’d like to revoke access if they don’t successfully make a payment within a time period, then run the Revoke Webhook. (You’ll create the tag in the Webhook generator.)

6. Add an “Event” for the “Payment Success” tag. When the contact updates their credit card and the payment processes, it will pull them to this point in the automation so they will stop getting notifications to update their card.
7. Remove both the Payment Failed tag. This is important because it’s always possible that a payment will fail in future months, so this allows this automation to run again if that happens.
8. Send an update user webhook to sync the changed tags, by applying the tag you set up for it.
1. Create a new Drip Workflow, where the trigger is the “Payment Failed” tag.
2. Remove the Payment Successful tag. This makes it possible to pull the contact out of the sequence when they do update their card and their payment goes through successfully.
3. Send as many emails as you’d like to send to remind people to log in and update their credit card on file.
4. If you’d like to revoke access if they don’t successfully make a payment within a time period, then run the Revoke HTTP Post. (You’ll find the webhook URL in the Webhook generator.)

5. Add a “Goal” for the “Payment Success” tag. When the contact updates their credit card and the payment processes, it will pull them out of the campaign so they will stop getting notifications to update their card.
6. Remove the “Payment Failed” tag. This is important because it’s always possible that a payment will fail in future months, so this allows this automation to run again if that happens. Run an update user webhook to sync tag changes.
7. Send an update user HTTP Post to sync the changed tags.
Managing Failed Payments in your CRM via webhooks
In the failed payment automation in your CRM you can link multiple products ID numbers for the same course or membership in the failed payment sequence.
This is helpful when you’re using the same Failed_Payment and Success_Payment tags so you’re not creating multiple failed payment sequences for each version of your course or membership.
Example – you have a membership with a monthly and yearly recurring subscription. This creates two separate products in AccessAlly, but you’ve only got one failed payment sequence in your CRM.
Inside your CRM in the failed payment sequence you’ve created earlier in this guide, you’ll link the two products together.
Use the Webhook Generator, found in the top bar of your WordPress admin area, under AccessAlly:
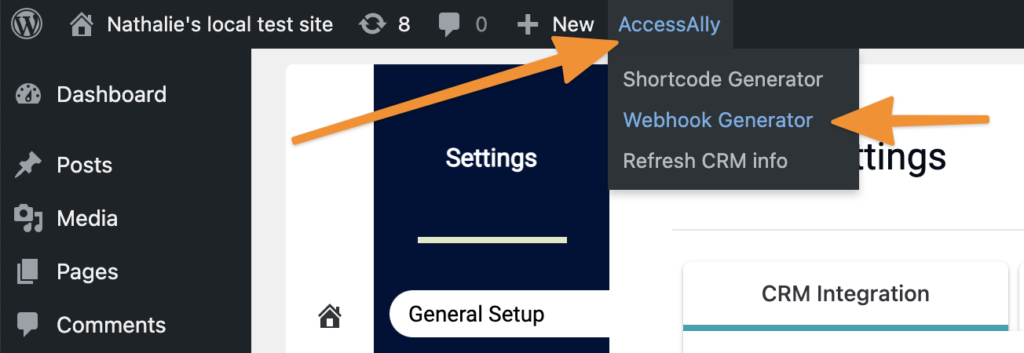
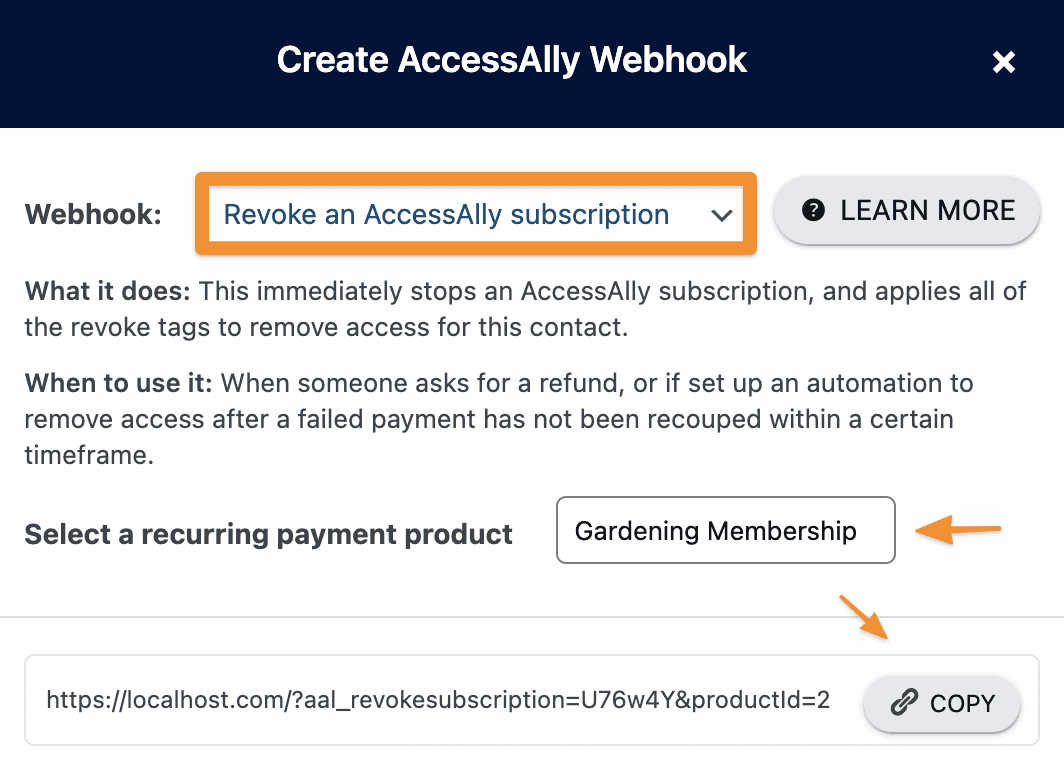
Then select the “Revoke Subscription” Webhook and select the offering you want to run it for.
Here’s how:
- Open your failed payment sequence and scroll to the spot where you added the revoke subscription HTTP post. It looks something like this: https://access.yourwebsite.com/?aal_revokesubscription=###&productId=##
- You’ll add a comma after the first product number followed by the second product number (inside the revoke campaign in your CRM) like this. https://access.yourwebsite.com/?aal_revokesubscription=OeNjvq&productId=45,46 IMPORTANT: do not copy and paste the example shown because it will not work for your site.
- Save and publish your campaign.
Retrying Payments Beyond the 3 Default Retries – Stripe Payments Only!
Sometimes payments fail, it happens! Maybe a credit card expired, or it is currently maxed out.
Here’s what AccessAlly will do about it:
- AccessAlly will retry the payment 3 times with 1 day in between, which helps if the card was maxed out and just got paid. This won’t help if the card is expired.
- When the 3rd attempt fails, AccessAlly will automatically apply the Payment Failed tag.
- From there, your “Failed Payment automation” sequence in your CRM will get kicked off to start the followup / recovery sequence using this Payment Failed tag as the trigger. (This is what we just set up in the above videos.)
When do payment retries happen?
- AccessAlly calculates time based on when the initial purchase was made. For example, if the client purchased at 10AM EST on June 16th, the retry will happen on the 17th after 10AM EST.
- After the first condition is satisfied, the exact timing will be determined by when the “cron job” is run. AccessAlly has an hourly cron job, so in the previous example, the payment will be processed between 10AM EST and 11AM EST.
- Different servers might run cron differently. That is out of AccessAlly’s control and if the cron is not run on schedule, you can contact your website host and ask them to enable native / alternate cron (which is based on the server OS). The default WP cron is traffic-based, so a quiet site might not run cron as often.
Forcing a payment retry from the CRM with Stripe
In some cases, you might want to try to process the payment again before revoking access and giving up.
For example, you might decide to do one try every 3 days for 21 days.
You can use a webhook to force a payment retry in AccessAlly.
Use the Webhook Generator, found in the top bar of your WordPress admin area, under AccessAlly:
Then select the “Charge Subscription” Webhook and select the subscription you want to run it for.

The webhook will look like ?aal_chargesubscription=###&productId=###. For Kit you will need to create a tag and use the “Generate webhook” button to set it up.
Then follow the instructions for running a webhook in your CRM automations.
Retrying Payments for PayPal Payments
Note for PayPal users there are no 3 default retries!
When a PayPal payment fails (or a user cancels a payment inside PayPal) the user receives the Failed Payment tag immediately and moves into your Payment Failure CRM automation.
If a client wants their subscription or access reactivated, they’ll need to make a new purchase from your order form.
You can review admin options for manually managing subscription payments with PayPal.
Set up Admin Notifications for Failed Payments
If you’d like to get an email every time a payment fails, so you can follow-up manually or just keep an eye on things, go to AccessAlly > Emails > Advanced, and enter your email or the email of someone on your team:

CRM Tutorials (Outdated Interface)
These videos will stay here even though the AccessAlly and CRM interfaces have changed a lot since they were recorded because some people learn better through video.
Please watch this tutorial video to learn how to create your automation inside Ontraport’s Campaign area.
Reminder: as noted in the video (3 min 47 seconds), please make sure you include the Contact ID post data as a part of your webhook.
A note for Kit Users:
Due to limitations in Kit automation, there are a couple of edge cases that need to be monitored periodically. Please go to AccessAlly -> Purchase Logs and review the subscriptions with the status Failed to collect.
- The follow-up email sequence is canceled for any client who unsubscribes. This means the revoke rule will not be triggered.
- The follow-up email sequence can only be run once for each client. This means the follow-up sequence will not be run when a second payment fails
Please email Kit support directly if you want to see improvements in this area. In particular, ask them to add the following features:
- Allow tags to be added with each email in a sequence.
- Allow email sequences to be run multiple times for the same client.
- Allow email sequences to be run for unsubscribed users. Kit doesn’t need to send the emails, but the tags and the associated rules should still be triggered
- Add delay in automation rules.
