We recommend using AccessAlly’s order forms to sell your digital products, online courses, and memberships, because all AccessAlly features work as advertised.
However, we understand that, you may choose to use a 3rd party tool to process orders for your online business. Below you will see two popular ways you could give access to your members without using AccessAlly order forms.
ARTICLE CONTENT:
Option 1: Use Your CRM as a Bridge
This option goes from purchase in your ecommerce system, to your CRM, to AccessAlly via an automation.
This option is allows for delivering date based dripped course content.
*This flow requires use of an additional tool to connect your ecommerce system to your CRM system. You can do a Google search to see what’s available based on your tech stack.
How this option works.
This option goes from purchase in your ecommerce system, to your CRM, to AccessAlly via an automation. This allows for robust delivery options like date based dripped content.
- When an order is placed, the customer’s information (and relevant Made Purchase tag) are added to your CRM system by your ecommerce system.
- You create an automation that starts in your CRM when a contact has the Made Purchase tag
- This kicks off your desired offering delivery automation which contains tags and webhooks to sync the information from your CRM back to AccessAlly for each part or module of your offering.
Why you might use this option.
A common reason to use a third party shopping cart might be because you were already using it before starting with AccessAlly, and you don’t want to change your set up or migrate subscription payments to a new system.
*This flow may require additional tool to connect your ecommerce system to your CRM system. You can do a Google search to see what’s available based on your tech stack.
Popular 3rd party ecommerce options.
- Infusionsoft by Keap order forms
- Ontraport order forms
- Thrivecart order forms
- SamCart order forms
- WooCommerce order forms
Reasons why this option can be tricky.
This option increases your need and dependence on webhooks to communicate from the CRM to AccessAlly. Webhooks can fail or work slowly depending on how many of these your CRM systems allows to be run within a specific time frame.
Where people pay you also controls a few important pieces like:
- Creating an affiliate program
- 1-click upsells and order bumps
- Revenue based metrics
- Managing ongoing subscription payments and failed payments.
Option 2: Use an AccessAlly Opt-in Form
What’s possible with this option.
- Have your ecommerce tool redirect a user upon purchase to an AccessAlly opt-in form where all information is instantly communicated to both AccessAlly and your CRM.
- Use AccessAlly’s release functionality to add tags and custom operations to deliver an amazing experience within moments of signup.
- Use the CRM to deliver course related emails without webhooks or tags being applied inside the CRM.
How this option works.
- Customer makes a purchase in your 3rd party ecommerce tool.
- After purchase the customer is…
- Redirected to a page with an AccessAlly opt-in form.
- Passed to your CRM system and receives an email with a link to the AccessAlly opt-in form.
- Customer fills out the form and is sent to the first page of your program.
- Tags and contact information are sent directly to your CRM system.
- You can send a welcome email or series of emails… no tags or webhooks needed.
How to set this option up.
Go to AccessAlly > Settings > Opt-in forms and create a new form or use an existing free opt-in form in your AccessAlly offering.
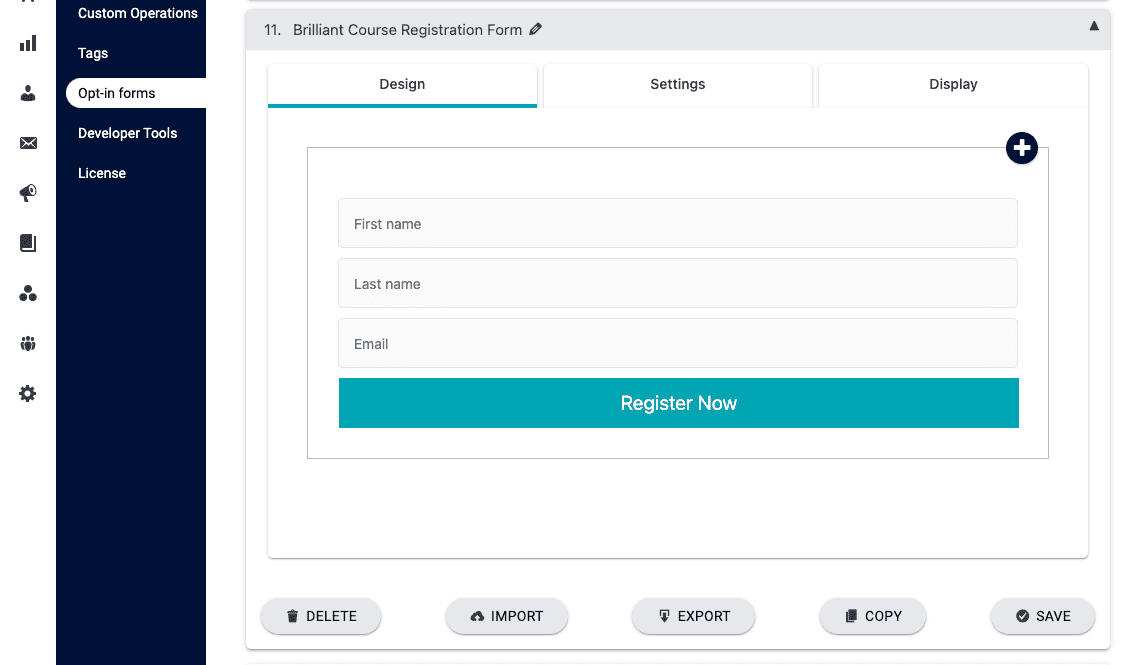
Add needed items to your form in the design tab:

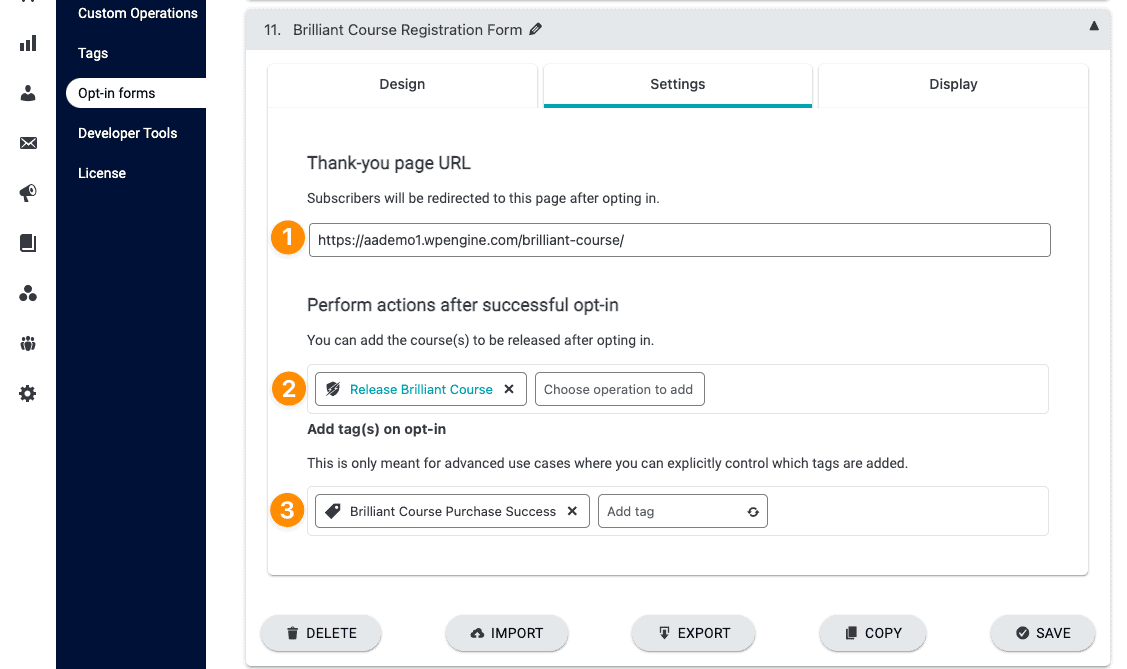
Visit the settings tab to select what happens after the form is filled out.
- Thank you page URL is where the new member will go after completing the form. This is usually the first page of the offering.
- Perform actions after opt-in. By default the release operation is here to release content based on your offering, but you can add additional custom operations if needed in this space.
- Add tag(s) on opt-in. This section is great for sending a welcome email to your new member with the link to your login page so they can create their own password by clicking “Lost your password.”

Reasons why this option can be tricky.
- Exact date based dripped content is not currently possible with this option all content is released based on “x” days between releases.
- The page needs to be hidden from search engines so it’s not shown in Google searches.
Option 3: Use a 3rd Party Tool
With this option you can use a 3rd party tool that like WPFusion that connects your desired checkout option to your AccessAlly site.

