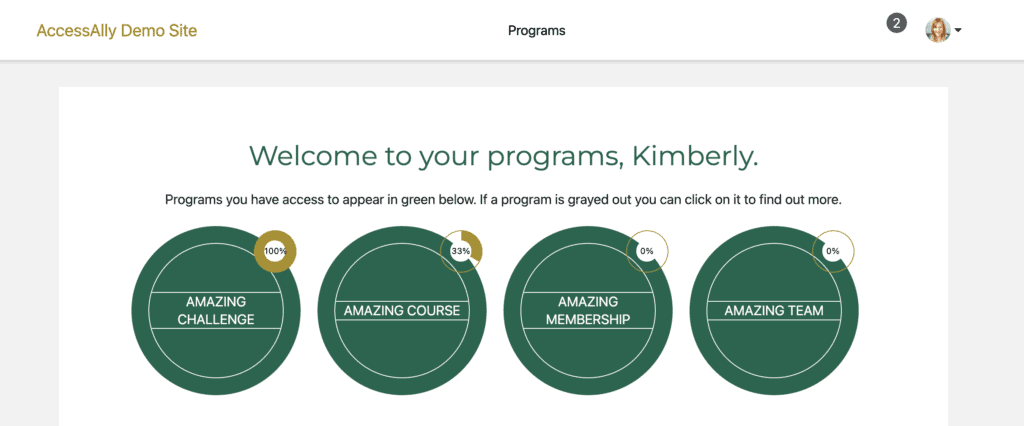
The AccessAlly offering dashboard allows you to display what’s available to your members at a quick glance. Members can resume where they left off, see their progress, and purchase additional offerings… all from one central dashboard.
ARTICLE CONTENT:
How the Offering Dashboard Works
Dashboard Styles
There are three main dashboard styles.
1. The Dynamic Offering Dashboard
This is the simplest option as it uses the built-in drag and drop dashboard inside the AccessAlly Offerings panel. This dashboard is automatically shown and updated as you add new offerings to your site. This option is perfect if you are using the AccessAlly Theme or you would like a quick and easy option to start with.
How to Create a Dynamic Offering Dashboard
This option is set as the current default design on the home page of your site. Once you add your first offering it will display automatically.
To design and edit the offering dashboard you’ll go to AccessAlly > Offerings > Edit Dashboard Layout.
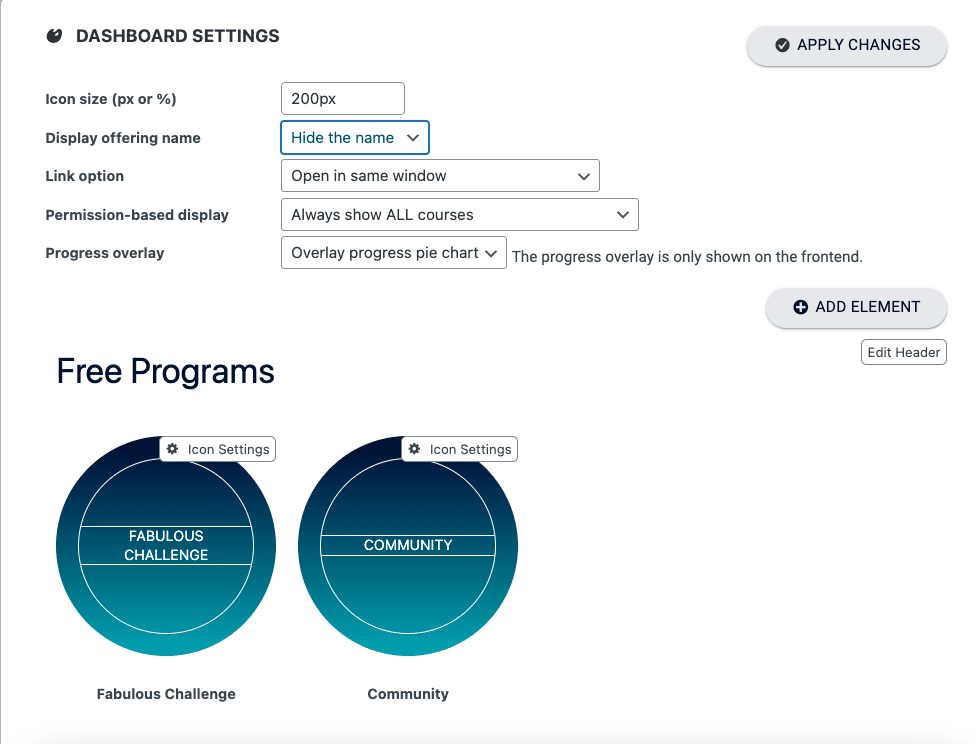
Dashboard Settings
This section allows you to customize how the offerings are presented on your dashboard.
- You can drag and drop to move offerings.
- Set the size of your offering icons
- Hide or show offering names below the icons
- Always show all courses or only show courses a user has access to
- Set how you would like offering progress to be displayed
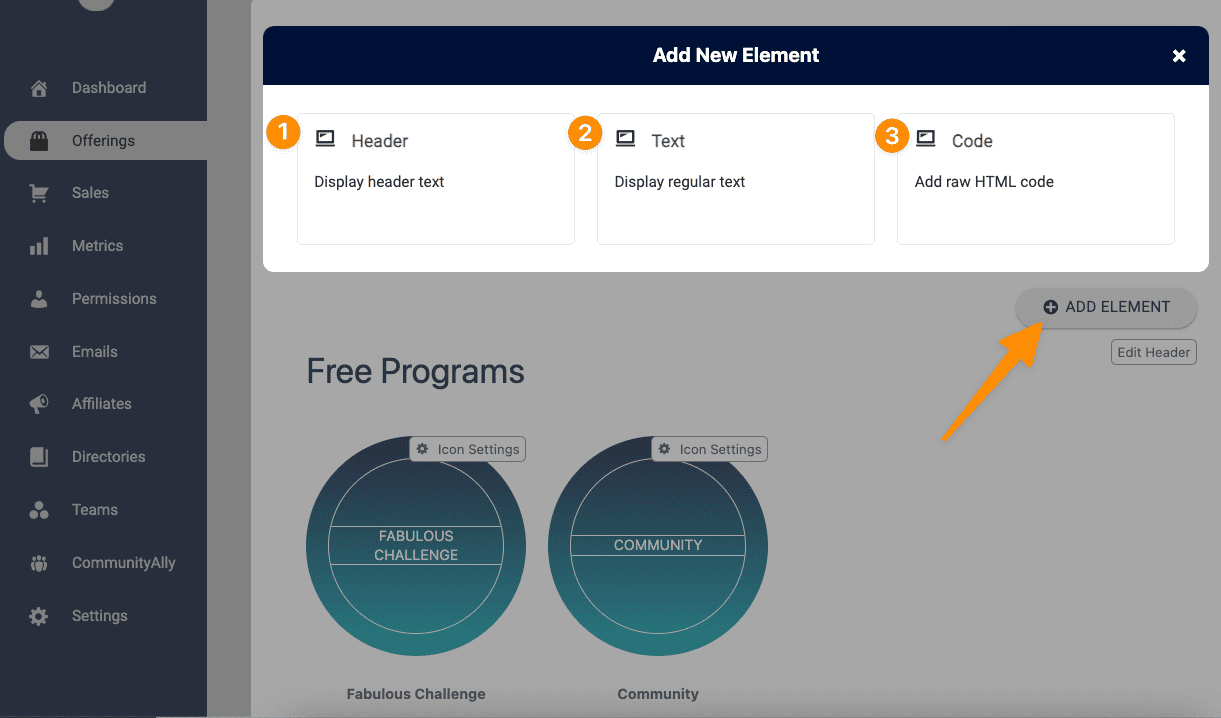
Available Elements
Click the + ADD ELEMENT button to add available elements.
- Header: displays a heading to break up your offerings.
- Text: easily add a line of text
- Code: get creative with HTML
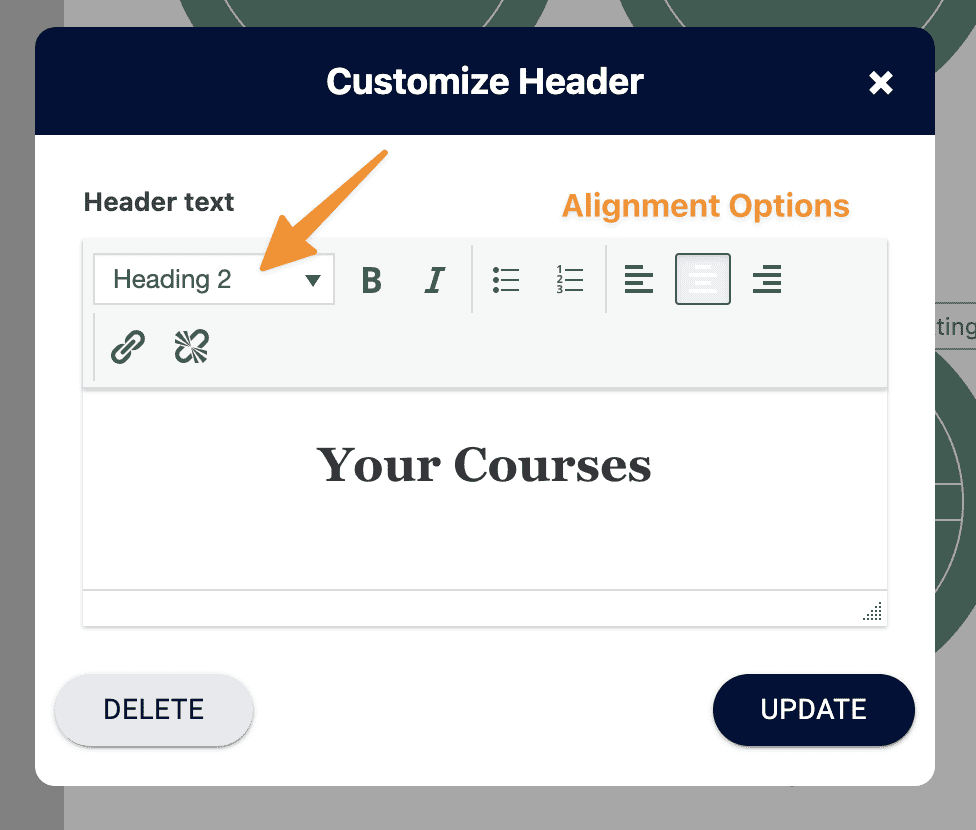
Centering the Heading and Text Elements
If you would like to center heading and text you can use the built in editor.
Icon Settings
If you would like a bit more control over each individual offering icon while using the dynamic offering dashboard the Icon Settings section allows you to customize each offering.
![]()
Centering Dashboard Icons
If you prefer the look of your dashboard page icons to be centered add the following code to the dashboard page of your site.
<center>[accessally_course_dashboard]</center>View Your Dashboard
Visit the home page of your site to see your newly styled dynamic dashboard.
2. The Individual Offering Icon Dashboard
This option allows you to choose and place individual offering icons using your theme and page builder for a highly customized user experience. With this option, you can add 1-click upsell buttons, custom operation buttons, or have users purchase items with points. You are in full control of the exact layout of every icon on your dashboard.
Create an Individual Icon Offering Dashboard
This option allows you to fully customize the dashboard (home page) of your AccessAlly site. You’ll use the AccessAlly shortcode generator to grab the code you need as you build each section.
New offerings are only visible when you add manually add them to the page. This is a great option if you would like to create sections with rows and columns to customize your layout and design.
In order to use this option, you will need at least one offering that has been added to your site.
Plan Your Layout
You can use a sheet of paper or your favorite visual tools to design what you would like your dashboard to look like.
- What offerings are you creating?
- Will you add 1-click upsell or custom operation buttons underneath any of your offerings?
- Do you want to show or hide anything inside a section based on offerings a participant has or does not have?
Need inspiration? Check out the AccessAlly Showcase. or ask users to share examples inside the AccessAlly Product Community Group on Facebook.
Build Your Layout
Open up your theme or page builder to your dashboard page and start building your layout.
You’ll create any headings, text, or styling for this page using your WordPress theme and/or page builder.
When you are ready to add your first offering you’ll use the AccessAlly Shortcode Generator to create the shortcode you’ll add to your layout.
The AccessAlly Shortcode Generator is visible by opening a tab in your browser and going to the https://nameofyoursite.com/wp-admin/ page on your site.
![]()
Offering Icon Shortcode Options
- Select feature: Offering icon (allows the icon to be added to the page)
- Show the offering icon for: This allows you to choose the offering.
- When clicked: What happens when a member clicks the icon
- Display option: This allows you to choose when the icon is displayed.
- Always show this icon: shows the has access, no access, or completed icon based on which one applies to that member.
- Do not show this icon if disabled: This offering will only be shown if the member has access to it. The no access icon will be hidden from view. This is a great option for creating a section of only offerings a member owns and/or hiding the option to purchase an offering that is not open for enrollment as the no access icon is hidden.
- Only show this icon if disabled: The icon will only be shown if the member does not own this offering. Great for creating a section of available courses with 1-click upsell buttons.
Example Dashboard
In the example below the individual icon offering dashboard has been used to display a monthly membership with a points system.
A look at the items created for this dashboard using the AccessAlly shortcode generator. Built using WordPress Gutenberg.
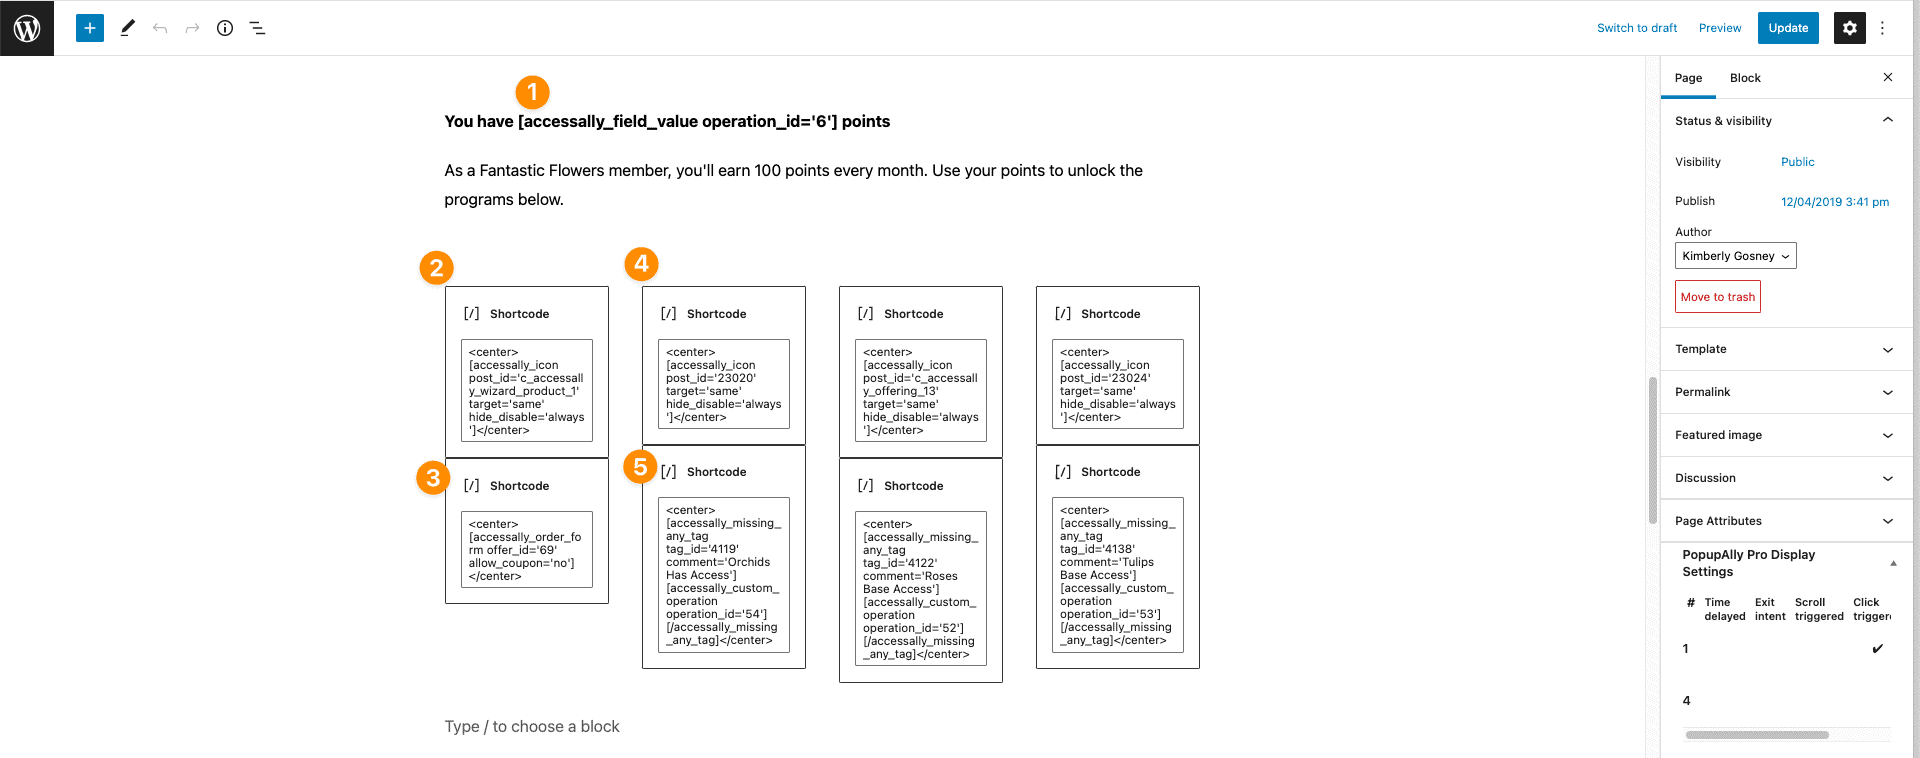
- The number of points a member has.
- An offering icon for a membership program.
- A 1-click upsell button to purchase the membership.
- An offering icon for a single membership topic.
- A custom operation for a member to purchase a single membership topic using their points.
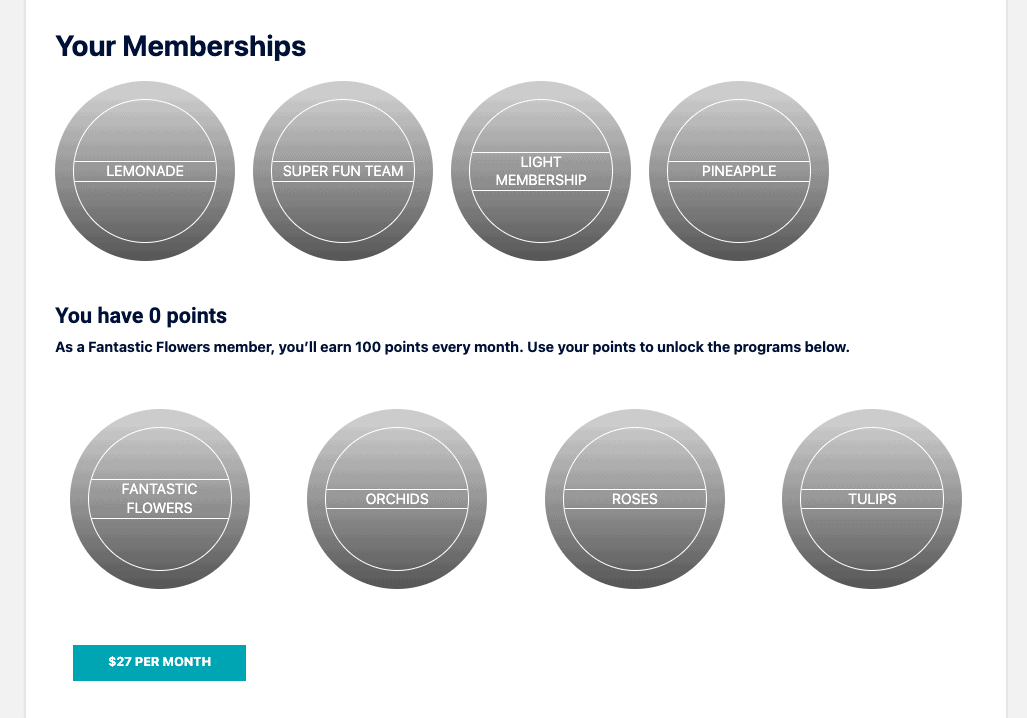
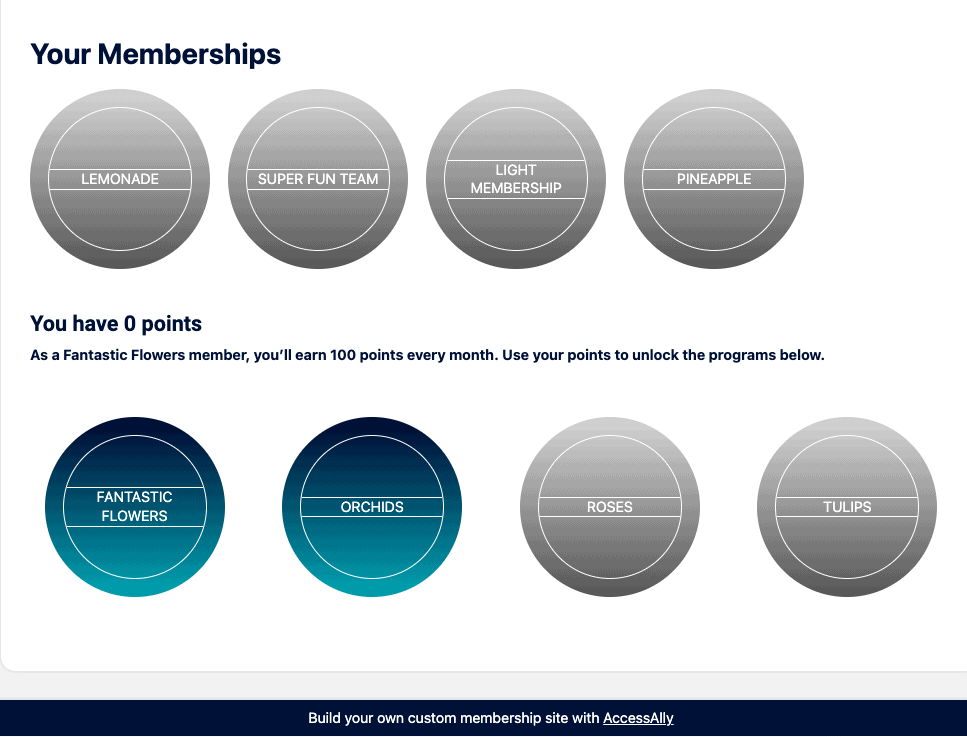
User View
Initial view before joining the membership.
View After Joining the Membership
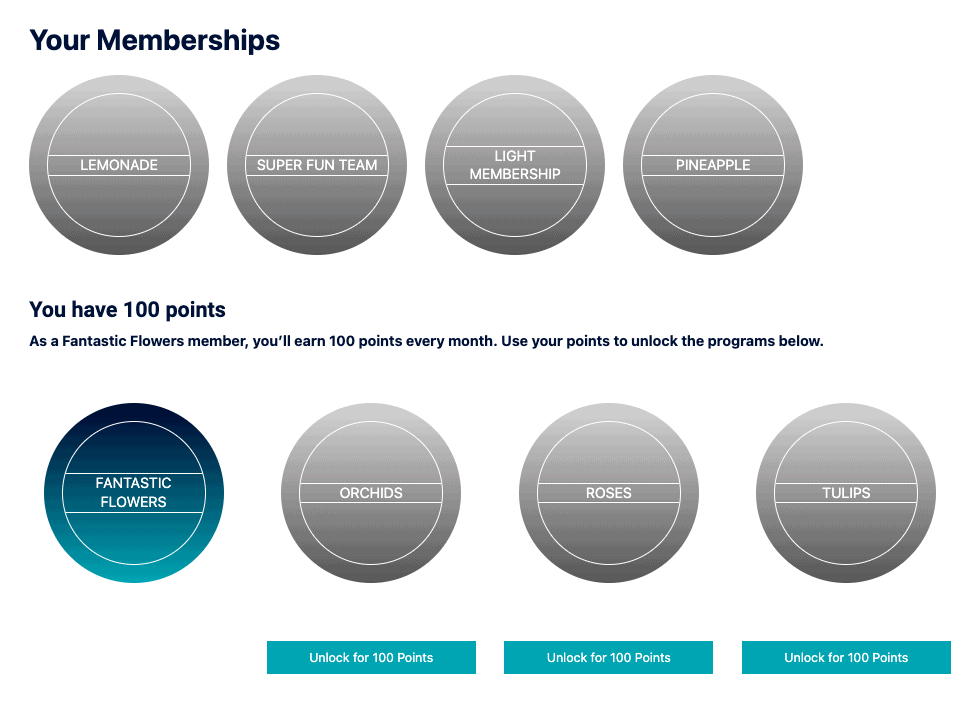
View After Unlocking a Membership Topic with Points
Additional features you can experiment with adding to your dashboard.
- Showing how many points a member has
- Showing a 1-click upsell order form
- Adding a resume button
- Unlock an offering with points
3. The Blended Dashboard
This is an option for users with a lot of existing offerings that started out using the Dynamic Offering Dashboard, but you are creating a new offering that uses custom operations to display buttons underneath your offerings like a Monthly Membership with Points or a 1-click upsell dashboard.
You’d like to continue using the Dynamic Offering Dashboard while also being able to add columns to your design to display buttons underneath programs as needed.
The Blended Dashboard
The most important part of this dashboard style is tweaking the current dashboard inside AccessAlly Offerings to hide the offerings that you will display with custom operation buttons underneath.
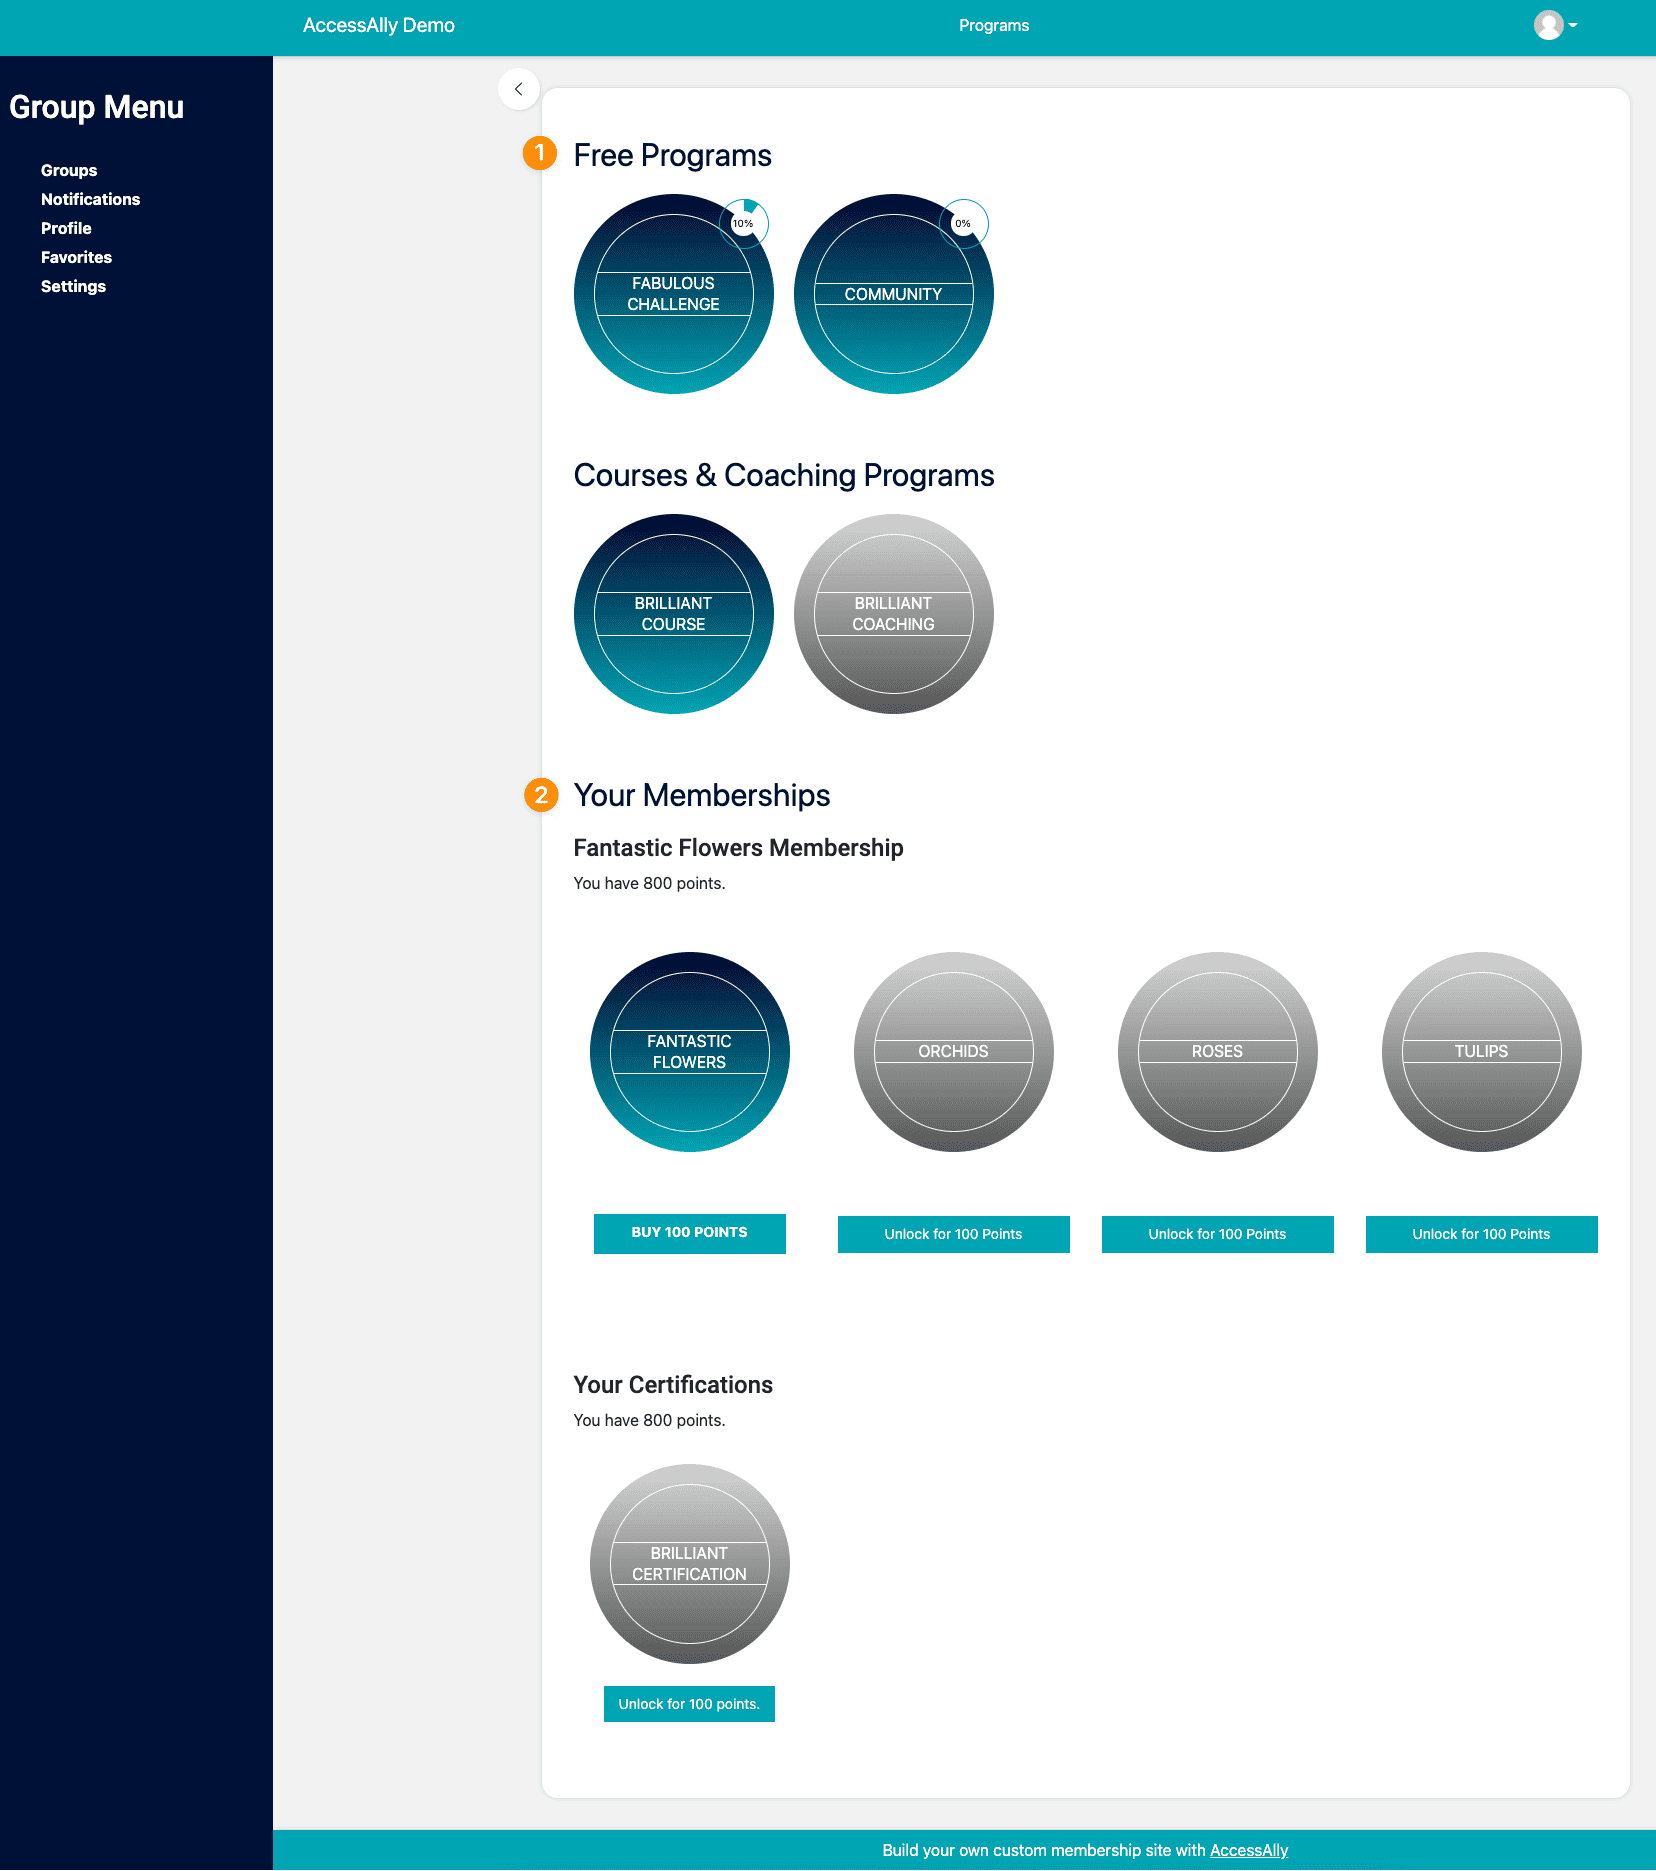
- The AccessAlly Offering Dashboard – in the example below the Free Programs section and Courses & Coaching Programs are using the AccessAlly Offering Dashboard shortcode.
- The Individual Offering Icon Dashboard – the Your Memberships section and Your Certifications are built using the steps for an Individual Offering Icon Dashboard as this method allows the custom operation buttons to appear underneath the offering icon they go with.
Part 1: Edit your existing AccessAlly Offerings Layout.
Go to AccessAlly > Offerings > Click Edit Dashboard Layout
Now you can drag all offerings that need a custom operation button to the bottom of your dashboard. You can reorganize these any way you would like.
![]()
In the example above…
- a heading was added to the Dashboard for the Fantastic Flowers Membership
- a text section was added to display details about points members earn
- All offering icons that go with this section are placed below the heading and text. The “Icon Settings” button will now be used to HIDE these icons from being displayed.
Part 2: HIDE icons from being displayed by clicking the Icon Settings button.
- Choose Hide this course icon
- Do not show progress overlay
A note about these steps as an admin you will always see these icons inside the AccessAlly > Offerings section even though they are hidden from view on the Dashboard page of your site. This allows you to still access and make changes to the offering inside your site.
![]()
Part 3: Display the offering icons and custom operations on your Dashboard page.
For this step, you will edit the page using your theme and/or page builder. Please contact your theme or/page builder for support on design-related questions.
Remember you will keep the existing AccessAlly Offering shortcode or block and create a new section on the page underneath this.
Your goal is to add each offering icon that was hidden in the step above to your dashboard page. While also adding any needed custom operations and/or 1-click upsells below icons they go with.
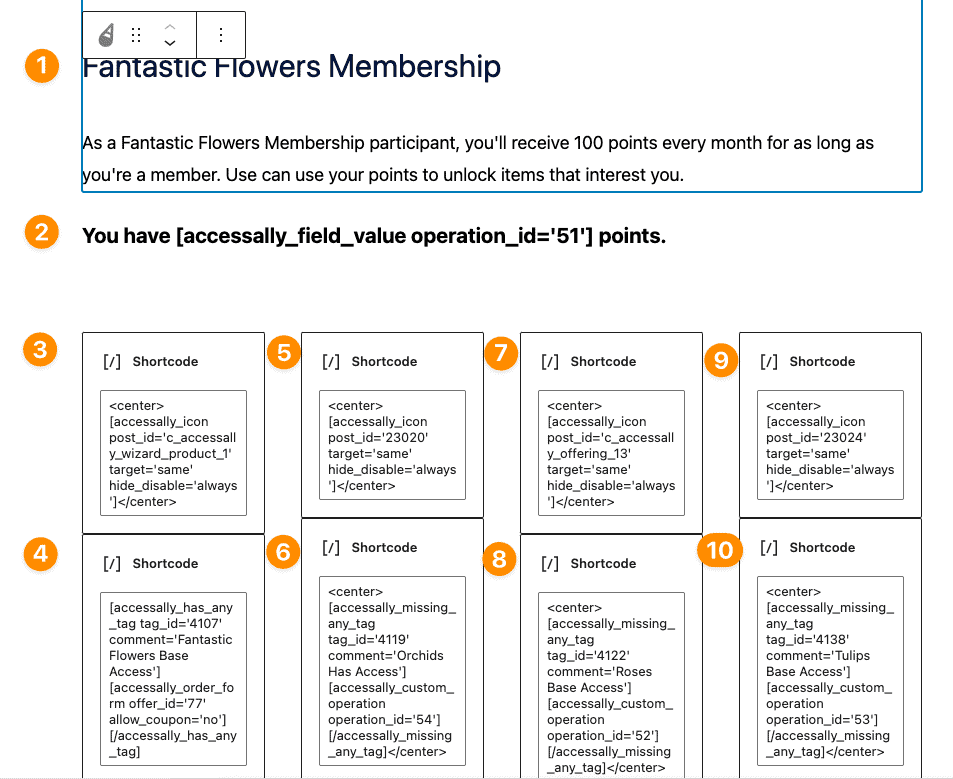
Here’s an example of how this looks when built with Gutenberg. This example shows both adding a 1-click upsell order form button and custom operations to unlock offerings with points.
- The end of the existing AccessAlly Course Dashboard section. Where you added your new heading and a bit of text for this section.
- The start of your custom offering icons area. In this spot, the custom operation to display the field value of a points system has been added. (You can select this option from the AccessAlly Shortcode Generator and paste it into a text section on the page.)
- The AccessAlly Offering Icon for the Membership is added via the AccessAlly Shortcode Generator to a column on the page.
- The 1-click upsell order form button option is added underneath so a member can buy more points.
- The AccessAlly Offering Icon for Orchids is added via the AccessAlly Shortcode Generator to the 2nd column in this section.
- The custom operation to decrease points for Orchids is added via the AccessAlly Shortcode Generator underneath the Orchids icon.
- The AccessAlly Offering Icon for Tulips is added via the AccessAlly Shortcode Generator to the 3rd column in this section.
- The custom operation to decrease points for Roses is added via the AccessAlly Shortcode Generator underneath the Roses icon.
- The AccessAlly Offering Icon for Tulips is added via the AccessAlly Shortcode Generator to the 4th column in this section.
- The custom operation to decrease points for Tulips is added via the AccessAlly Shortcode Generator underneath the Tulips icon.