Use this tutorial to learn how to run ProgressAlly Events.To initiate a ProgressAlly Event from inside your CRM, you can use a special Custom Operation called Run ProgressAlly Event.
It might sound complicated, but the use case is fairly straightforward: This feature lets you (1) add a tag or (2) check off a user’s objectives by using a webhook inside your CRM automation.
NOTE: This feature only works with AccessAlly Pro.
ARTICLE CONTENT:
When To Use This Feature:
Scenario 1:
One use case for the Run ProgressAlly Event custom operation would be if you wanted to mark one (or more) objectives as “complete” for a user if/when they have a unique tag applied to their account.
For example, you might offer a “special credit” seminar for students that covers the same material (but in more depth) that exists in Lesson 1 of your training on Accounting.
In this case, any student who attends the seminar receives the “Lesson 1 Special Credit” tag. This tag triggers the Run ProgressAlly Event operation inside your CRM, which marks all of Lesson 1’s objectives complete for that student.
The benefit: the user receives credit for their extra effort and is spared from having to take time reading over redundant course work.
Scenario 2:
Perhaps you require students to submit specialized homework (like sharing designs or doing extra curricular activities like attending a conference) as part of their online course. You’d like to review these submissions before permitting students to move onto the next lesson or complete the course.
In this case, you could require students to submit their homework, but withhold the final objective (using partial objectives) until you approve what’s been submitted.
How to set it up:
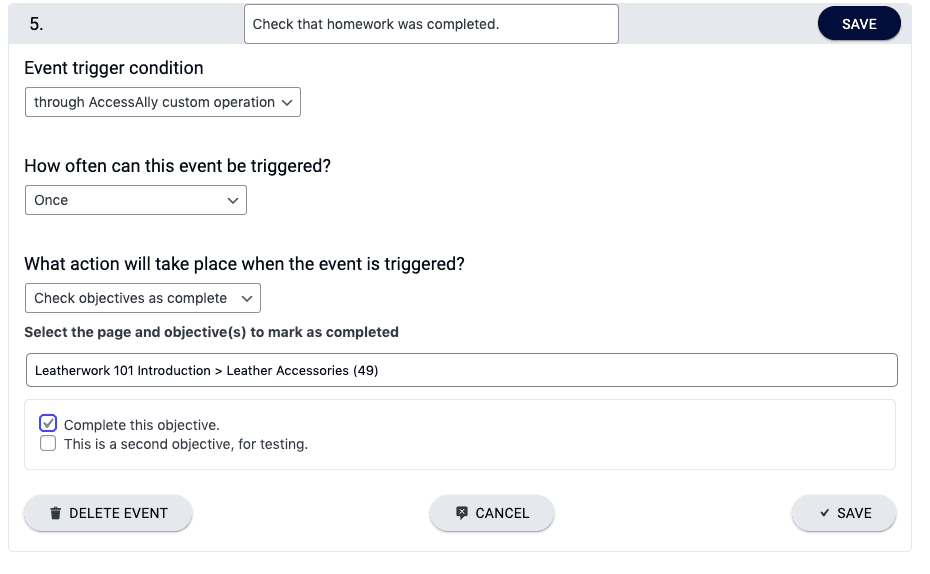
1. Set Up Your ProgressAlly Event
First, log into your AccessAlly website and use the left navigation sidebar to go to ProgressAlly > Events.
Here, you’ll want to create a new event with the following items:
- Event trigger condition: Through AccessAlly Custom Operation
- How often can this event be triggered? (1) Once (2) Each time the event happens
- What action will take place when the event is triggered? Choose the intended action from the dropdown.
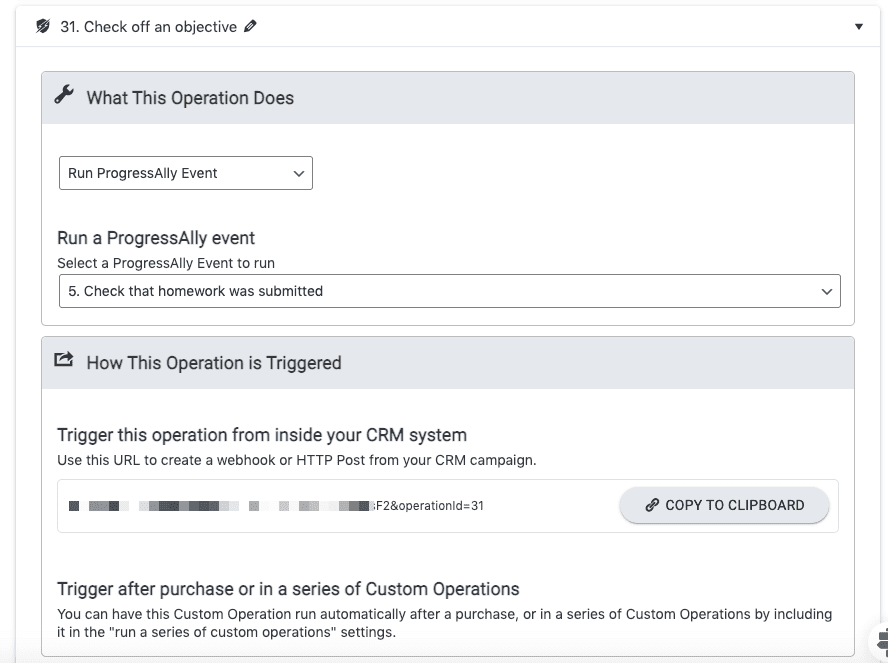
2. Set Up Your Custom Operation
Now, head over to AccessAlly > Settings > Custom Operations and click on the “Add New Operation” button.
Then, set up your custom operation as follows:
- Choose what this operation will do: Run ProgressAlly Event
- Run ProgressAlly Event: Using the dropdown, select the ProgressAlly Event that you created in Step 1 of this tutorial.
- Want to trigger this event from inside your CRM system? The URL you see here can be added as a webhook in your CRM automations. Any time the webhook is run, the ProgressAlly event you configured in Step 1 of this tutorial will occur.
3. Add the Webhook to your CRM automation
Finally, it’s time to add the webhook from Step 2 in this tutorial to your CRM automation. Remember: Any time the webhook is run, the ProgressAlly event you configured in Step 1 of this tutorial will occur.
The automation you build is going to be totally unique to your scenario. Many AccessAlly users may choose to use a unique tag as the trigger for the automation, followed by the webhook, and possibly an email that notifies the end-user/course student. Whenever you manually apply the trigger tag to a user (or have it automatically applied in a separate automation), the process set up in this tutorial will be run.
How To Test Your Setup
As always, we strongly recommend that you test your setup before making it “live” for your clients. To do so, please follow these steps:
- Create a test user in your membership site (or find an already created test user who does NOT have the trigger tag associated with their account).
- From inside your CRM, manually apply the trigger tag to the user’s account.
- Using an incognito window, log into the membership site with your test user’s username & password.
- Check to make sure the correct objectives are now marked “complete” on the course page.
