This article shows you how to use the Protected Content feature in AccessAlly. This feature is used to add file downloads (like PDFs) to your Offerings while protecting access to them using tags & redirects to sales page and landing pages, if a member does not have access.
ARTICLE CONTENT:
Step 1: Turn On Protected Content
In your WordPress dashboard, navigate to AccessAlly → Settings → General Settings → Display Settings.
Enable the Protected Content option.
- Note: You can upload files up to 10 MB using this built-in feature.
- If your file is larger than 10 MB, you’ll need to use the Amazon S3 integration.
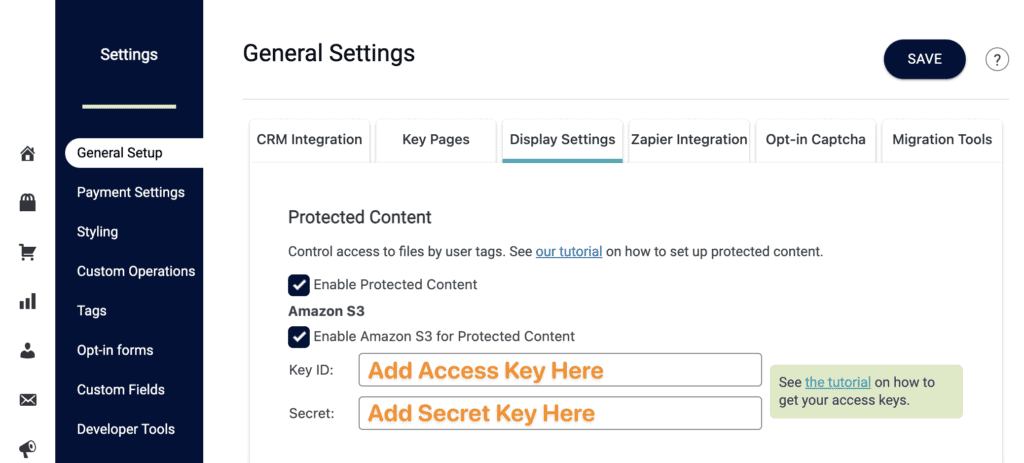
Amazon S3 Users
How to Get Your AWS Access Keys
To connect AccessAlly to Amazon S3 for protected file hosting, you need to create an AWS IAM user and generate access keys. This tutorial walks you through the complete setup process.
Step 1: Create an IAM User in AWS
- Log in to AWS Console
- Go to https://console.aws.amazon.com/
- Sign in with your AWS account credentials
- Navigate to IAM (Identity and Access Management)
- Click “Services” in the top menu
- Search for “IAM” and click on it
- Or go directly to: IAM Console
- Create a new IAM user
- In the left sidebar, click “Users”
- Click the “Add users” button (or “Create user” in newer AWS console)
- Enter a username (e.g., “accessally-s3-user”)
- For “Access type” or “Credential type”, select “Access key – Programmatic access”
- Click “Next”
Step 2: Set IAM Permissions
You need to give this user permission to access your S3 buckets.
Option A: Attach Existing Policy (Easier, Less Secure)
- On the “Set permissions” page, select “Attach policies directly”
- Search for
AmazonS3FullAccess - Check the box next to “AmazonS3FullAccess”
- Click “Next”
⚠️ Note: This grants full S3 access to ALL buckets. For better security, use Option B below.
Option B: Create Custom Policy (Recommended, More Secure)
- On the “Set permissions” page, click “Create policy”
- Click the “JSON” tab
- Paste this policy (replace
YOUR-BUCKET-NAMEwith your actual bucket name):{ "Version": "2012-10-17", "Statement": [ { "Effect": "Allow", "Action": [ "s3:GetObject", "s3:PutObject", "s3:DeleteObject", "s3:ListBucket" ], "Resource": [ "arn:aws:s3:::YOUR-BUCKET-NAME", "arn:aws:s3:::YOUR-BUCKET-NAME/*" ] } ] } - Click “Next: Tags” (optional), then “Next: Review”
- Name the policy (e.g., “AccessAlly-S3-Policy”)
- Click “Create policy”
- Go back to the user creation tab and refresh the policy list
- Search for your new policy and attach it
- Click “Next”
Step 3: Generate Access Keys
- Review and create
- Review your user settings
- Click “Create user”
- Download your credentials
- You’ll see a success page with your credentials
- Access Key ID – A string like “AKIAIOSFODNN7EXAMPLE”
- Secret Access Key – A longer string (only shown once!)
- Click “Download .csv” to save these credentials
- ⚠️ CRITICAL: You cannot retrieve the Secret Access Key after leaving this page. Save it now!
Step 4: Enter Credentials in AccessAlly
Now that you have your AWS access keys, enter them in AccessAlly:
- Go to AccessAlly Settings
- In WordPress admin, go to AccessAlly → Settings
- Click the “Protected Content” tab
- Scroll to Amazon S3 Users section
- Find the “Amazon S3 Integration” section
- Enter your credentials
- AWS Access Key ID: Paste the Access Key ID from Step 3
- AWS Secret Access Key: Paste the Secret Access Key from Step 3
- S3 Bucket Name: Enter your S3 bucket name (e.g., “my-course-files”)
- S3 Region: Select your bucket’s region (e.g., “us-east-1”, “eu-west-1”)
- Test the connection
- Click “Save Changes”
- AccessAlly will attempt to connect to your S3 bucket
- You should see a success message if credentials are valid
What Your S3 Bucket Region Code Is
If you’re not sure what region your S3 bucket is in:
- Go to the S3 Console
- Find your bucket in the list
- The “AWS Region” column shows the region name
- Use this mapping for the region code:
- US East (N. Virginia) →
us-east-1 - US East (Ohio) →
us-east-2 - US West (N. California) →
us-west-1 - US West (Oregon) →
us-west-2 - Europe (Ireland) →
eu-west-1 - Europe (London) →
eu-west-2 - Asia Pacific (Sydney) →
ap-southeast-2 - See full region list
- US East (N. Virginia) →
Troubleshooting: S3 Integration Issues
Error: “S3 Integration Disabled” or “Cannot Connect”
Possible causes and solutions:
- Invalid credentials
- Double-check you copied the Access Key ID and Secret Access Key correctly
- Make sure there are no extra spaces before/after the keys
- If you lost the Secret Access Key, you must create a new access key pair in IAM
- Wrong S3 bucket region
- Verify the region code matches your bucket’s actual region
- Check the S3 console to confirm bucket region
- Insufficient permissions
- Go back to IAM and verify the user has S3 access permissions
- Ensure the policy includes
s3:GetObject,s3:PutObject,s3:ListBucket - If using a custom policy, verify the bucket name ARN is correct
- Bucket doesn’t exist
- Go to S3 Console and verify the bucket name is spelled correctly
- Bucket names are case-sensitive and must match exactly
- Expired or deleted access keys
- Access keys can be deactivated or deleted in IAM
- Go to IAM → Users → Your user → Security credentials
- Check if the access key status is “Active”
- If needed, create a new access key and update AccessAlly settings
Error: “Access Denied” When Uploading Files
This means your IAM user doesn’t have PutObject permission.
Solution:
- Go to IAM → Users → Your user → Permissions
- Review the attached policy
- Ensure it includes:
"Action": [ "s3:GetObject", "s3:PutObject", "s3:DeleteObject", "s3:ListBucket" ] - If using the built-in
AmazonS3FullAccesspolicy, this should already be included
How to Rotate Access Keys (Security Best Practice)
For security, AWS recommends rotating access keys every 90 days.
- Create a new access key
- Go to IAM → Users → Your user → Security credentials
- Click “Create access key”
- Download the new credentials
- Update AccessAlly with new keys
- Go to AccessAlly → Settings → Protected Content
- Enter the new Access Key ID and Secret Access Key
- Save changes and test
- Delete the old access key
- Back in IAM, find the old access key
- First, set it to “Inactive” and test everything works
- After confirming the new key works, delete the old key
Next Steps After S3 Setup
Once your S3 integration is connected:
- Upload protected files to S3 – Use the AccessAlly file manager or upload directly to S3
- Link files in your content – Use AccessAlly shortcodes to create protected download links
- Test download links – Log in as a test user and verify file access works
- Set up file expiration – Configure how long download links remain valid
💡 Pro Tip: Test your S3 integration with a small file first before uploading your entire course library. This ensures everything is configured correctly.
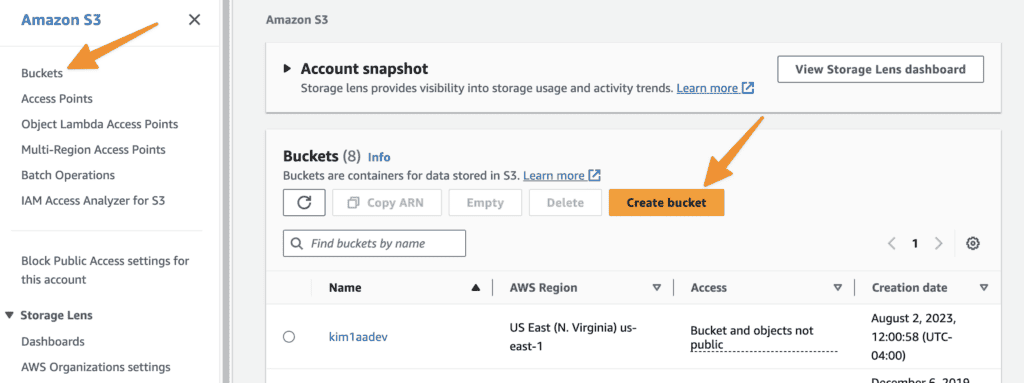
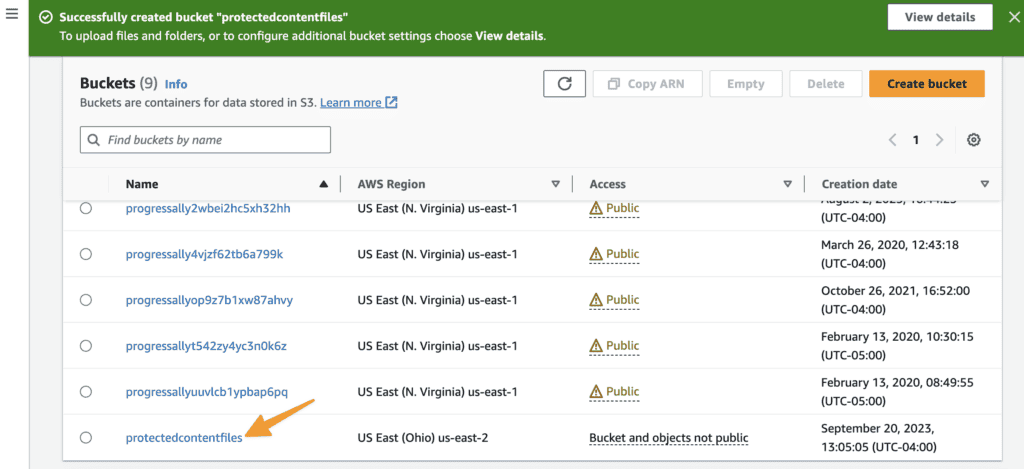
Creating Buckets for Amazon S3
We recommend creating “buckets” if using Amazon S3 to store your files. This makes finding and organizing easier. You can create as many buckets as you like.
Visit this link https://console.aws.amazon.com/s3/ → click “Buckets” → Create a Bucket
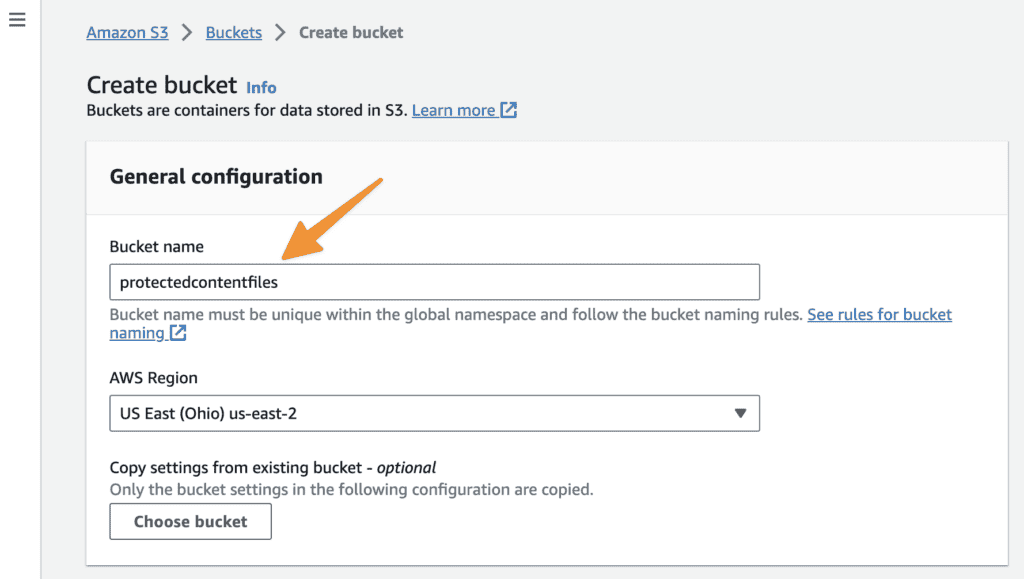
Name your bucket.
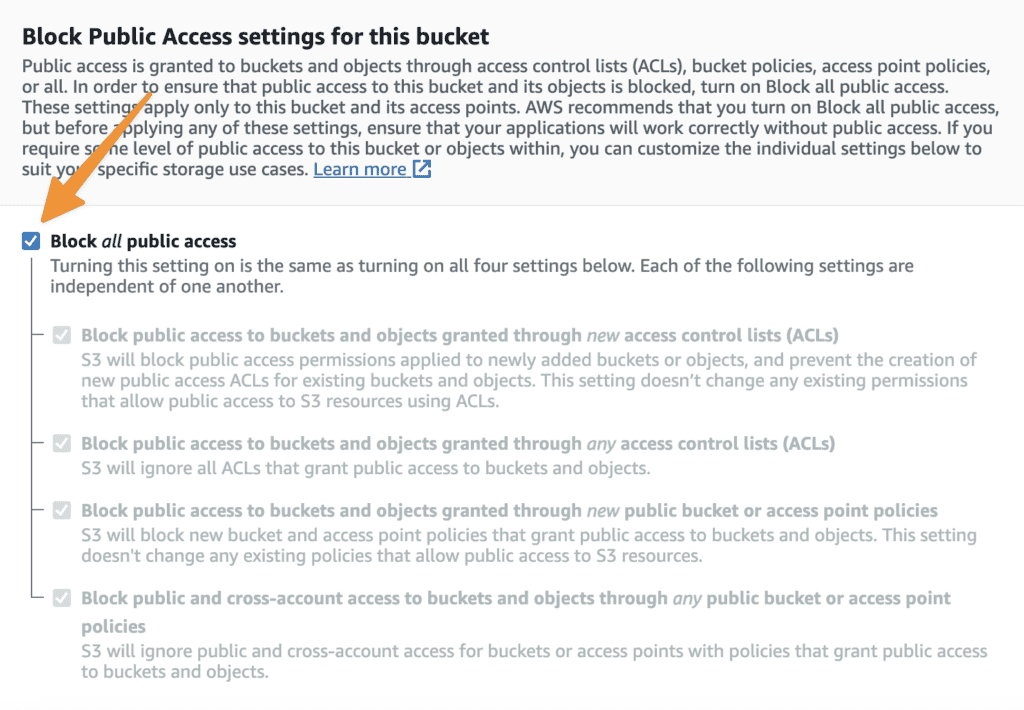
Confirm “block all public access” is marked to protect files you upload from unauthorized visitors.
Click your newly created bucket.
Start adding your files. You can do this one by one or add multiples at the same time. Click Upload once all files appear in the list.
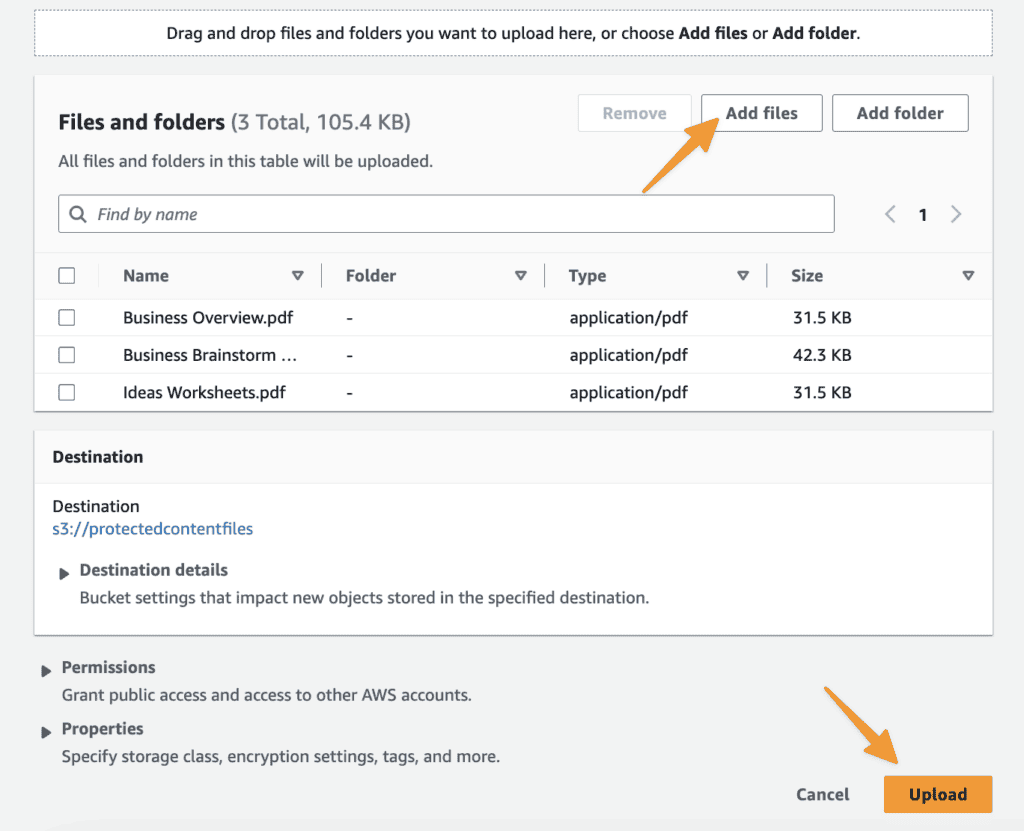
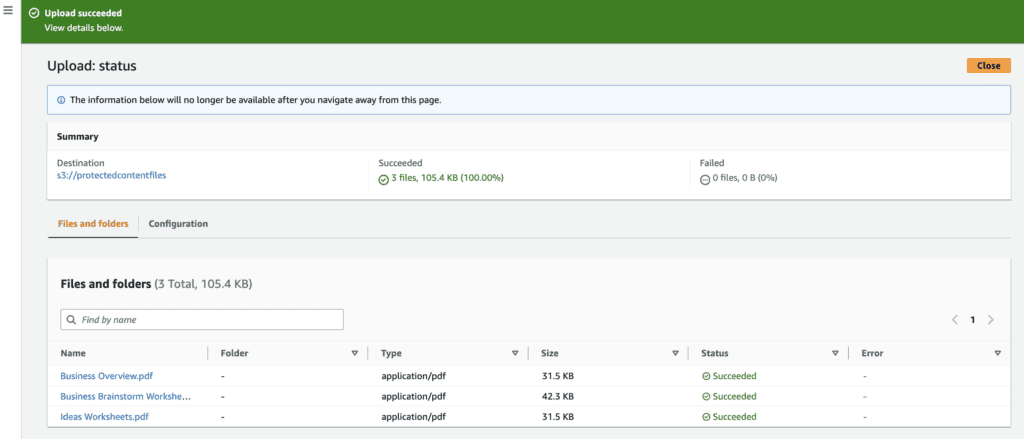
Confirm successful file upload and close this window.
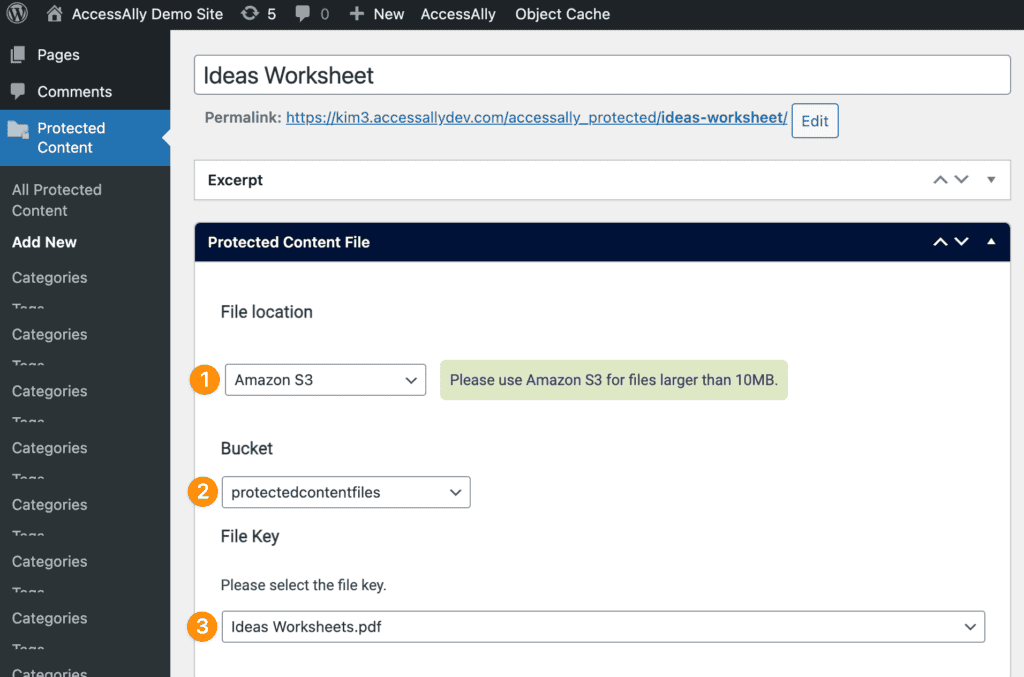
Confirm Amazon S3 Integration
Go to Protected Content → Add New
Amazon S3 is integrated if you can select Amazon S3, your bucket, and your files.
Watermark Protected Content PDFs
*This feature is not compatible with Amazon S3 files.
Select Watermarked PDF file and add add your desired watermark position.
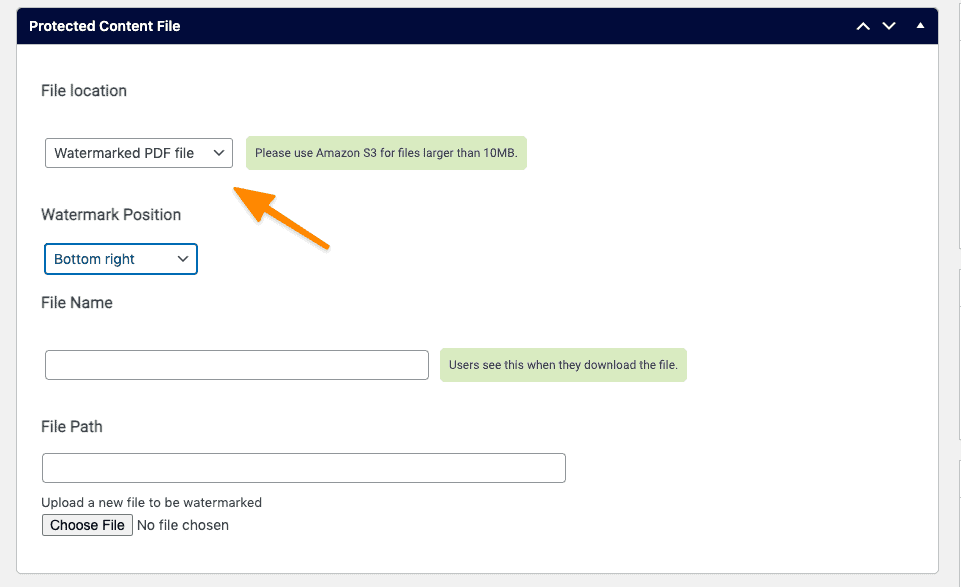
3. Upload your PDF and save your Protected Content item.
4. Test with the User Switching plugin or a test user to confirm the watermark.
Add Protected Content Files
There are two ways you can add protected content files to your site.
- Add in Protected Content Feature (great for single file downloads where you do not have additional content to add to the file)
- Add Protected Content to an Offering (great if there is a course or additional content that goes with the file)
Option 1: Add in Protected Content Feature (No Offering Required)
*Try this option if you do not need a page or post in an offering to deliver a standalone file like an e-book or audio download, no offering is required with this option.
For the most flexibility you can add protected content from the WordPress Dashboard. This option is great if this piece of protected content is used by multiple different offerings in your site because you can tag each for access to this content.
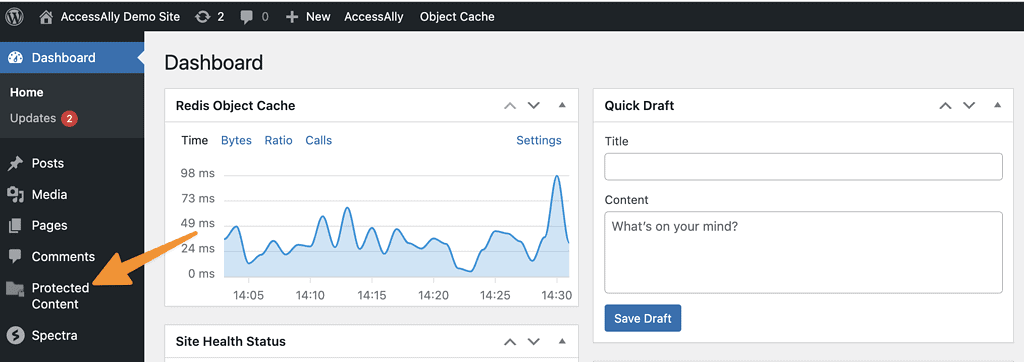
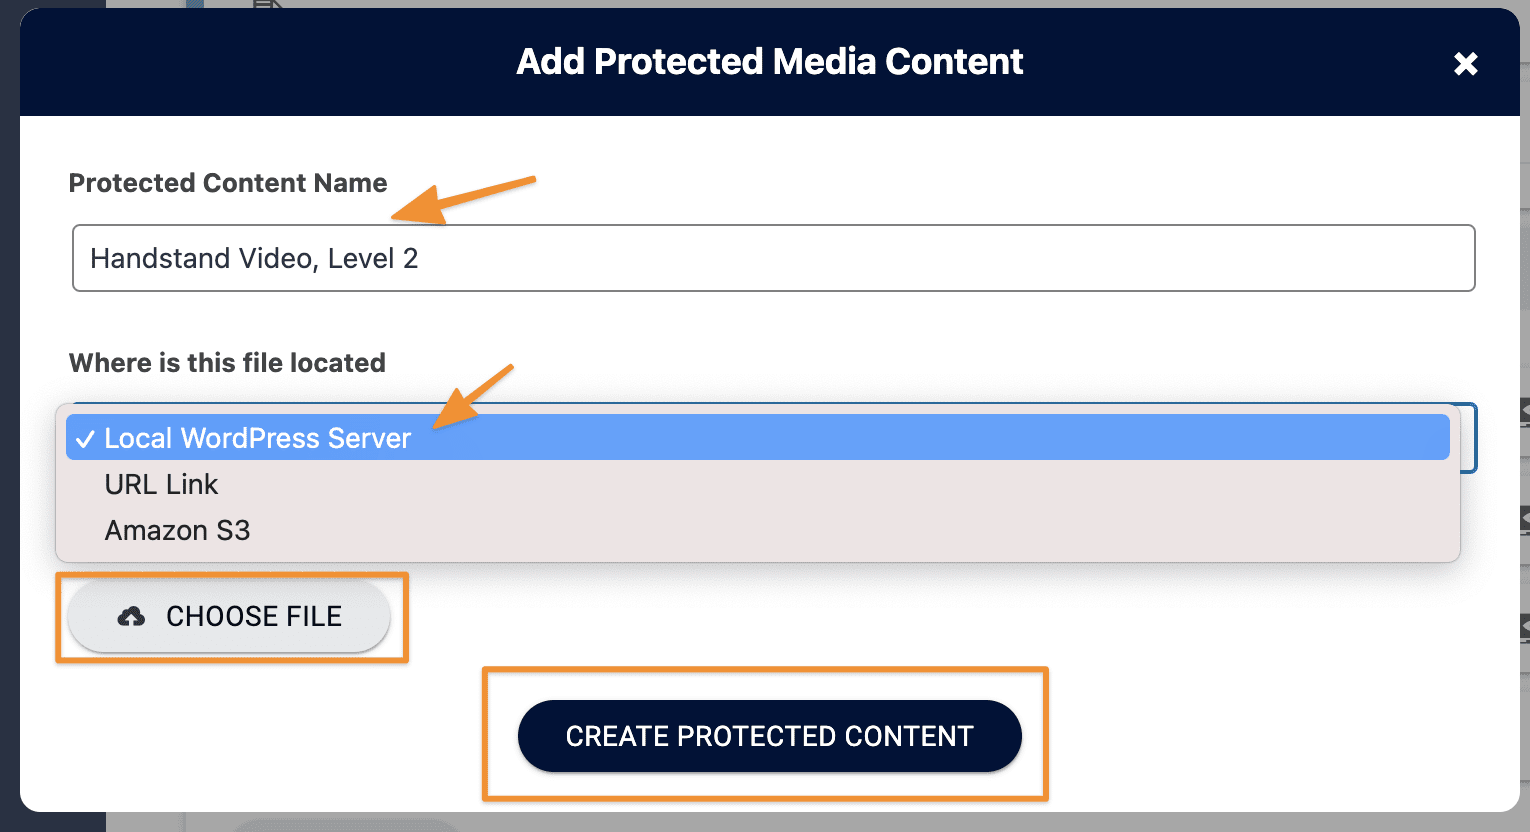
Here you can add new files, edit existing ones, or sees the categories and tags in use for your files. If you’d like to add a new piece of protected content select:
Add New
- Name your file
- File location is local unless integrated with Amazon S3
- Adjust file name if desired
- Upload your file (or select file from Amazon S3 bucket)
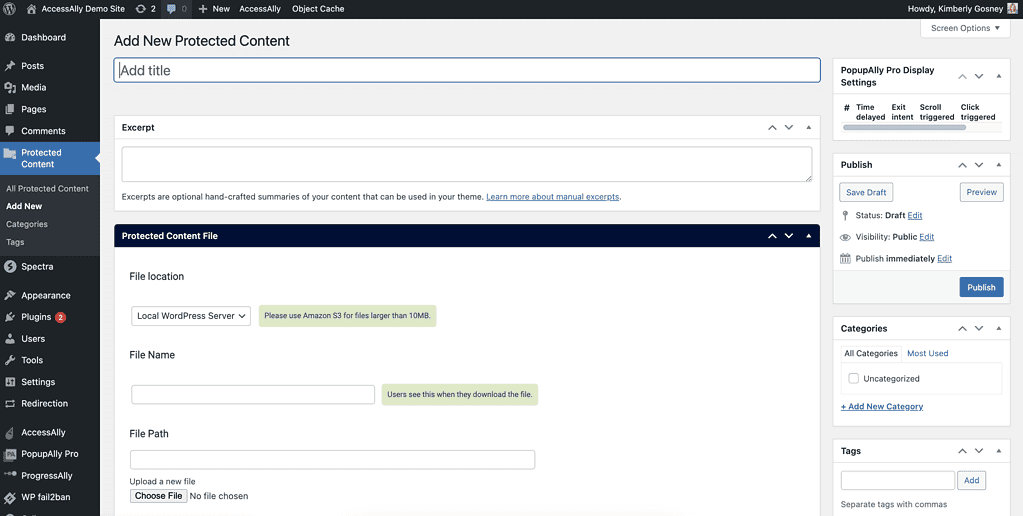
You can add WordPress categories and tags on the right (note these are not AccessAlly page access tags!)
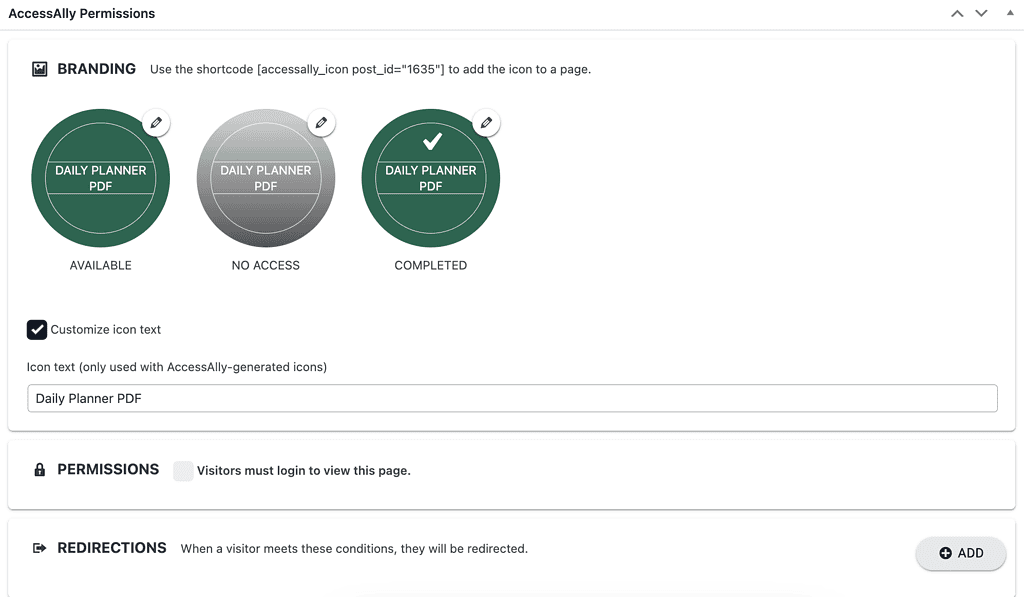
Protected Content Permissions
This feature works in a similar way to offering access where items or shown or hidden based on the AccessAlly tags a client has. If you would like to add images or create conditions for when your protected content can be seen you can set these up here.
Option 2: Add Protected Content to an Offering
Adding your protected content in an AccessAlly offering applies all page tags and redirects at the time of setup. This option is great if this piece of protected content belongs to a specific offering.
Go to: AccessAlly → Offerings → Select the offering. In the content tag click the “+Add” button in the module you’d like to add a protected content file to.
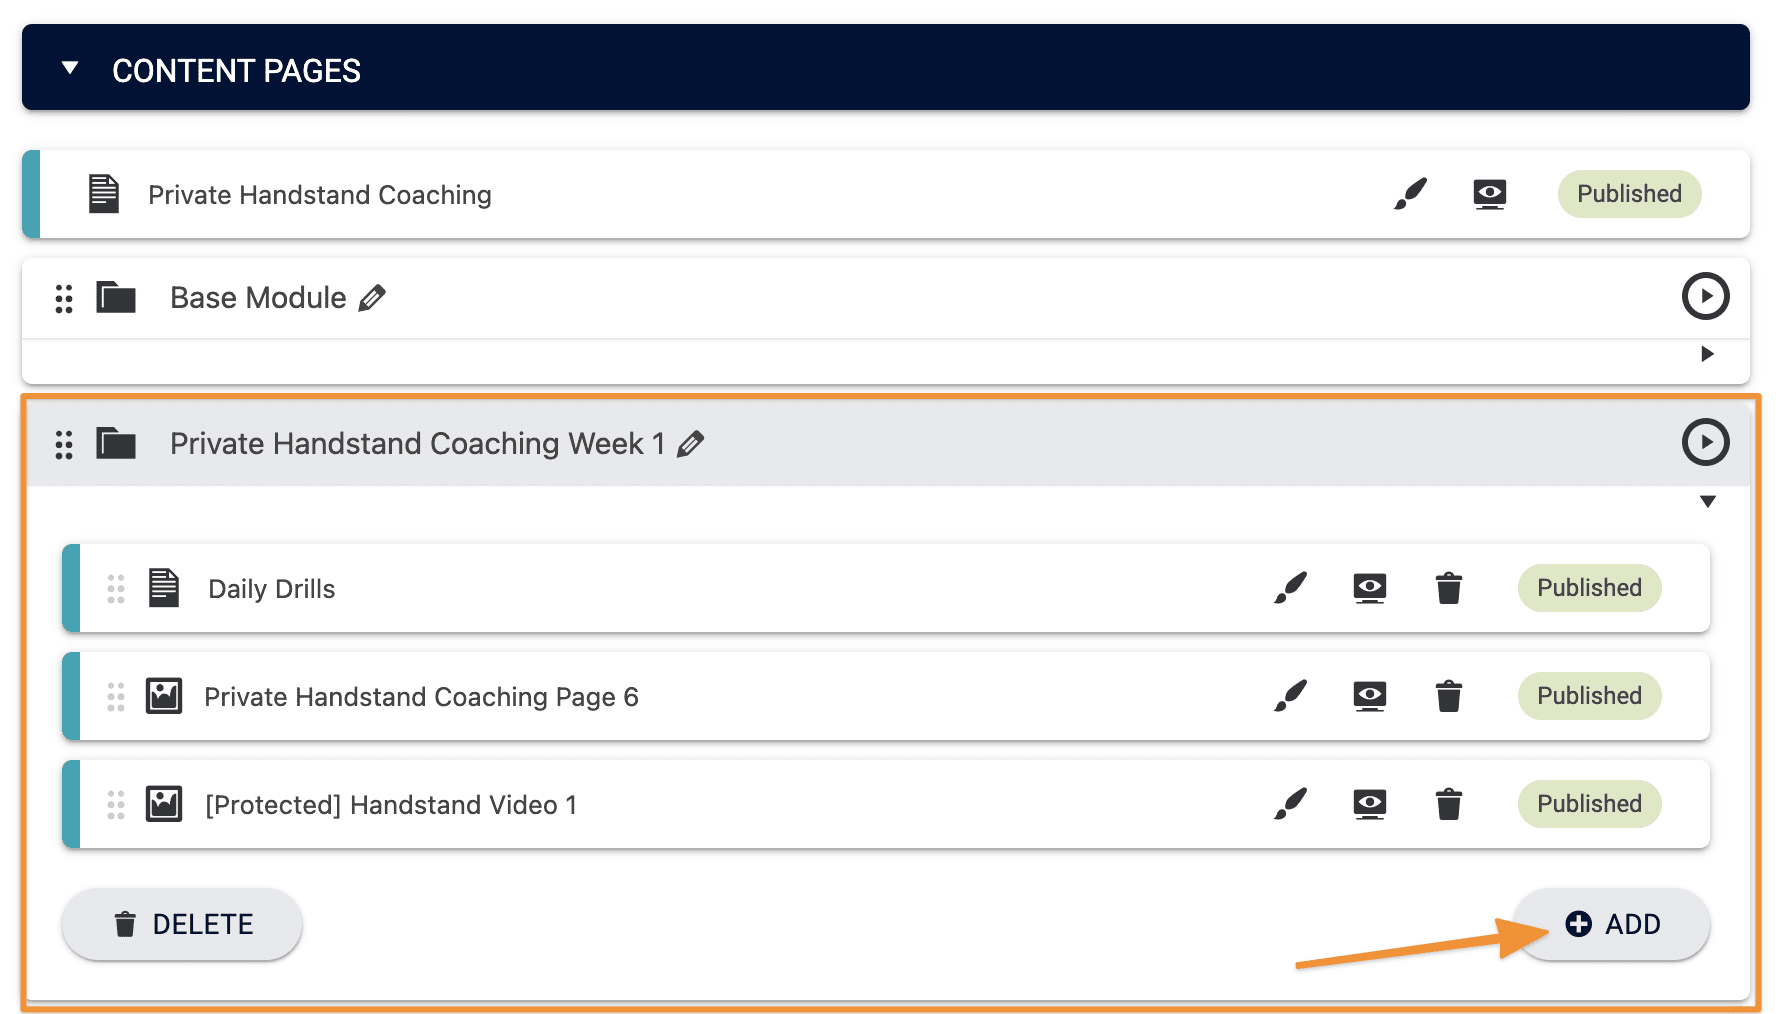
Name your protected content, specify where the file is located, and choose the file. If your file is located on Amazon S3, that’s covered later in this article.
Your content will be added as a draft. Click Save to publish your new protected content.
Editing Protected Content in an Offering
When you add protected content through the Offerings wizard, permission tags and redirects are automatically applied. You can edit those permissions, redirect, and/or icons by clicking on the pencil icon after the protected content is created and saved.
Upon clicking the brush icon in the offering you will be taken to the Protected Content feature with this item open in AccessAlly.

Testing Protected Content
Test your protected content with the User Switching plugin or a test user. A successful test reveals the protected content file upon clicking the link.
Remove Protected Content From Google Search Results
If you’re using AccessAlly’s protected content, you might do a search in Google or another search engine and find some of your files are indexed and showing up in the results.
The good news is that no one can access these files unless they’re logged in and have the correct tags.
You can remove protected content from Google search results by following the instructions in this tutorial.
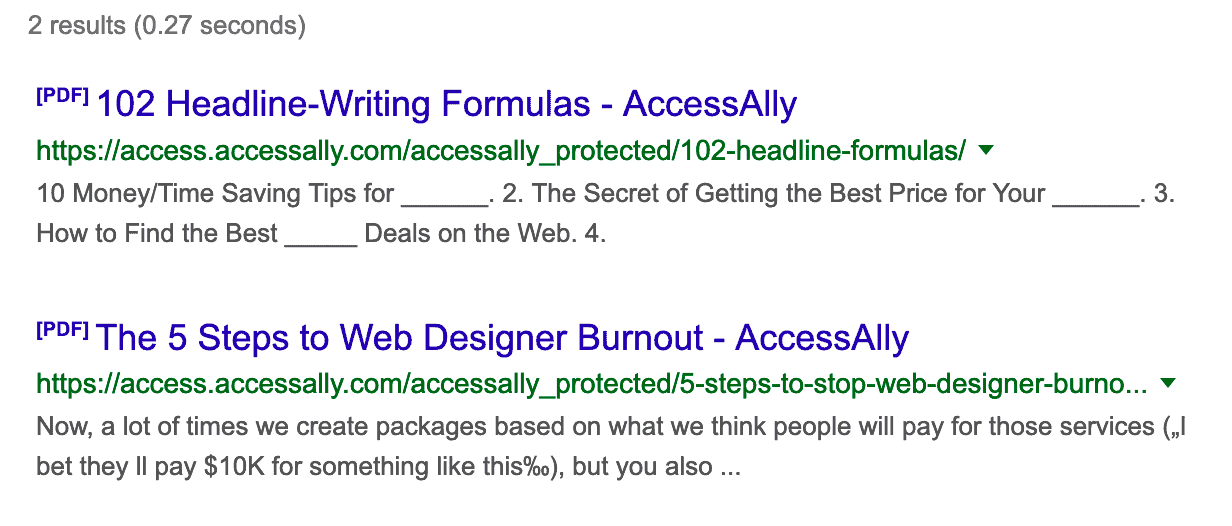
But it might not be the best user experience to have people click through to a protected file, so you might want to remove them from the search engines entirely.
Here’s how to do that!
Blocking Files In Robots.txt
The best way to block the search engines from indexing and linking to files you’d rather keep private is to edit your site’s “robot.txt” file.
Every website has this file at the root directory, and it tells the search engines what’s fair game and what’s off limits.
This is the text you’ll want to add to this file to stop the search engines from indexing your protected content files:
User-agent: *

Disallow: /accessally_protected/*
Two Main Ways of Editing Robots.txt
If you’ve never edited your robots.txt file before, there are a few different ways of doing it. Here they are, and the resources walking you through the steps:
Article FAQs
A: Visit this article to see all the different ways you can display your protected content files.
A: Try flattening your PDF files before uploading to Protected Content. Flattening converts layers, transparencies, and fonts into a single image or vector object. In the case of fonts, it essentially “bakes” the font into the design so it’s no longer editable text but a visual element.
This prevents issues like font substitution and color issues because your PDF will be treated like a series of images in the browser.
Yes, you can! See Option 1 in this article to “Add in Protected Content Feature (No Offering Required)”
With Amazon S3, it is possible to place an unlimited number of files in a bucket. If your bucket has 1000+ files, you may encounter an issue where, the Amazon API sets a limit to the number of files that can be displayed in a list (like the dropdown to select your files.)
We recommend creating a new bucket, so that you can organize larger numbers of files, into smaller buckets. This will ensure they’re visible and able to be selected from the dropdown.
Videos are added to pages in offerings using the media objective in ProgressAlly or added using embed code. Videos are not compatible with the protected content feature.
A: Yes you can!
A: Yes, you can! Add your shared templates in Canva Pro plans using the URL link option and linking out to the template file.
