ARTICLE CONTENT:
Why Track Course Progress in WordPress?
When you run an online course membership site in WordPress, it can be challenging to keep your students engaged and motivated.
One way to overcome that challenge is by tracking course progress in WordPress with your membership site plugin.
By tracking your students’ progress through the online course (and displaying this progress through pie charts or progress bars), you make it easier for them to see how far they’ve come – and how much work they have left to do.
It’s a great way to visually motivate them to stay focused on course content.
What You’ll Need To Track Course Progress in WordPress
The tool list you need is pretty short:
- A WordPress website
- The AccessAlly Pro membership plugin for WordPress
- A tag-based CRM (see the current list of integrations)
How Does Tracking Course Progress in WordPress Work?
When a membership site is built on WordPress, each of the subscribing members are given a unique username and password. They use these credentials to login to WordPress and access the protected content on the site.
As each user works their way through your online course, AccessAlly Pro can track and display their progress.
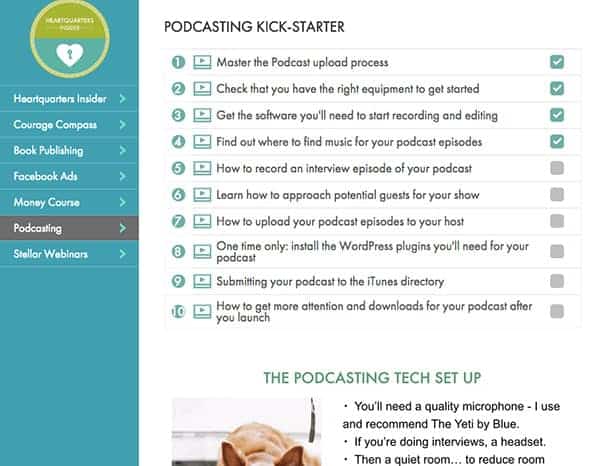
AccessAlly Pro’s progress tracking feature uses checklists (created by you!) to determine what the progress information should display on any given page or post. When each item on the checklist is marked complete, the progress information changes accordingly.
How To Track Course Progress in WordPress (Piecharts, Progress Bars, and More!)
Step 1: Install AccessAlly Pro Plugins
Install the AccessAlly Pro plugin suite (AccessAlly + ProgressAlly) on your site, then integrate with your CRM.
Step 2: Create Your Objective List
In the page settings found at the bottom of each WordPress page/post, create your objective list.
You can add as many objectives as you want from the following options:
- Text – Totally customizable with basic HTML, this objective type must be manually checked off by the user once they’ve completed the objective specifications.
- Video – This objective type works with any video that is uploaded through YouTube, Vimeo, or Wistia. Users manually mark this objective “complete” after they’ve watched the video embedded on the page. You can also configure this objective to automatically mark itself complete after the user watches a certain portion of the video.
- Quiz – AccessAlly Pro allows you to create quizzes, which can also be used as objectives. When the user completes the quiz, the corresponding objective is automatically checked off.
- Page/Post – This objective type is automatically marked complete when the objective list on another designated page has been completed.
- Notes – This objective is automatically checked off in two ways, depending on the note type. With the “homework review”, it’s completed when the admin approves the submitted “homework.” With the other note types, the objective is completed as soon as the student hits “submit” on the note.

Step 3: Add Objective List To Page With Shortcode Adder
With an objective list ready to go, it’s time to insert the corresponding shortcode to the page using the shortcode adder, found on the toolbar.
Select “Objective List” from the dropdown, then click the yellow “Insert Shortcode” button.
Once inserted in the page, the checklist items will automatically track course progress in your WordPress site for any logged in user.
Note: some types of objectives (like the “text” option) must be manually marked complete by the course student. Others (like the “quiz” objective type) are completed automatically.
Step 4: Add Progress Bar (or Pie Chart) to Page With the Shortcode Adder
Using the same shortcode adder, select “Progress Information” from the Dropdown. Then, you can decide how you want to display the progress to your students:
- Progress Text – A numerical percentage display
- Progress Pie Chart
- Progress Bar
- Total Objective Count – this will show the number of objectives on the page
- Completed Objective Count – this shows how many objectives have been marked complete on the page
…hit “insert shortcode” and you’re done!


