Skill Level: Intermediate
There are many different ways that you can use a points system to deliver your certification program inside an AccessAlly site. This is one example. If you have questions about anything Contact Support.
Scenario: Members in your Continuing Education Program (or Coaching Certification) receive points for completing activities (CEU credits.) They need to download their certificate once they have the required number of points. They also repeat the process again in the future for recertification.
ARTICLE CONTENT:
What you’ll need for the points-based certification program
- Points System – this allows for members to earn and redeem points for items on your site.
- Certificate PDF – a one-page certificate design your members will download.
What you’ll have after completing the points-based certification program
- Start From Scratch Offering – tagged access to the certificate (this gives you the most flexibility and control)
- Decrease Points Custom Operation – this allows the member to purchase the certificate when they have the required number of points.
- Add/Remove Tag Custom Operation – this allows for access to the certificate to be removed if a member needs to recertify again in the future.
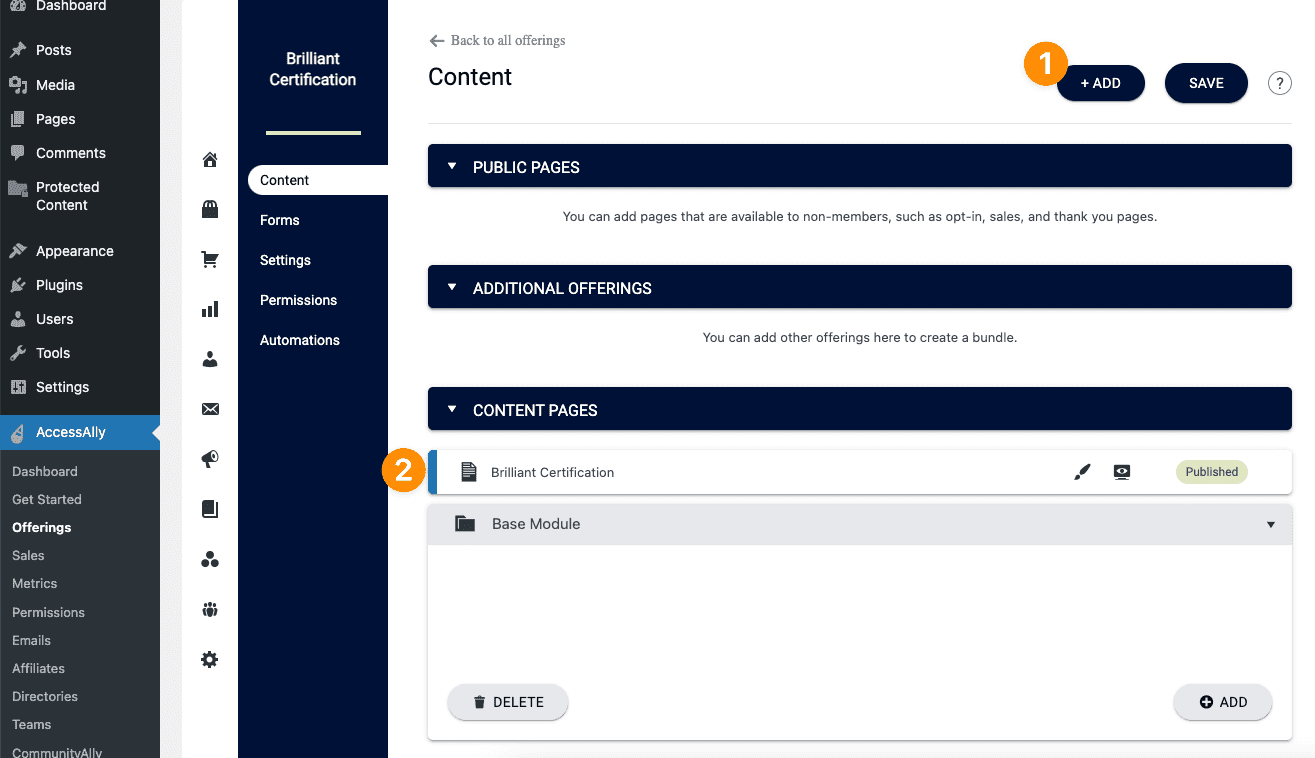
Step 1: Create an Offering for the Certificate.
The Start from Scratch Offering Template allows you to quickly create a one-page offering to hold the certificate. This allows tags to be used for your certificate. Since your members will purchase with points you do not need to create any forms for this offering.
- Click +ADD and choose the Start From Scratch Offering Template.
- The page is automatically created when you build the offering. Make sure you click the
- Save the Offering template
- Click the edit brush icon by the page and publish it. You’ll need the link to this page in Step 2 of this article.
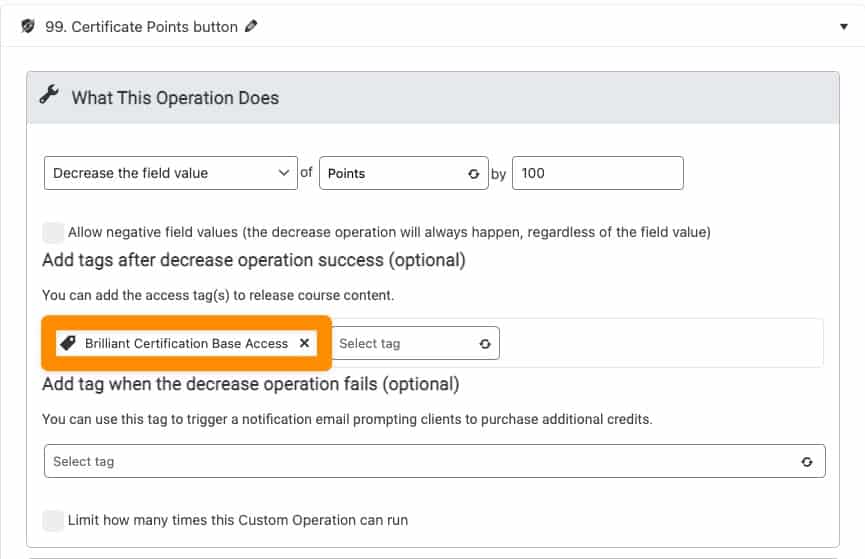
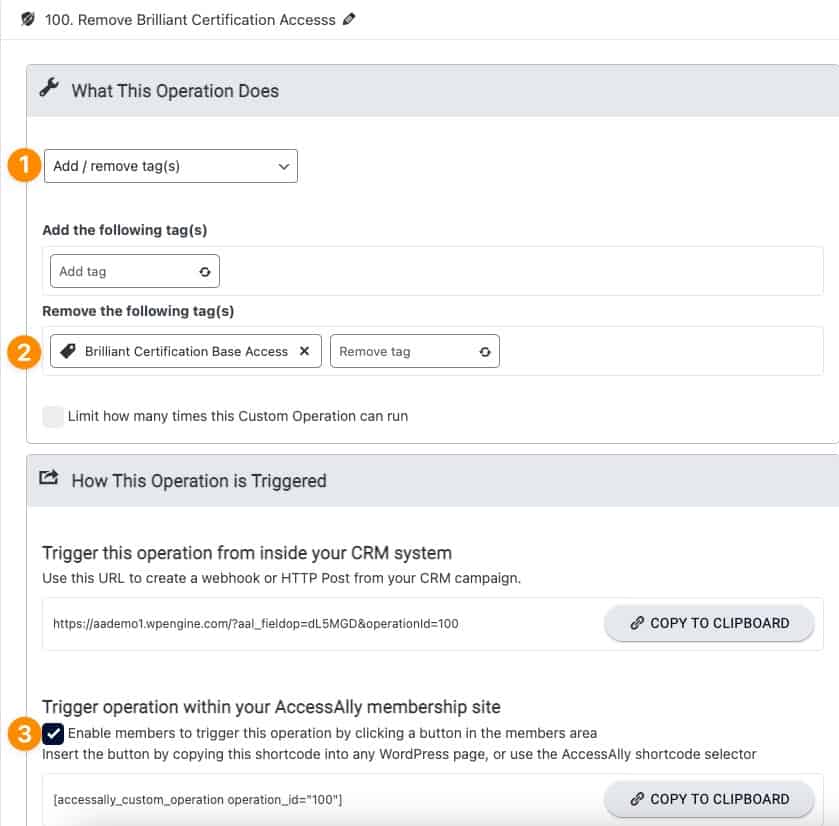
Step 2: Create a Decrease Points Custom Operation
This creates a button that allows a member to use points to purchase this offering.
- Go to AccessAlly > Settings > Custom Operations and click the +ADD NEW OPERATION button.
- Use “Decrease the field value” of “custom field that holds your points” by “number of points“
- Add the Base Access tag for the offering you created in Step 1 (shown in orange in the photo below.)
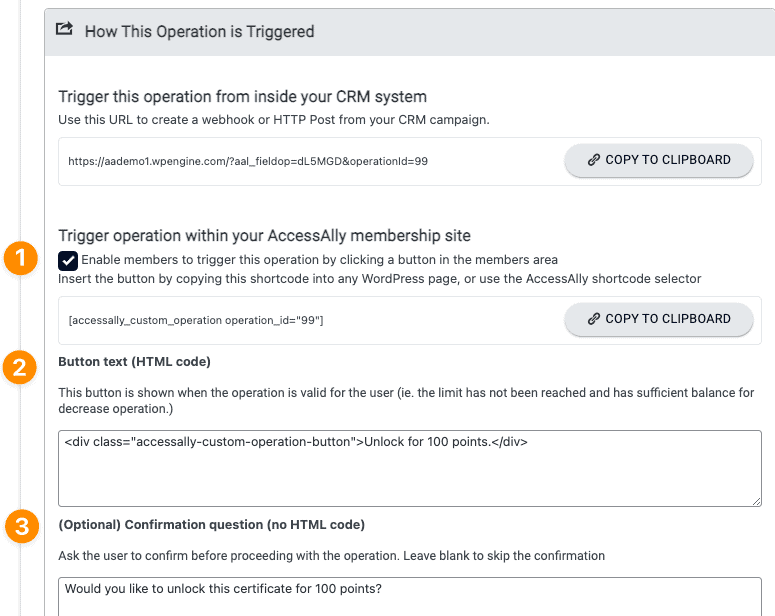
While still inside the same decrease operation move into the How This Operation is Triggered section.
- Check the box by Enable members to trigger this operation by clicking a button
- Add the button text members will see
- Add wording to confirm the member wants to use points
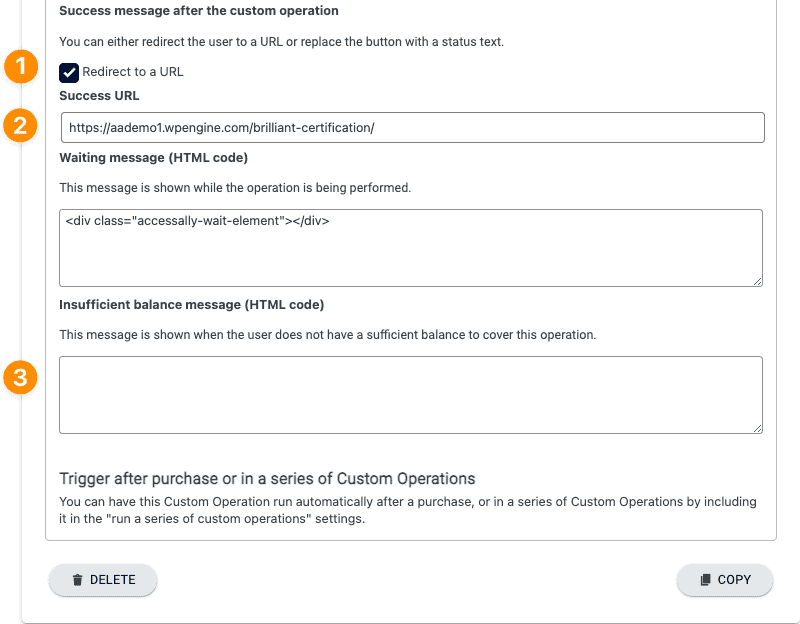
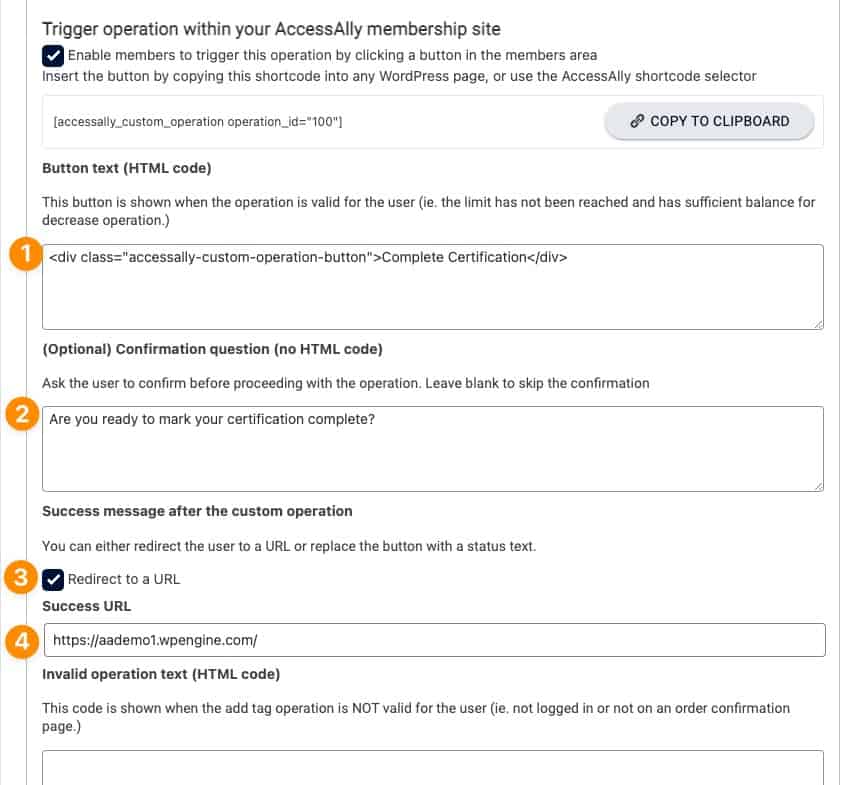
Final steps within the same decrease points custom operation.
- Check the box to redirect to a URL
- Add the link to the page you created in Step 1 above.
- Recommended: delete any wording inside the Insufficient balance message box so members will only see the button when they have enough points to purchase the certificate.
Step 3: Create a Custom Operation to Remove a Tag
This is an optional step that allows you to remove access to the certificate offering once completed. This is useful for CEU credit courses that require yearly recertification.
Caution: This workflow may lead to additional email support requests for your team as the certificate can not be downloaded after completion unless the member purchases again with points or an admin tags the member so they can redownload.
This is created inside AccessAlly > Settings > Custom Operations.
- Select Add/remove tag(s) from the dropdown.
- Remove the following tag – the Base Access tag for your Certificate Offering.
- Check the box to enable members to click a button in the member area.
- Keep this operation open to continue with the next screenshot below.
Continuing from the steps in the image above.
- Add the wording you would like the button to say. You want the member to know that this is the final step in the certification process.
- Add a confirmation message to ensure the user is really ready to complete the process.
- Check the box to redirect to a URL
- Put the page link you would like the user to be redirected to. At this point, the tag will be applied that removes access to this page. The member should be redirected to a page that they can see!
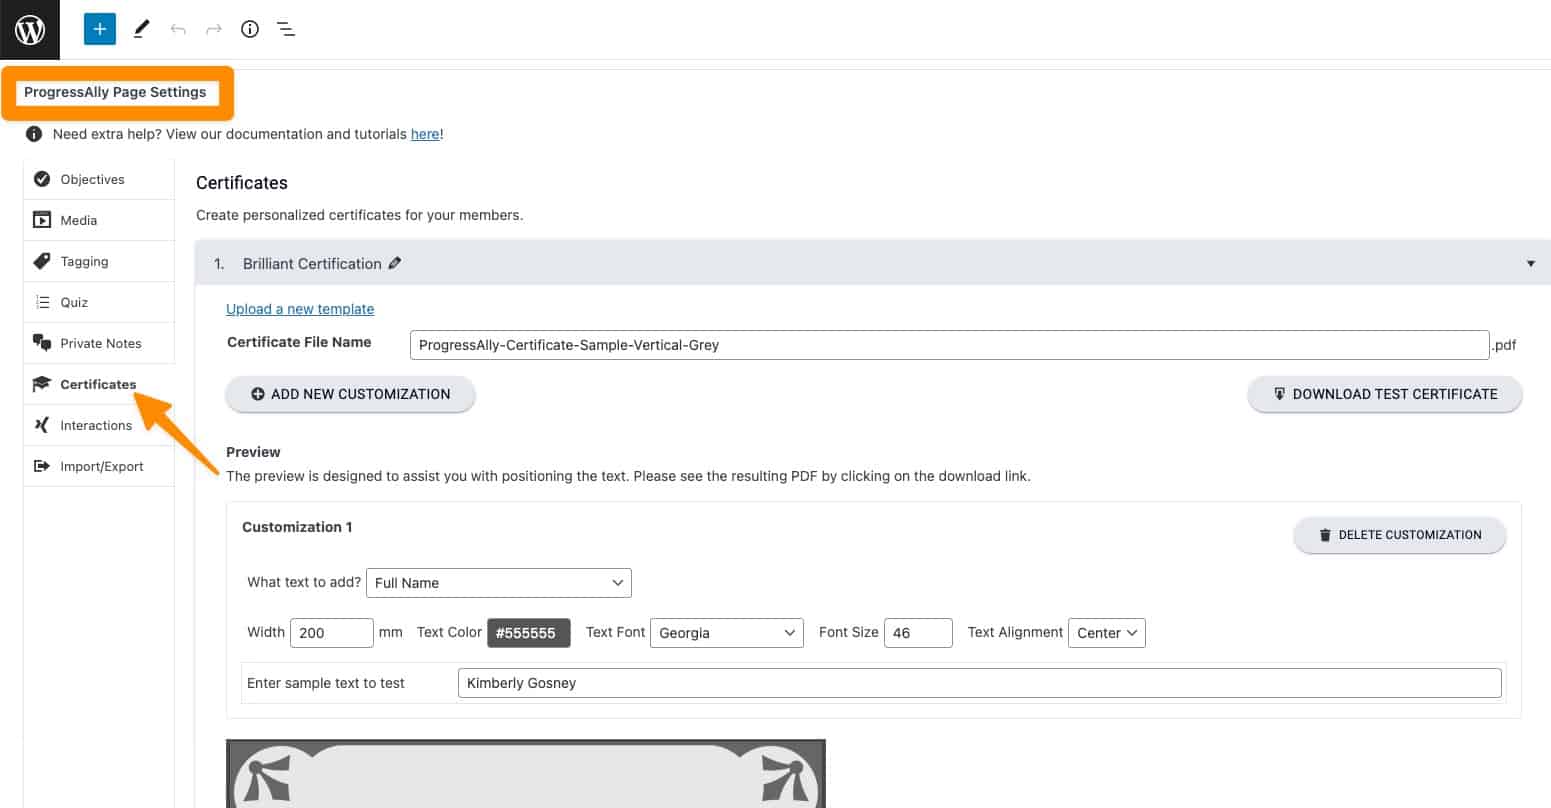
Step 4: Upload Your Certificate
Use the paintbrush icon in the Certificate Offering to open the page in WordPress. Go to ProgressAlly Page Settings > Certificates tab.
If this is your first time creating a certificate take a peek at How to Create a Custom Certificate. This article will open in a separate tab so you’ll be able to visit and come back to this article.
An example certificate is shown below for reference.
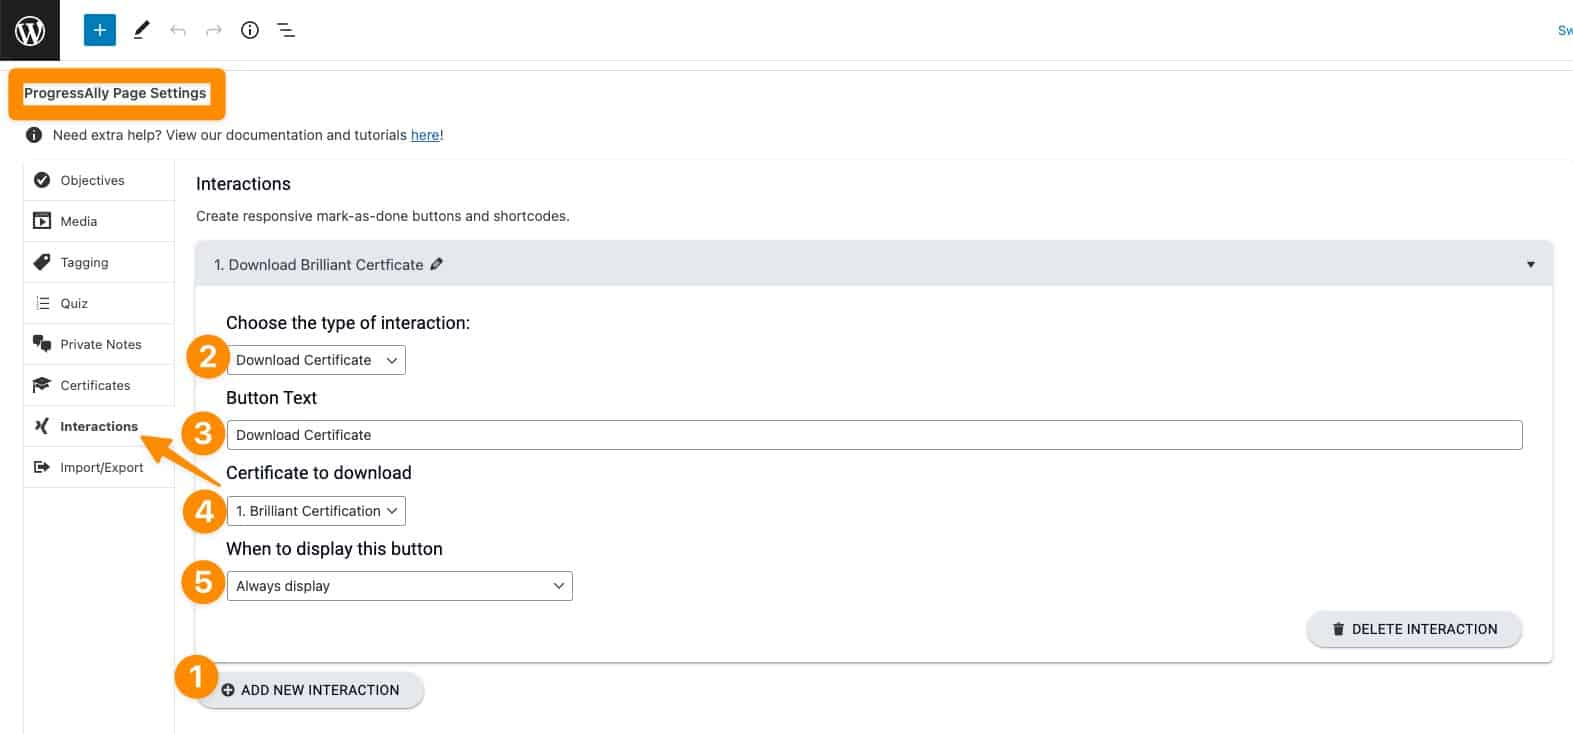
Step 5: Create a Download Certificate Interaction
Go to ProgressAlly Page Settings > Interactions tab. The recommended settings for this interaction are shown in the image below.
This step creates the Download Certificate button your member clicks on to get their certificate.
Step 6: Add Content to the Certificate Offering Page
Display the Download Certificate Button
Add the certificate download button to the Certificate Offering page using the AccessAlly Shortcode Adder.
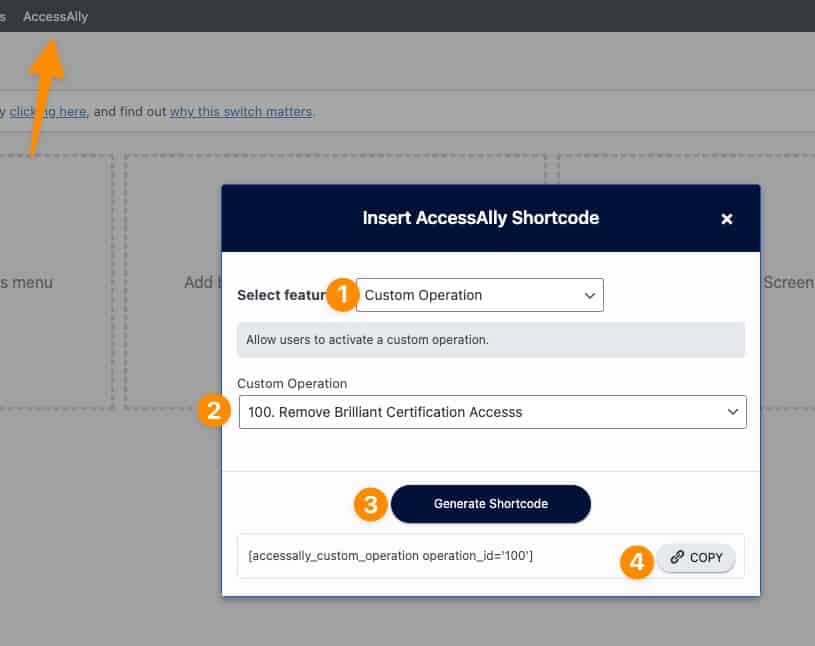
Optional: Display Remove Tag Custom Operation
If you would like to remove access after downloading as shown in Step 3 of this article you can use the AccessAlly Shortcode Generator to create the shortcode. How you add the code to your page will vary based on the WordPress theme and/or page builder you are using.
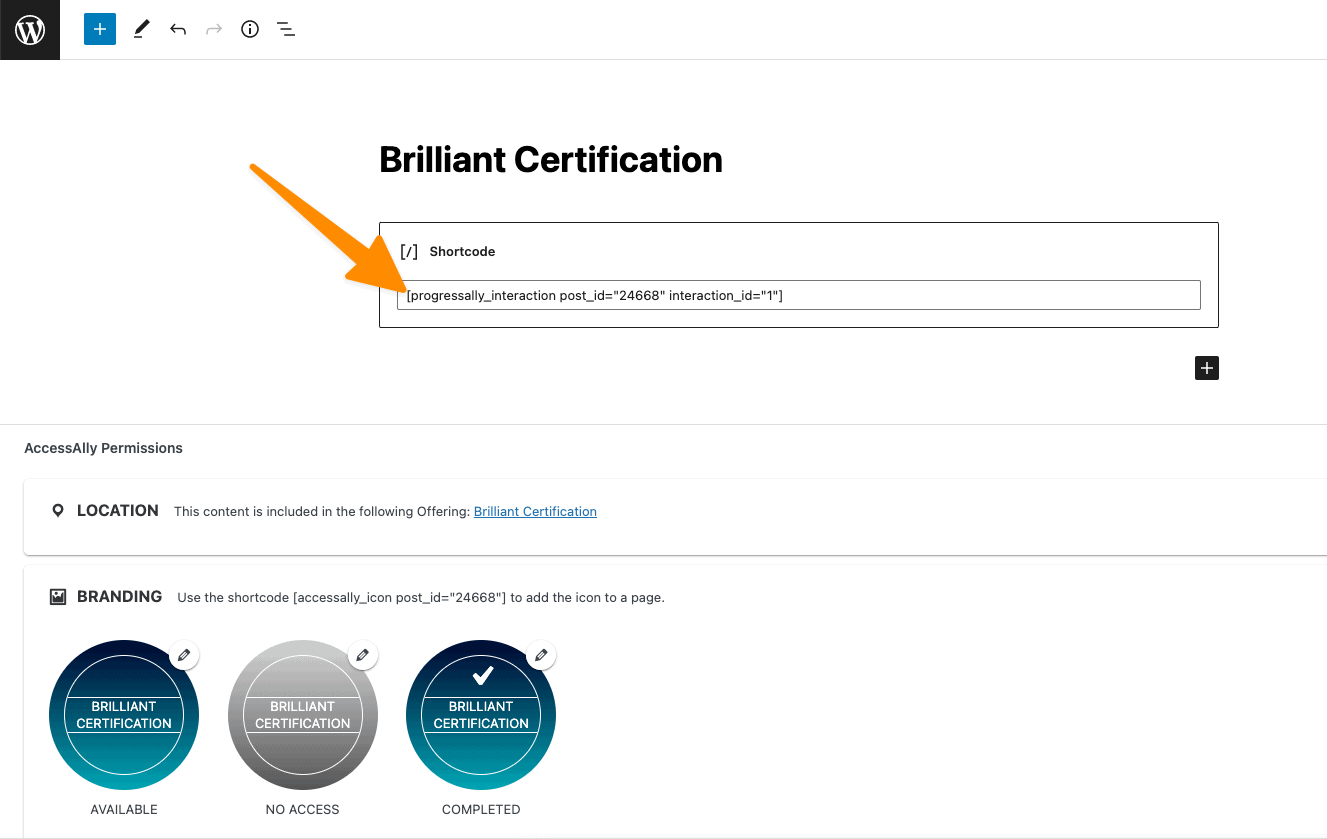
Example of the shortcode added to the Certificate Offering page using Gutenberg.
Add the code to the offering page with your certificate using your WordPress theme or page builder. In the example below the code will be pasted into a Gutenberg shortcode block.
Not sure how to add the shortcode to your site? We can assist you with this step via AccessAlly Support if you use the AccessAlly Theme. All other themes and page builders are 3rd party tools. You’ll reach out directly to that company for support.
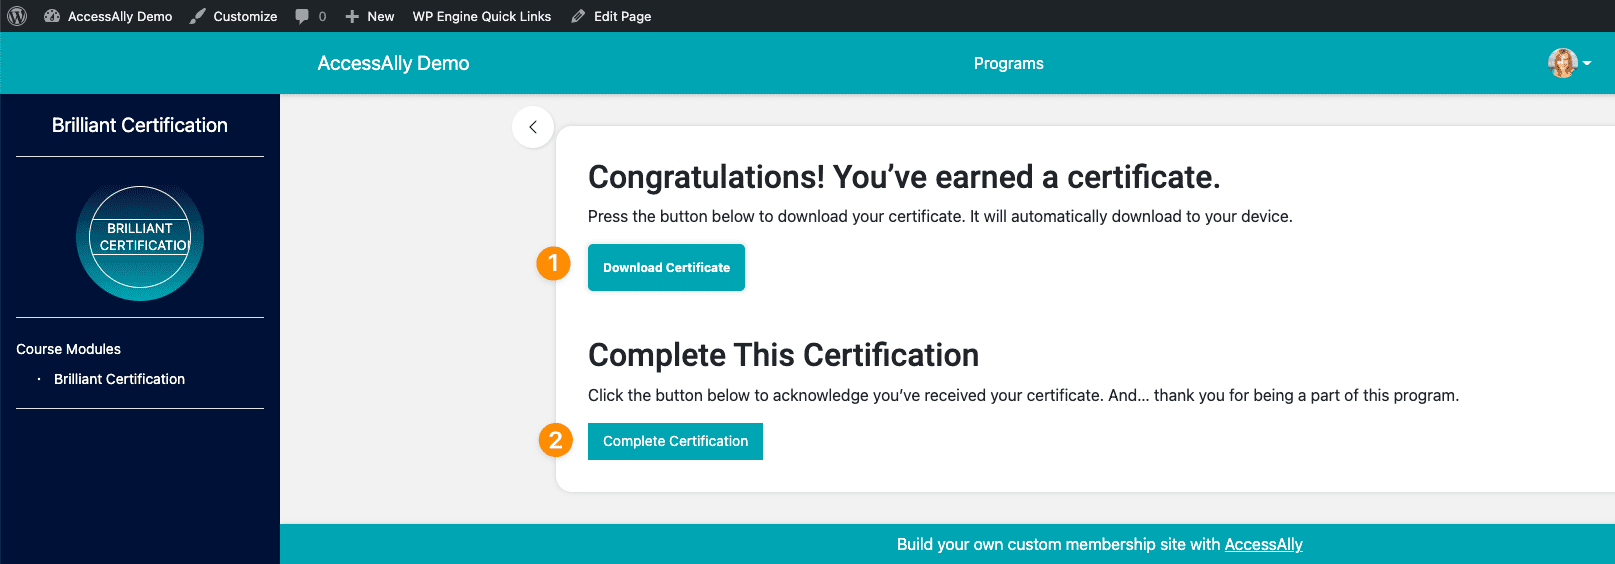
Front End View: What this page looks like with the interaction added. You can also add content to this page like a welcome message or video to make this page more inviting.
- The Download Certificate Interaction
- Optional: Remove a tag Custom Operation displayed as a button once clicked this removes access to the offering and redirects the member to a new page.
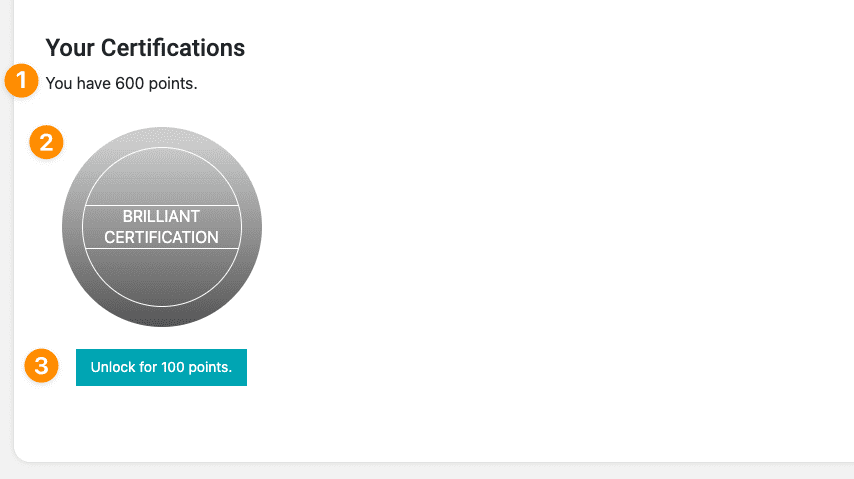
Step 7: Display the Certificate Offering
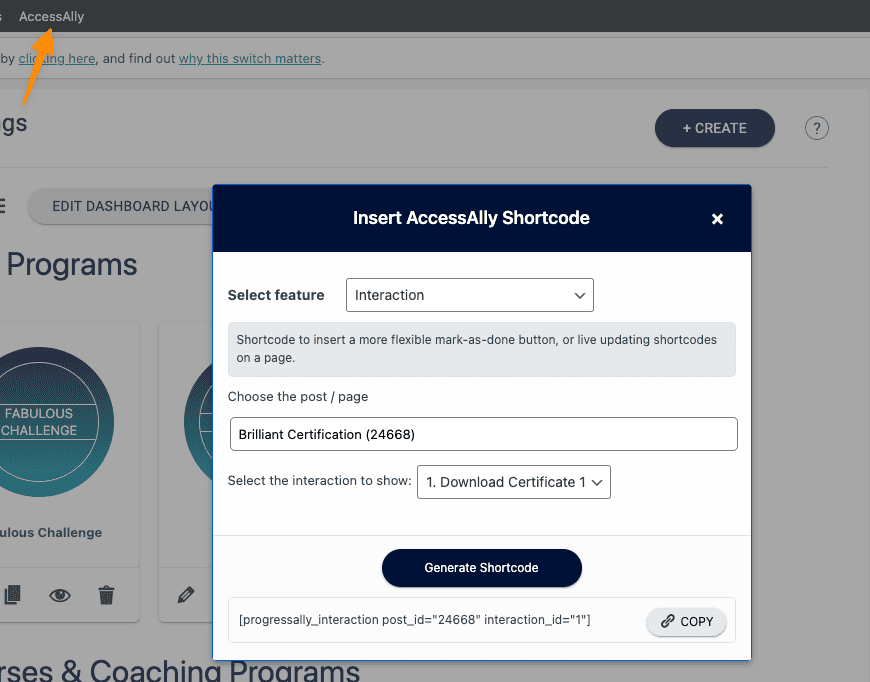
Now it’s time to use the AccessAlly Shortcode Generator to get the codes you’ll need to display the Certificate Offering. You’ll add the shortcodes below to the page on your site you would like your members to visit to purchase access with points.
- Points Balance* > use the Custom Field Value for Operation option along with the custom operation you use to INCREASE points for your points system. This is optional if you would like a member to see how many points they have along with the icon.
- Offering icon > for the offering that you have added your certificate to.
- Custom Operation > for the DECREASE Points Custom Operation you created in Step 2 at the beginning of this article.
As an admin on the site, you may notice that you are not able to see all of these options when you view the front end of your site – do not panic! You will create a test user to test this workflow and see it as your members will see it in the next step.
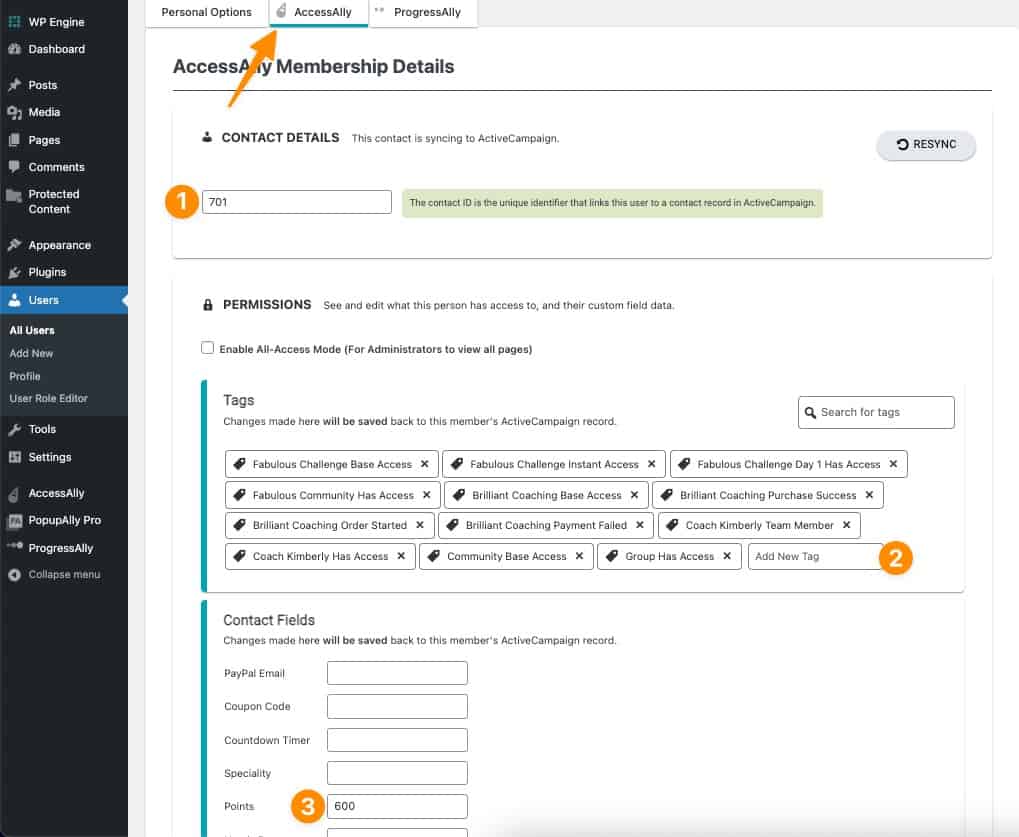
Step 8: Time to Test
YAY, now it’s time to test your setup. When testing you’ll need to make sure that you test with a user that has…
- A number under Contact Details
- Any tags needed to view the page on the site that they buy the certificate with points.
- Enough points to see the purchase button.
You can review your test users by going to Users > All Users
What does a successful test look like?
The video at the top of this page shows the member view with a successful test of this article.
