Skill Level: Advanced
There are many different ways that you can create a team with levels inside an AccessAlly site. This is one example.
Scenario: You’ve been approached by a school with a principal that oversees teachers and students. The principal needs to oversee teachers and see student progress while the teachers need to oversee their students.
This scenario is applicable to any relationship where one person oversees the training of others. You’ll always start with the topmost level the one with a single leader.
Heads up! Before diving into this article is it important to note that this workflow is designed for use with a single company where all members are known to each other. it is not dynamic for multiple companies.
In our example within a school the Principal, Teachers, and Students are all able to know each other.
If you are selling to businesses where each company should not know of other companies your trainings have been sold to we recommend the tiered team setup in this article.
ARTICLE CONTENT:
What does this look like?
The article was created on a site using the AccessAlly Theme with images created in Canva.
What you’ll need before creating a tiered team setup
AccessAlly Version: AccessAlly Pro or above
Offerings: At least one offering that the principals will give access to for the teachers and one offering that teachers will give access to all students. You can create as many offerings as you would like, but you’ll need at least one of each to get started.
What you’ll have after creating a tiered team setup
Offerings: Principal Team Offering, Teacher Team Offering
Directories: A Principal Directory (shows teachers and students) and a Teacher Directory (shows students)
Custom Operations: “x” number of custom operations or team interactions depending on your unique programs.
Step 1: Create the Principal Team Offering
The Principal Team Offering creates a portal where the principal can add teachers and view their progress.
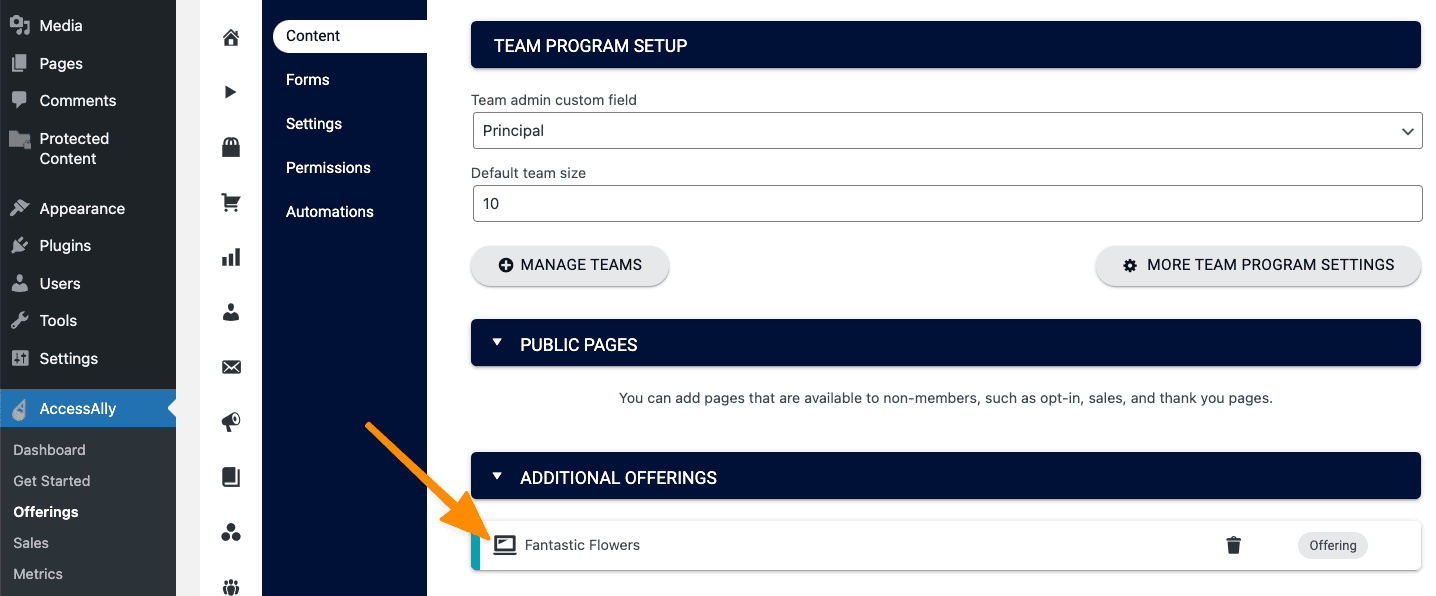
Part 1: Add a Team Center Offering
Go to AccessAlly > Offerings > +NEW and follow the steps to create a Team Center. This offering will be for the Principal.

It is very important to note that this offering will need a unique custom field that is not used in any other offerings! Reusing custom fields for more than one team will result in member data being overwritten.

Part 2: Add Additional Offerings
In the content section of your new Principal Team, you’ll nest the offerings that all teachers get access to inside your site.
*If you do not add additional offerings the teachers will not have access to any content to get started with.
Part 3: Publish the Principal Team Offering Pages
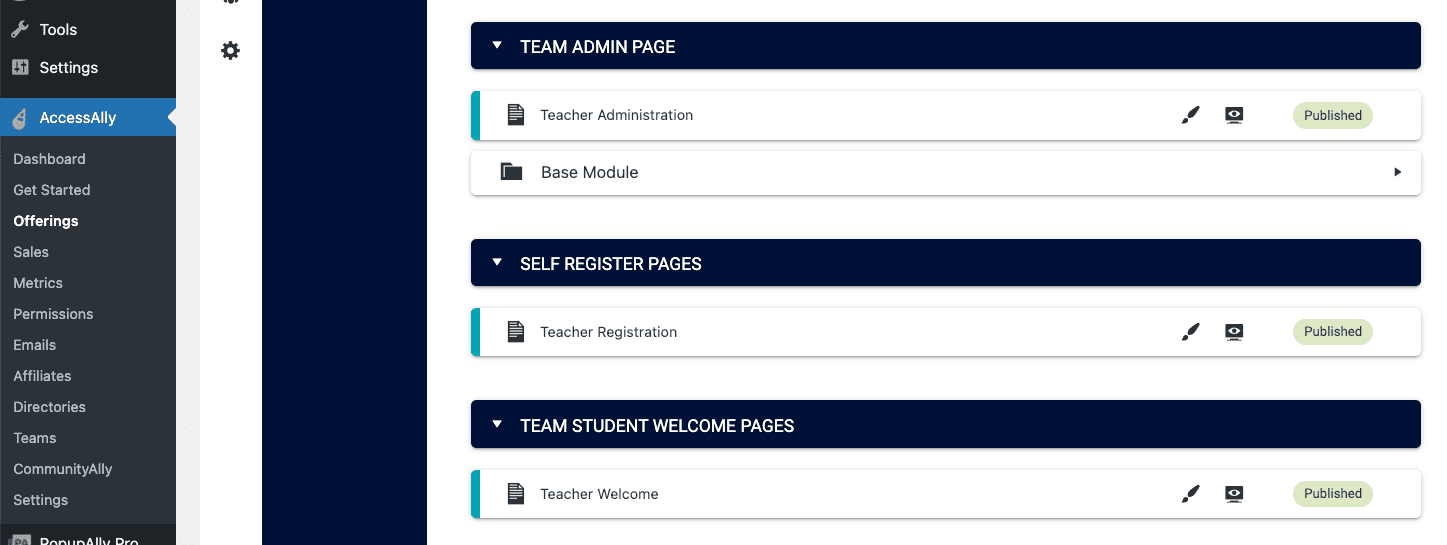
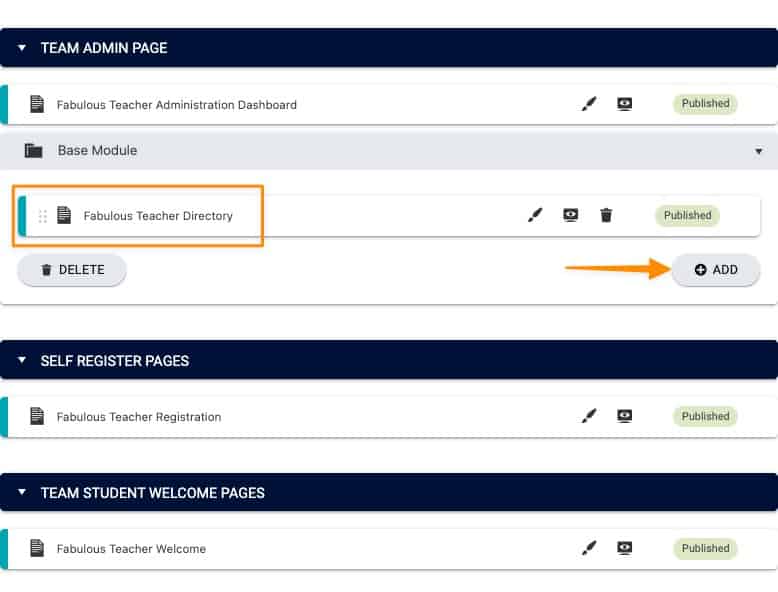
The Principal Team will have three very important pages. All of these pages should be published before selling this offering to the principal.
- The Administration Dashboard – where the principal adds and manages their teachers.
- The Registration Page – the teacher uses this page to self-register for the principal’s team.
- The Welcome Page – a new teacher is redirected to this page when they complete the self-registration process. This page can be used to share important information the teacher needs to know. The teacher will only see this page after the self-registration process is successful.
Don’t forget to save your changes!
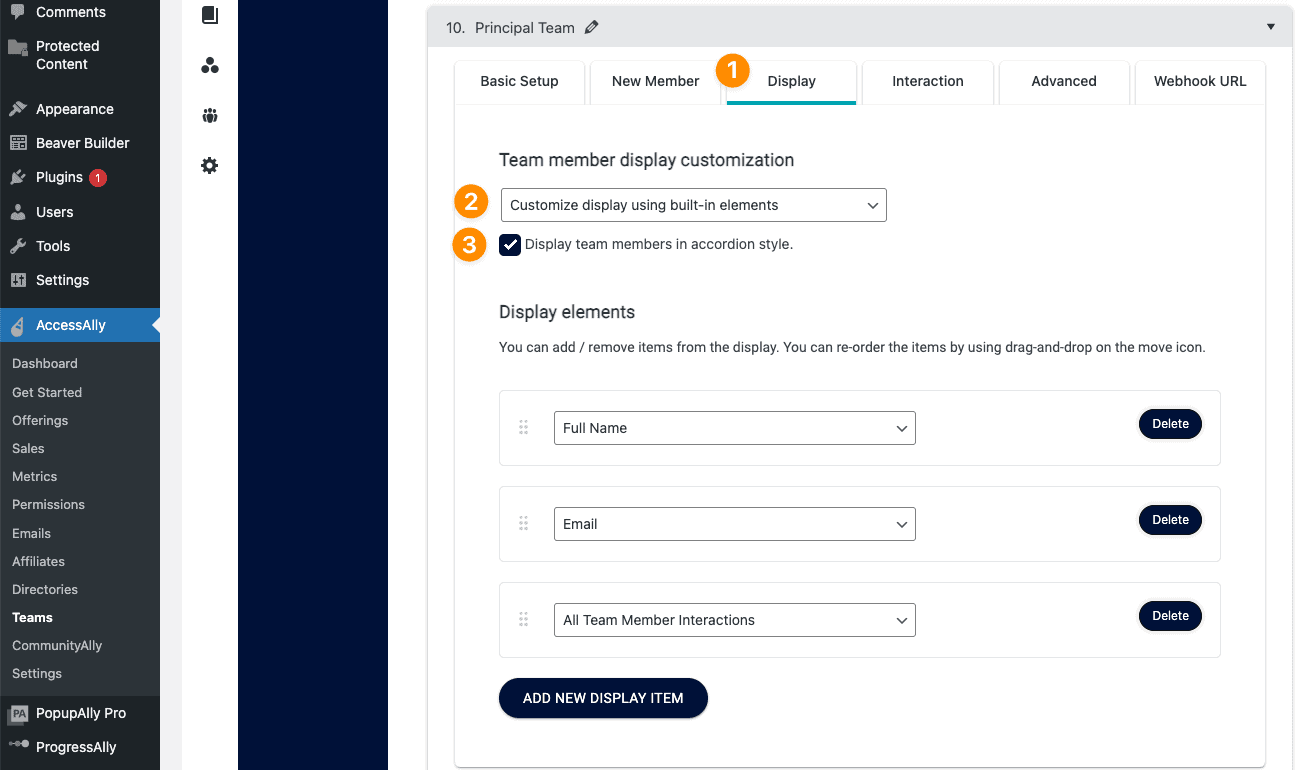
Part 4: Adjust the Principal Team Display to Accordion Style
Go to AccessAlly > Teams > Programs tab and open the dropdown by the Principal Team.
- Click the Display tab
- Under the Team member display customization setting choose to customize the display using built-in elements
- Check the “Display team members in accordion style” box. This allows for an easier principal administration page view if there are large numbers of teachers that will be added.
This is also a great time to Set Up Interactions so the Principal Team Leader can initiate interactions with the Teacher Team Member(s).
Step 2: Create the Teacher Team Offering
The Teacher Team Offering creates a portal where teachers can add their students and view student progress.
Part 1: Add a Teacher Team Center Offering
Go to AccessAlly > Offerings > +NEW and follow the steps to create a Team Center. This offering will be for the Teachers.
It is very important to note that this offering will need a unique custom field that is not used in any other offerings! Do not use the same field that you used for the Principal team as custom fields for a team cannot be shared or the data would be overwritten.
Part 2: Add Additional Offerings
In the content section of your new Teacher Team, you’ll nest the offerings that the students will get access to inside your site. *If you do not add additional offerings the students will not have access to any content to get started with.

Part 3: Publish Teacher Team Pages
The Teacher Team will have three very important pages. All of these pages should be published before selling this offering to the principal.
- The Administration Dashboard – the teacher can manually add students, see student progress, or grab the self-registration link to send students if they need to self-register.
- The Registration Page – where a student can self-register for access to the offerings provided by the teacher.
- The Welcome Page – after self-registration students are redirected to this page. This page is only shown to the students when they have successfully registered.
Don’t forget to save your changes!
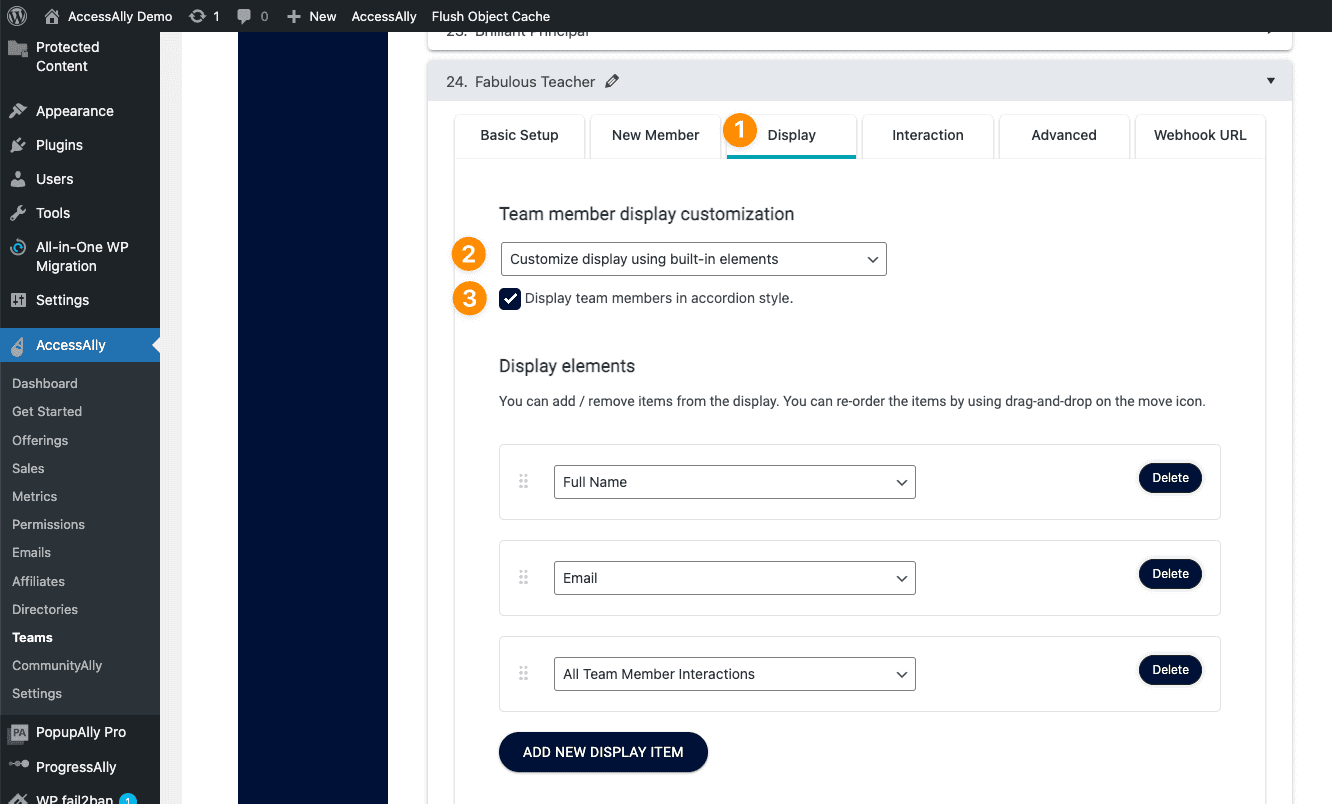
Part 4: Adjust the Teacher Team Display to Accordion Style
Go to AccessAlly > Teams > Programs tab and open the dropdown by the Teacher Team.
- Click the Display tab
- Under the Team member display customization setting choose to customize the display using built-in elements
- Check the “Display team members in accordion style” box. This allows for an easier teacher administration page view if there are large numbers of students that will be added.
This is also a great time to Set Up Interactions so Teacher Team Leaders can initiate interactions with Team Member Student(s).
Step 3: Create a Principal Directory
The Principal Directory is used to display both teachers and students in a central location to allow for the principal to easily see the progress and any other important details at a quick glance.
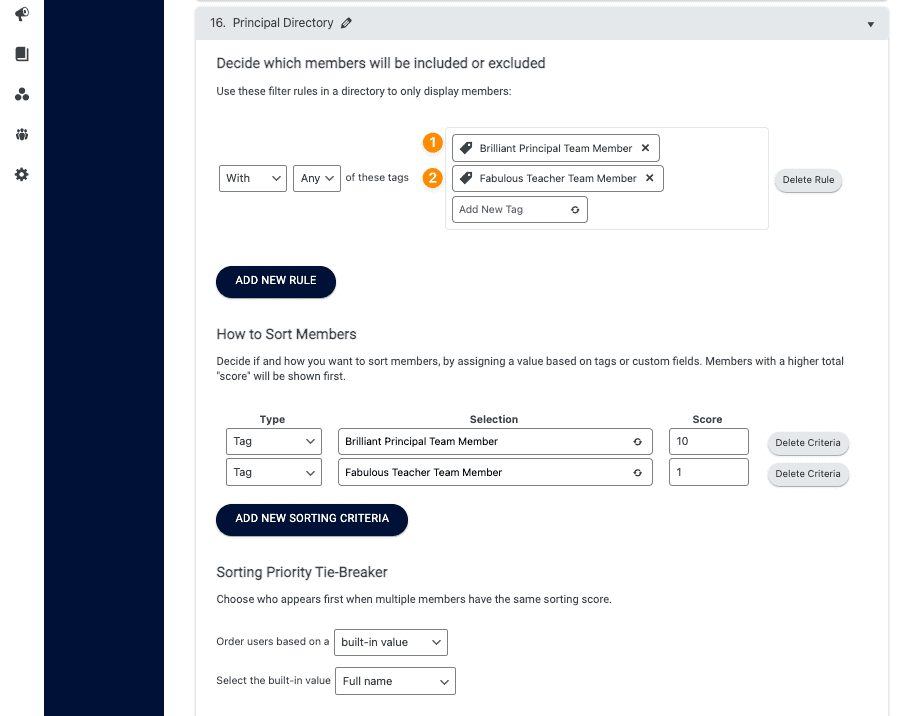
Part 1: Add a Principal Directory Filter
Go to AccessAlly > Directories > Filters and add a new filter.
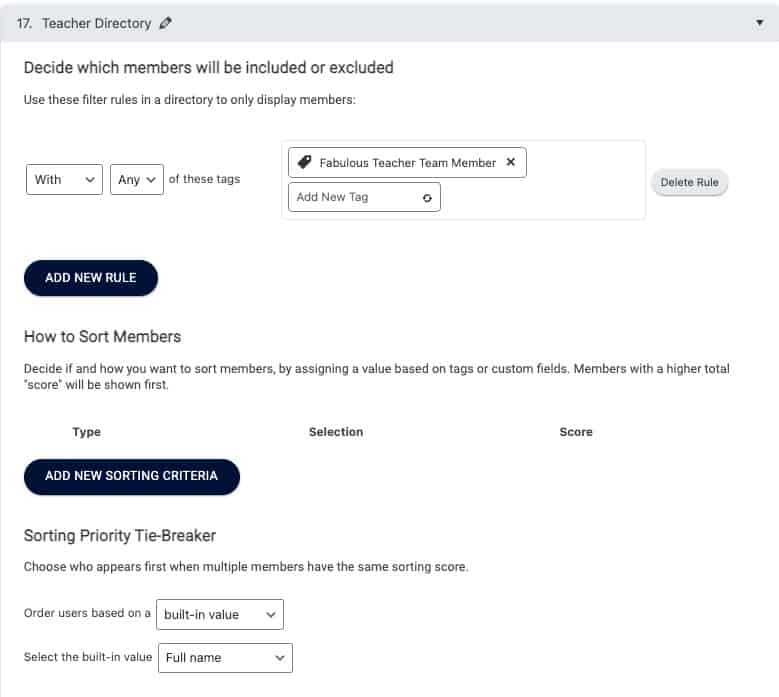
This filter will use the Team Member tags for your Principal Team and Teacher Team. You can also use the How to Sort Members section to pull all teachers to the top of this directory by assigning them a higher score.
Part 2: Add a Teacher Directory Filter
Go to AccessAlly > Directories > Filters and add a new filter.
This filter will use the Team Member tags for your Teacher Team. This allows all students to be displayed in the directory.
Part 3: Add a Principal Directory
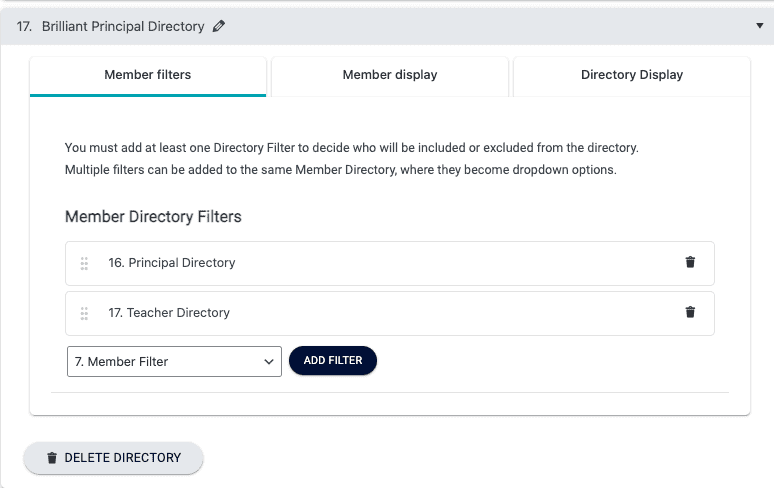
Go to AccessAlly > Directories > Directories tab to create a New Directory.
You will add a new directory by adding your Principal Directory Filter AND your Teacher Directory Filter. This will pull all teachers and students into this directory. You can season the member display and directory display to taste so you show exactly what you want to the Principal via this directory.
Part 4: Add a Teacher Directory
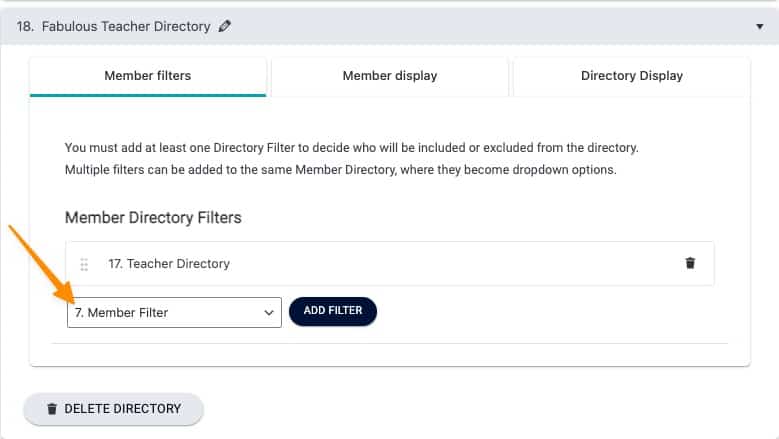
Go to AccessAlly > Directories > Directories tab to create a New Directory.
You will add a new directory using only the Teacher filter. This filter will pull all students into the directory. You can season the member display and directory display to taste so you show exactly what you want to the Teachers via this directory.
Part 5: Add the Principal Directory to the Principal Team Offering
Go to AccessAlly Offerings and select the offering you created for the Principal. In the Content tab, you’ll add a new BASE page. This page will hold the AccessAlly shortcode for the Principal Directory.
You can use the AccessAlly shortcode generator to find this shortcode.
After saving this setup, you’ll go to the Settings tab and make sure that you select the option to have an AccessAlly created menu to use with this offering. The Team Offering template does not automatically generate a menu. The principal will need to see this page in order to view the directory.

Here is an example of what the Directory looks like when teachers and students have been added. Remember you can create the exact display that you would like for this directory.
Part 6: Add the Teacher Directory to the Teacher Team Offering
Go to AccessAlly Offerings and select the offering you created for the Teachers. In the Content tab, you’ll add a new BASE page. This page will hold the AccessAlly shortcode for the Teacher Directory.
You can use the AccessAlly shortcode generator to find this shortcode.
After saving this setup, you’ll go to the Settings tab and make sure that you select the option to have an AccessAlly created menu to use with this offering. The Team Offering template does not automatically generate a menu. The teacher will need to see this page in order to view the directory.
Here is an example of what the Teacher Directory looks like. Remember you can create the exact display that you would like for this directory.
Results
Here’s how this scenario works from the front-end view of the Principal, Teacher, and Students.
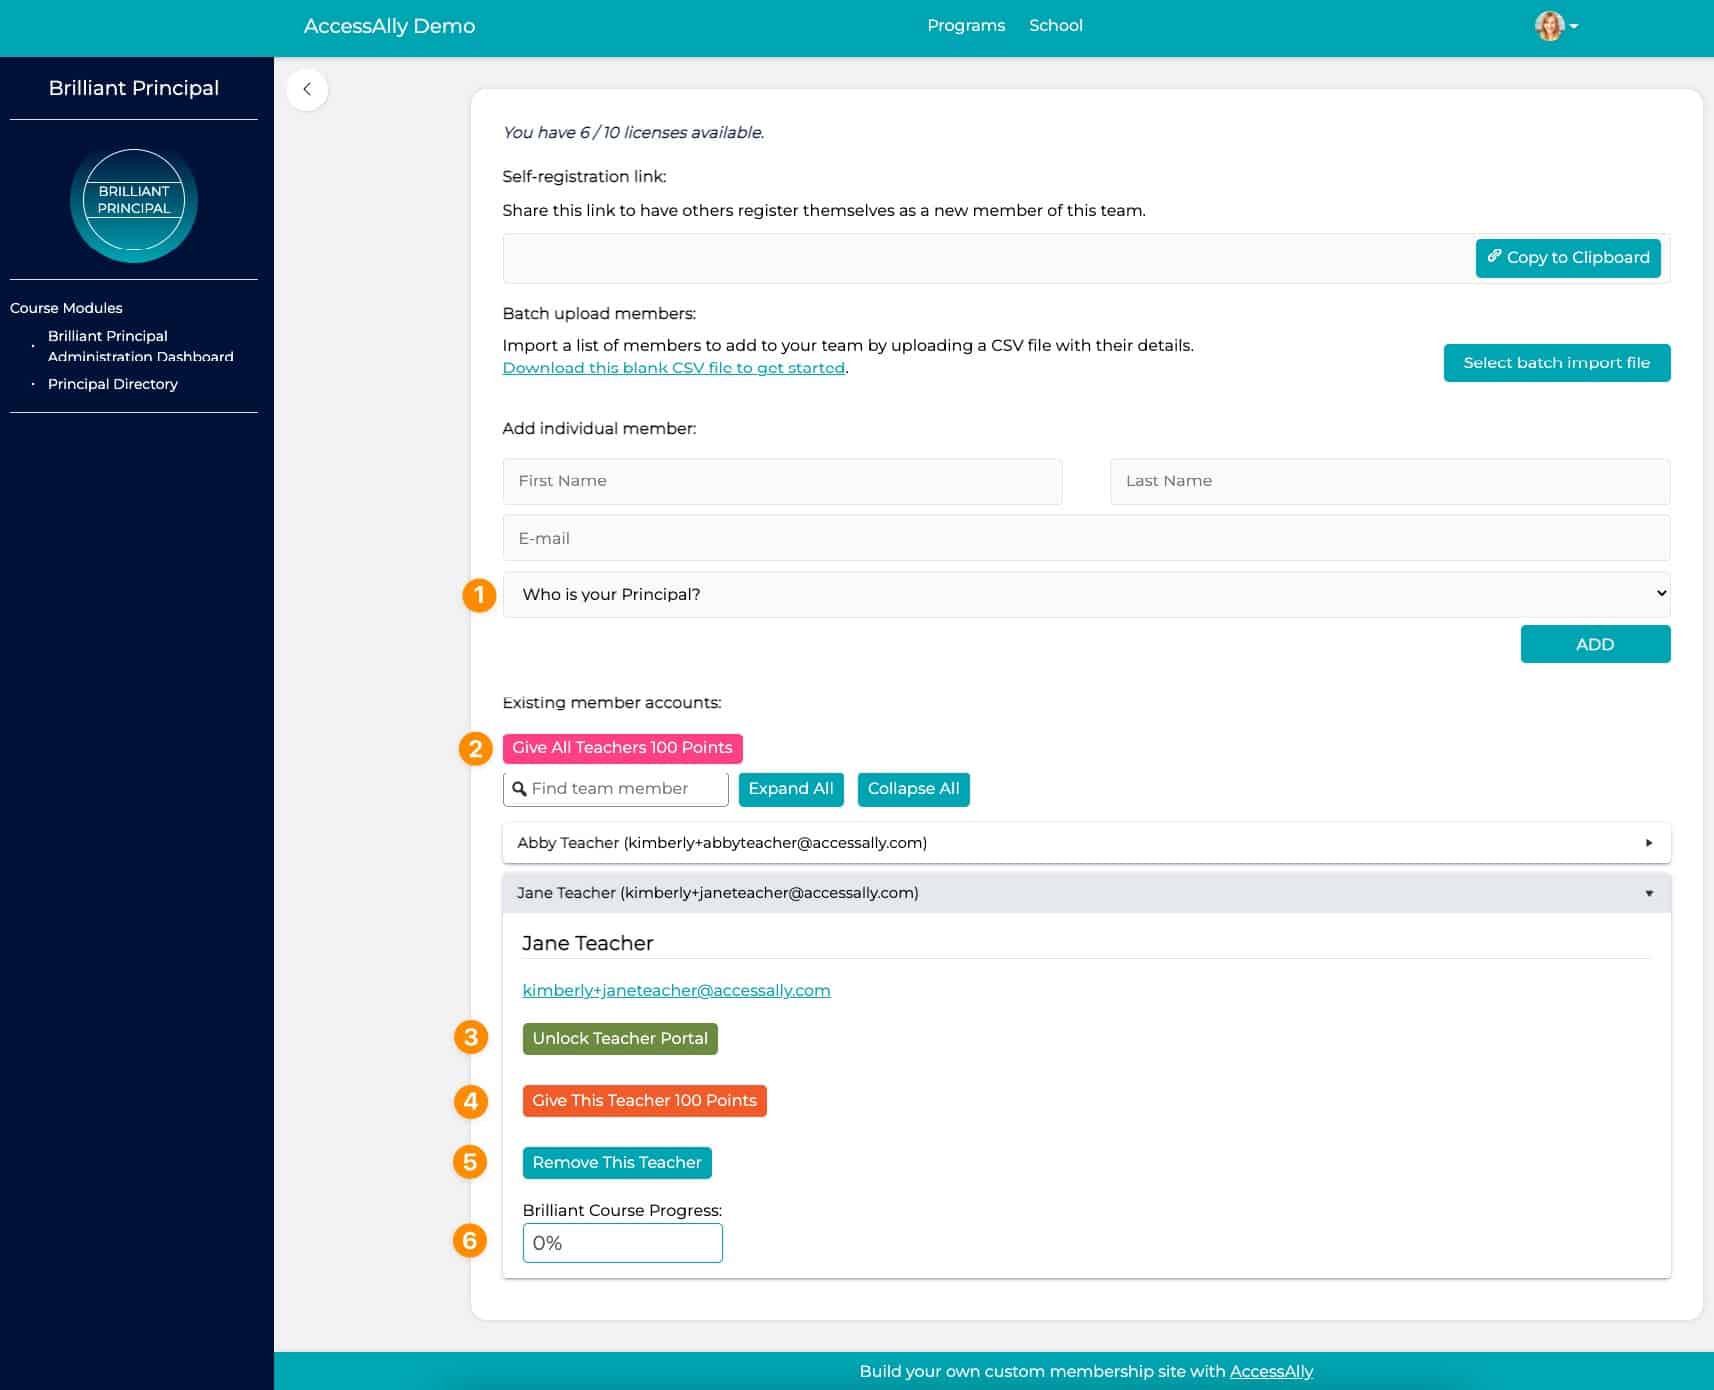
What the Principal Sees:
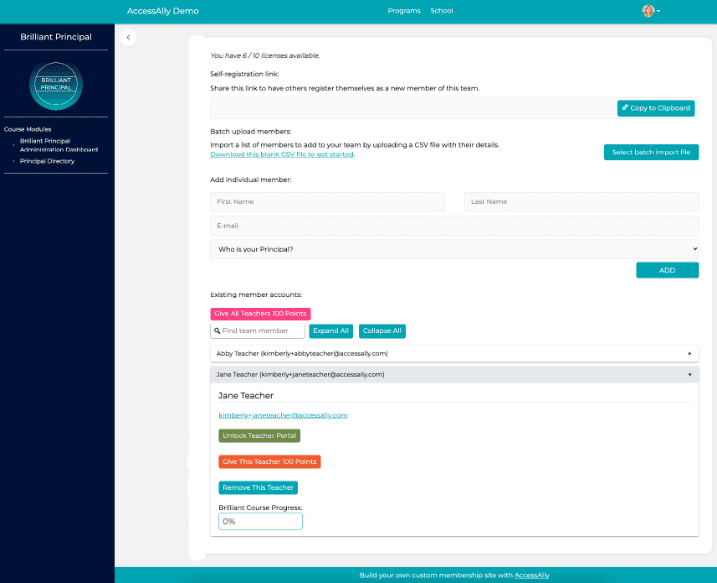
The Principal Team Administration Dashboard – all teachers (Members) are shown. The Principal can sort by the teacher’s name and/or open and collapse all the available options for each teacher.
In the example image below you’ll see how you could use your team display options to create the Principal Administration Dashboard.
- Add a Custom Field to the Team Display to capture the Principal’s name (so a Principal can quickly find all of their Teachers on a Directory.)
- A team Interaction button allows the Principal (Leader) to give points to all Teacher (Members) at one time. Click here to see how!
- A Team Interaction custom operation allows a Principal (Leader) to give the Teacher (Member) access to the Teacher Administration Dashboard.
- A Team Interaction (custom operation) allows the Principal (Team Leader) to give points to a single Teacher(s). Click here to see how!
- A Remove button option that allows the Principal (Team Leader) to remove a Teacher (Team Member) if they are no longer with the school.
- A ProgressAlly option that allows the Principal (Team Leader) to see the Teacher (Team Member) progress inside an Offering.
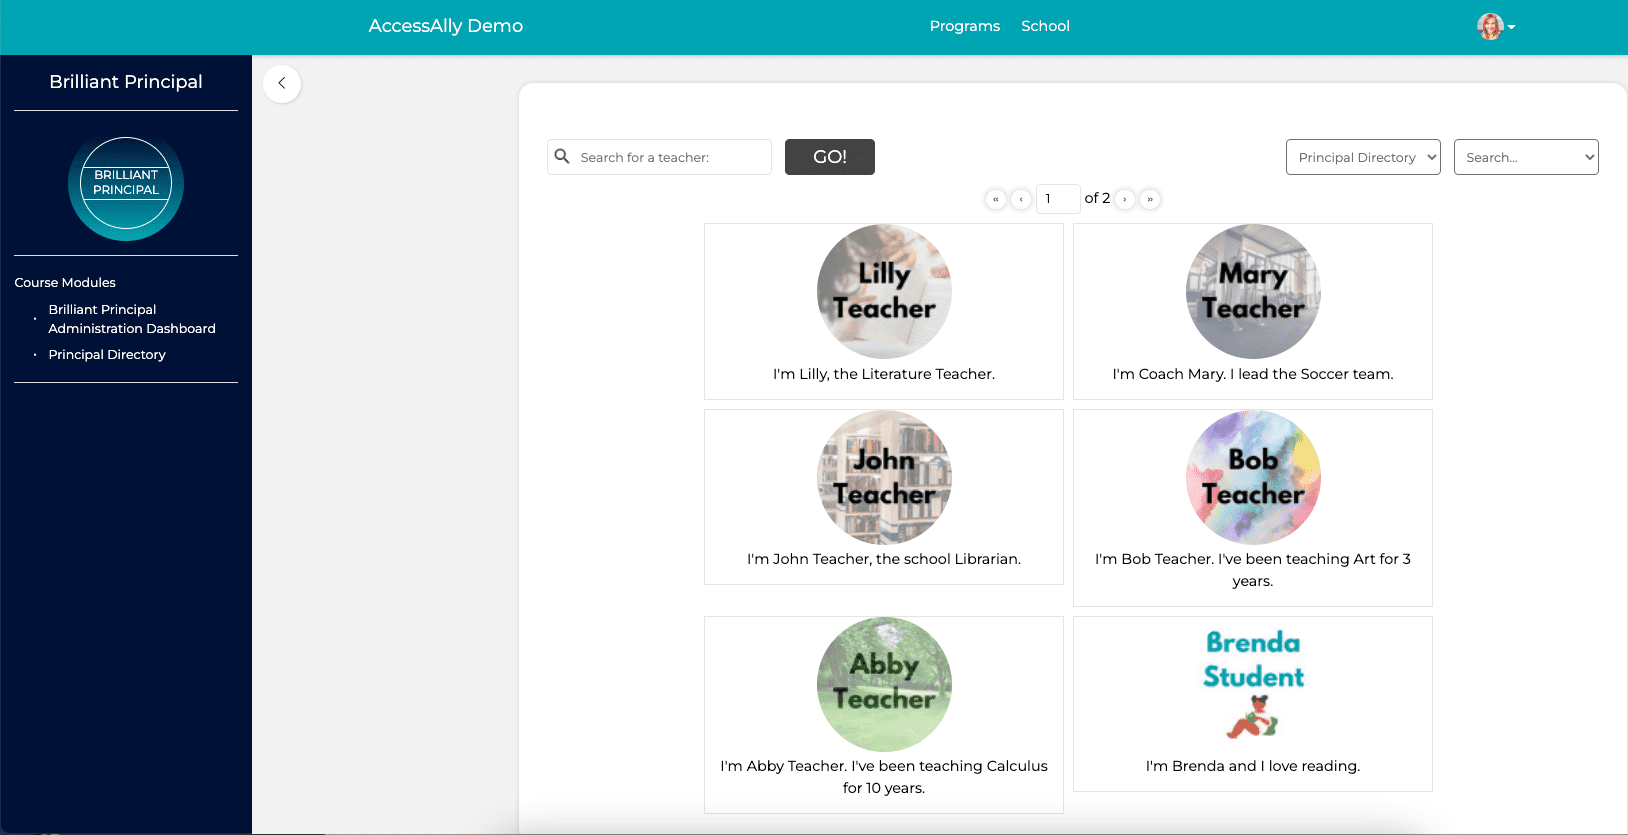
The Principal Directory
All teachers and students. With any member display options that you’ve added to the directory.
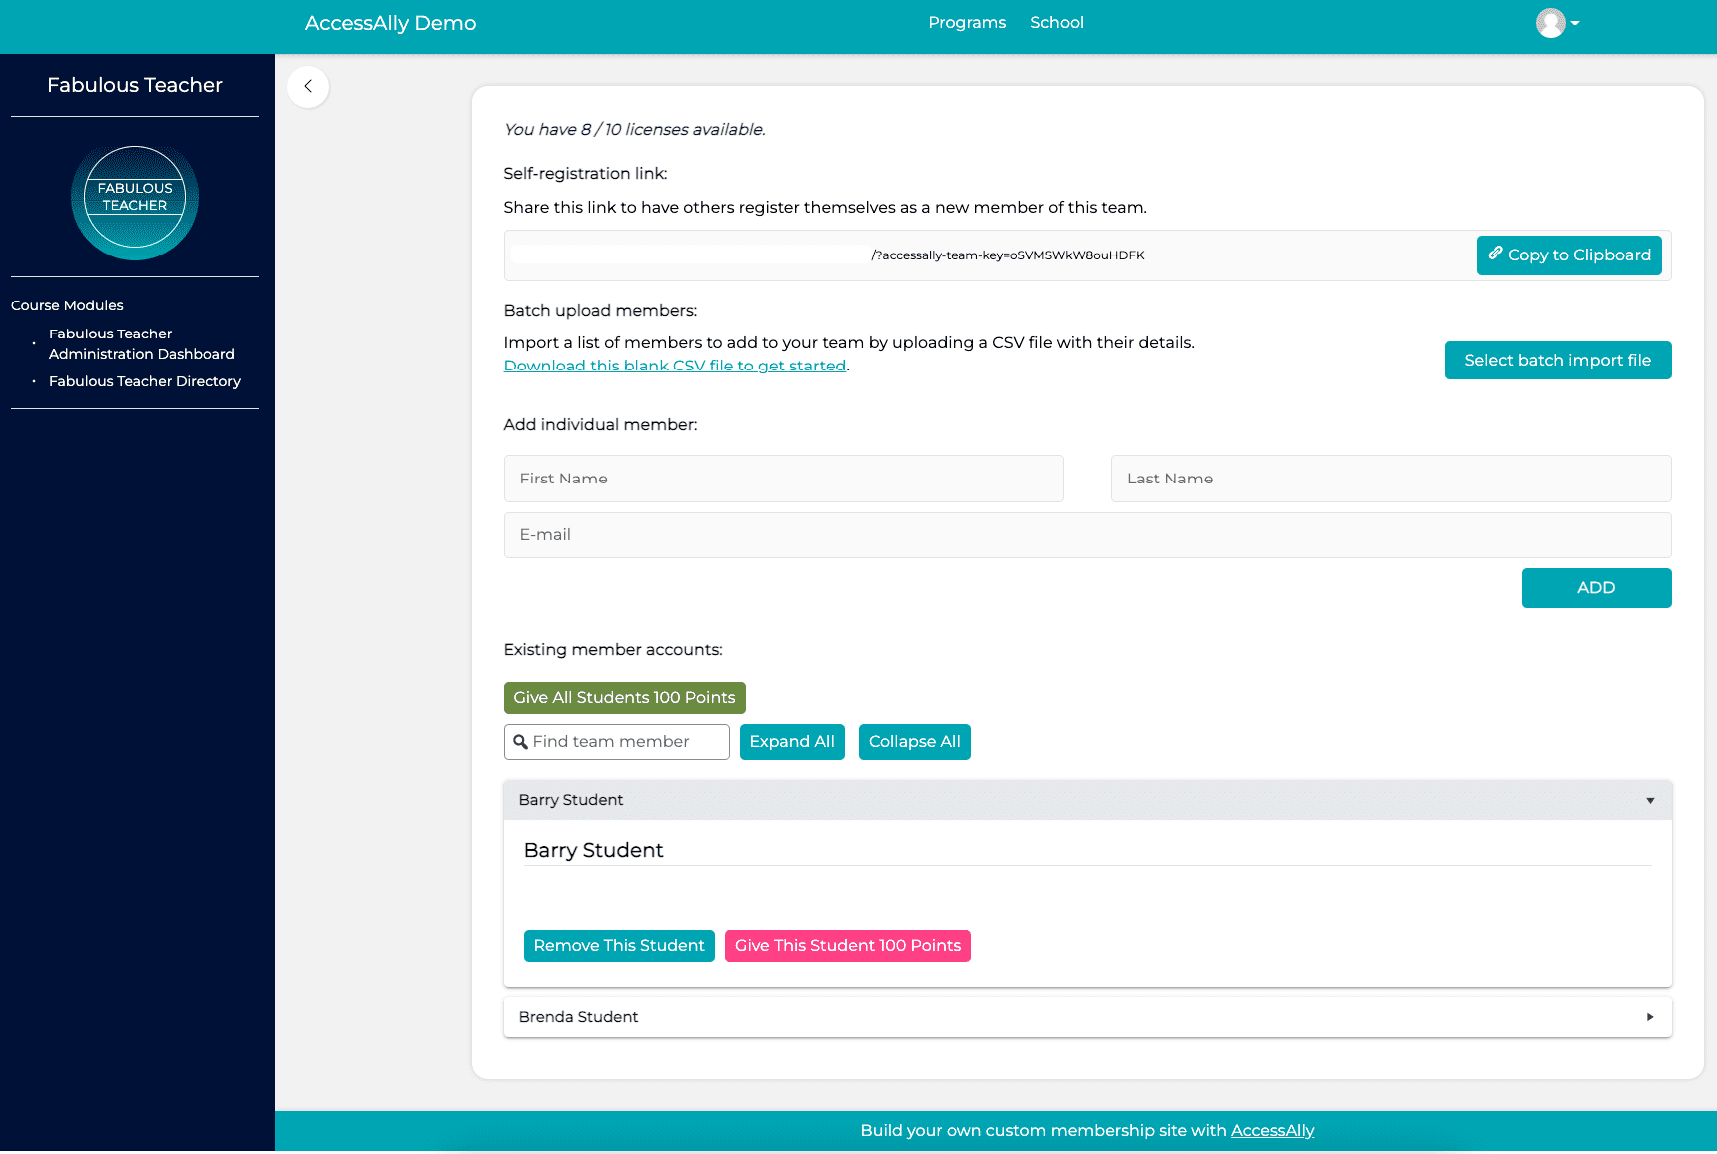
What the teachers see.
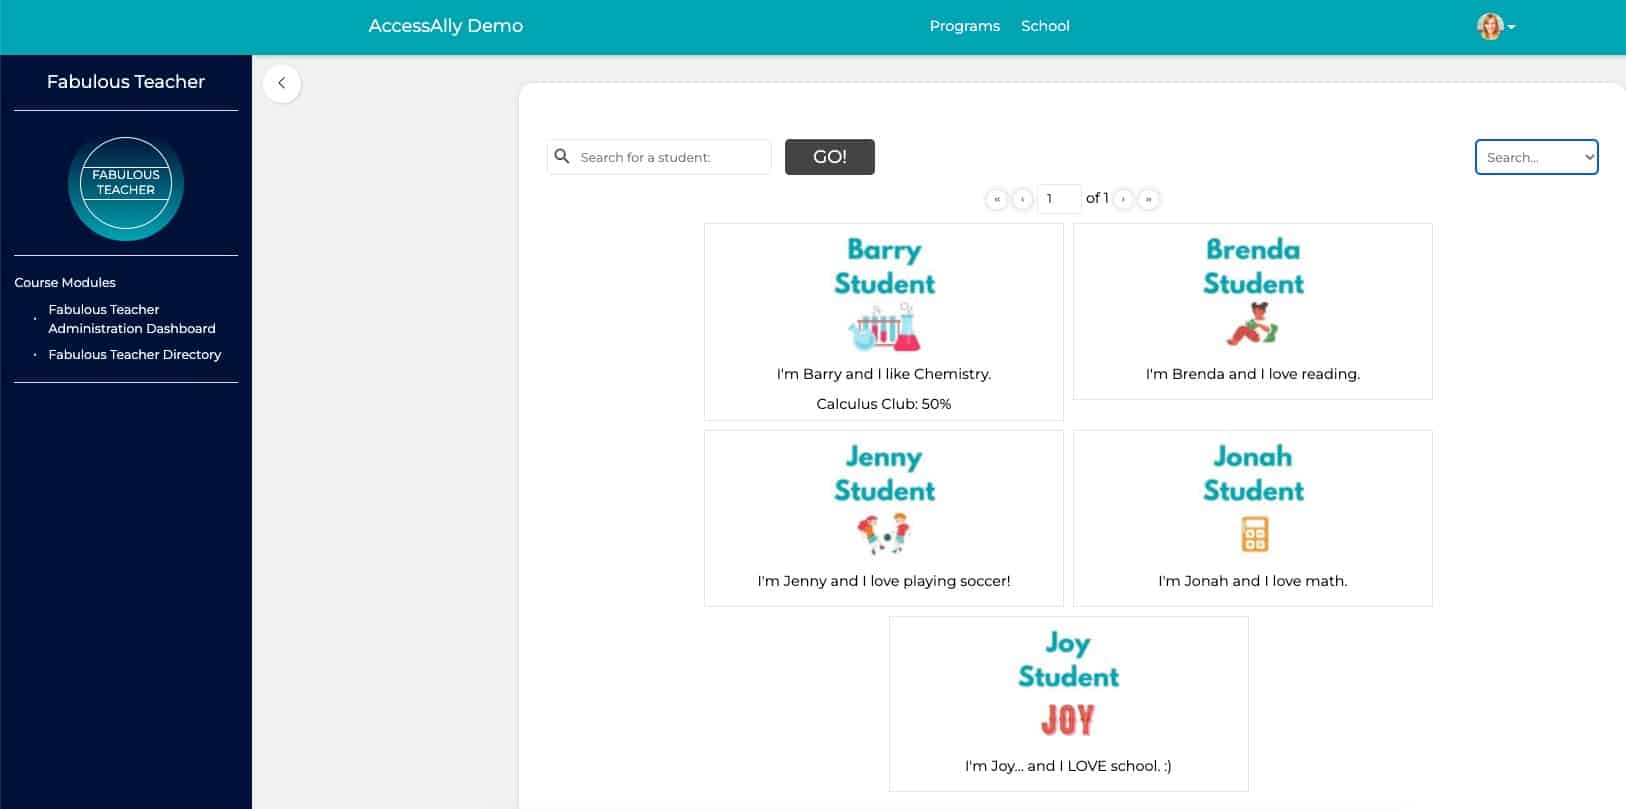
The Teacher Team Administration Dashboard – all students are shown. The Teacher can sort by the student’s name and/or open and collapse all the available options for each student.
In the example image below you’ll see team interactions have been added to the Teacher Administration Dashboard so teachers can reward students with points. Click here to see how.
The Teacher Directory view where all students are displayed to all teachers.