Skill Level: All
There are many different ways you can deliver an online summit using AccessAlly. This is one example.
Scenario: In this article you’ll create a free 5-day online summit with an option for participants to upgrade to a paid all access pass for $27.
ARTICLE CONTENT:
Video Walkthrough of Online Summit Offering
Watch our workshop on creating an Online Summit Offering with AccessAlly.
Create Your Summit Offering
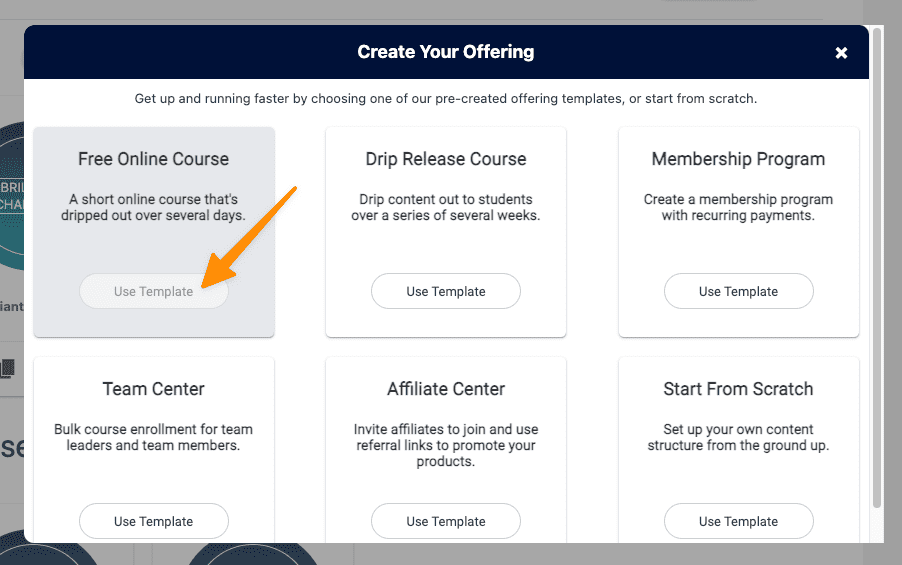
Step 1: Go to AccessAlly > Offerings > “+ ADD” button > Use the Free Online Course template > when prompted Name Your Summit
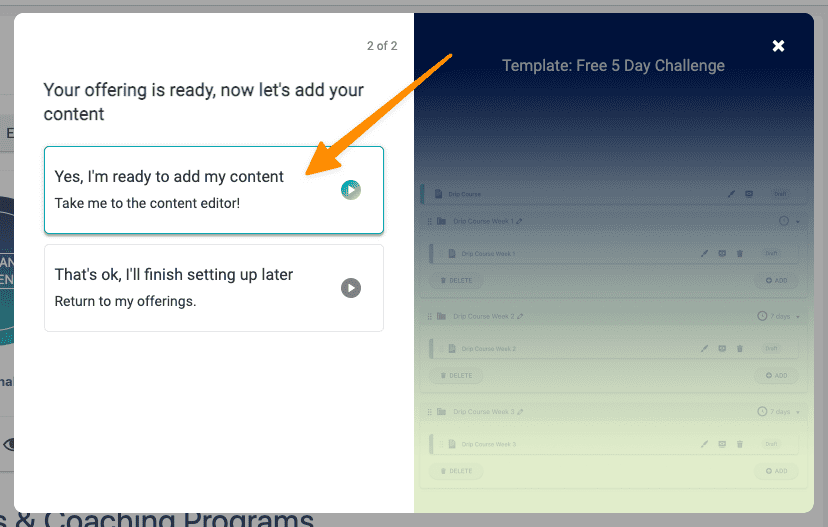
Step 2: Your free summit offering is ready… click “Yes, I’m ready to add my content”
The Content Tab
The top “Content” tab in the blue sidebar is where you create your summit pages. This section has three parts:
Public Pages
This step is optional. You do not have to create public pages to go with your online summit offering. You can come back to this step later if you decide to add these in.
You could use a public page if you want to create an invitation page, landing page, or info page that you send people to so they can find out about your summit. AccessAlly does not lock public pages down so this is perfect for any pages you would like someone to see when you’re marketing your summit BEFORE they sign up.
Click “+ ADD” in the top corner to add a public page.
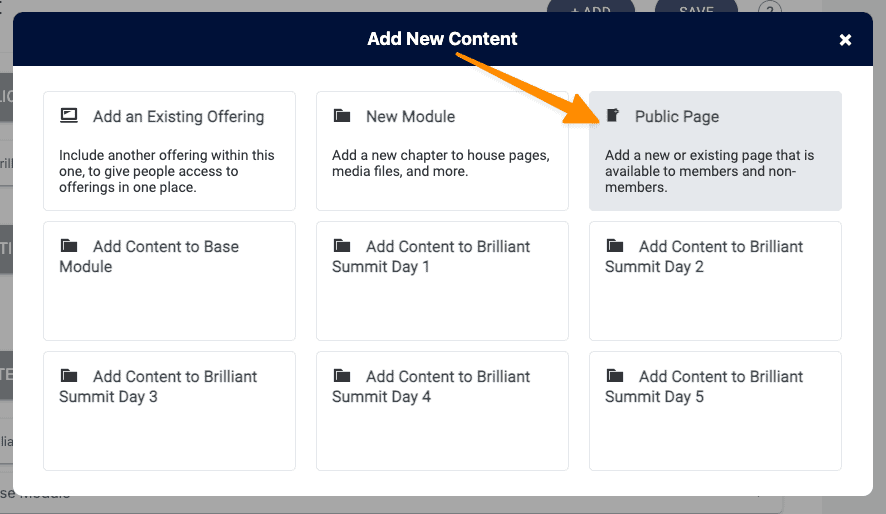
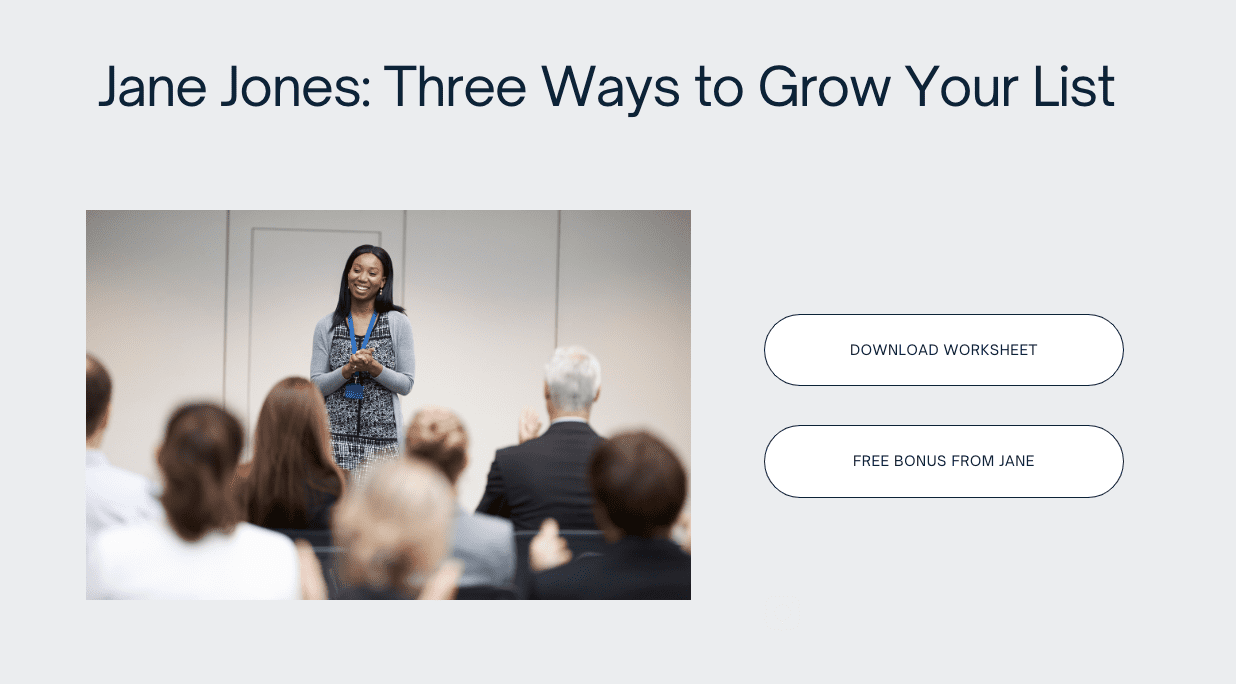
Here is an example of adding a public invitation page to your summit offering.
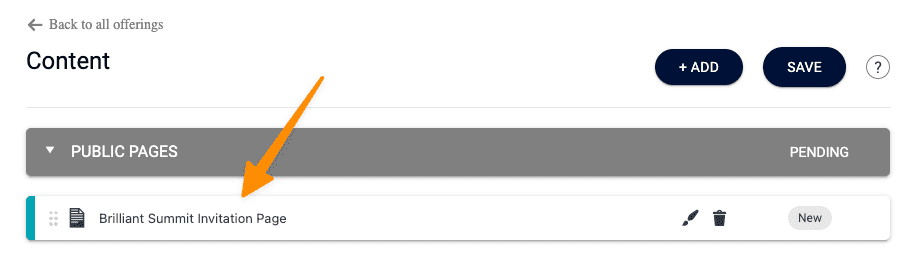
Clicking on the brush icon will take you to the public WordPress page so you can design using your WordPress theme and/or page builder.
Please note! You build this design look and feel of this page using your WordPress theme and/or page builder. If using the AccessAlly Theme choose the “page without sidebar” template.

Additional Offerings
This step is optional. This step is optional. You can come back to this step later if you decide to add additional offerings to your free online summit.
How to use Additional Offerings: You could use Additional Offerings to give your summit participants a free bonus for signing up like a summit workbook or complimentary course.
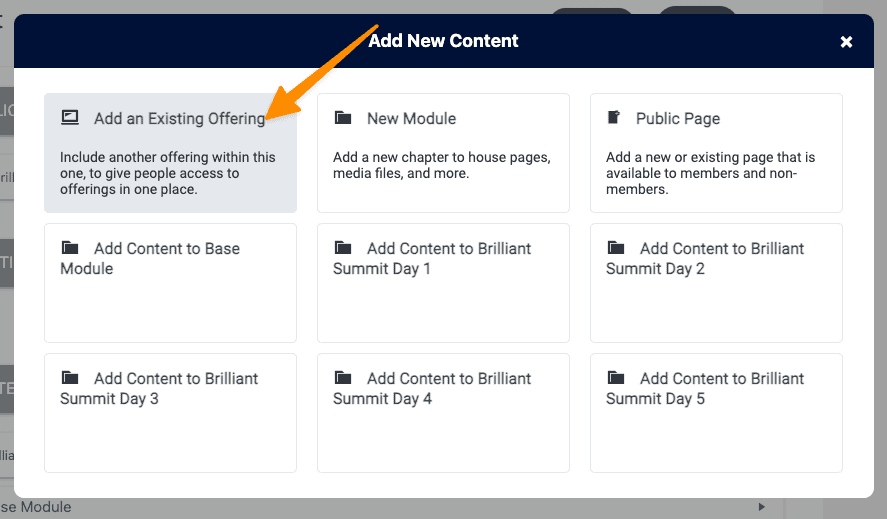
If you have an existing offering you would like to add to your summit offering you can select the offering from the dropdown.
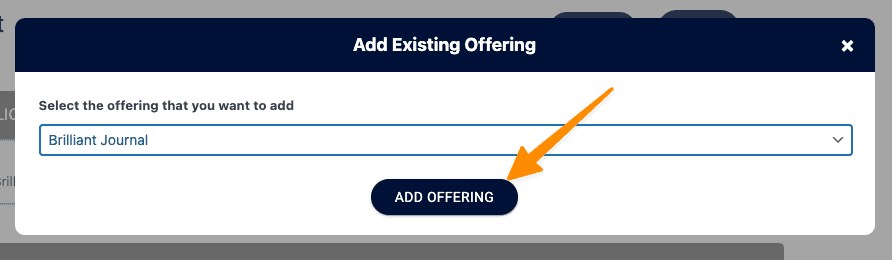
The additional offering will be automatically unlocked (or dripped) to your summit participants.
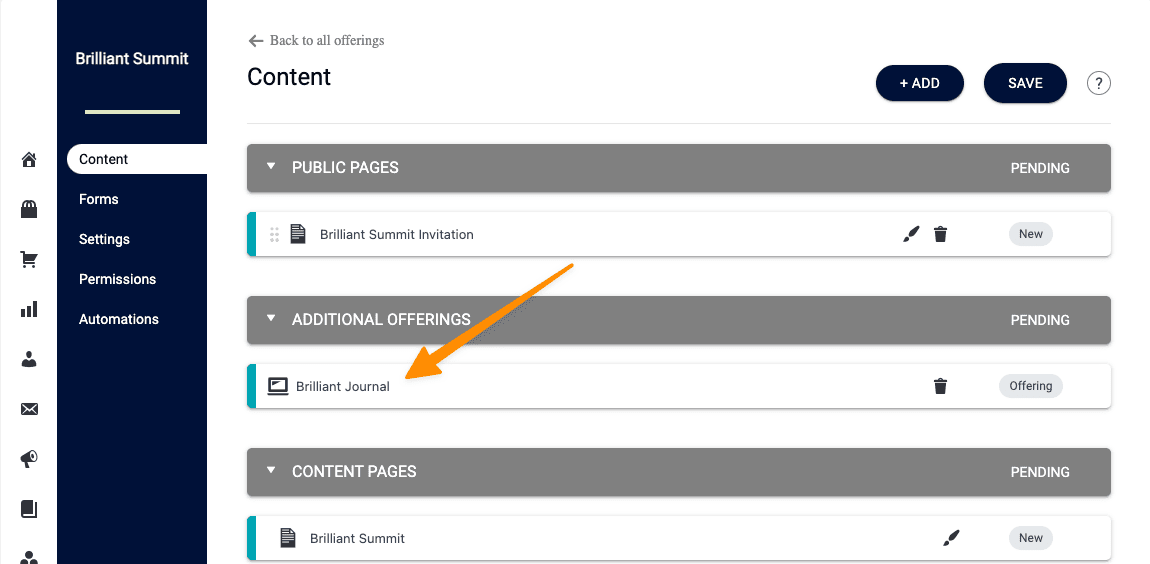
As participants join your summit they will see the additional offerings you have added on the dashboard page of your site.
- Your Summit Offering
- Additional Offering

Content Pages
Now it is time to review the pages participants will see inside your summit. The offering template has already created these pages for you.
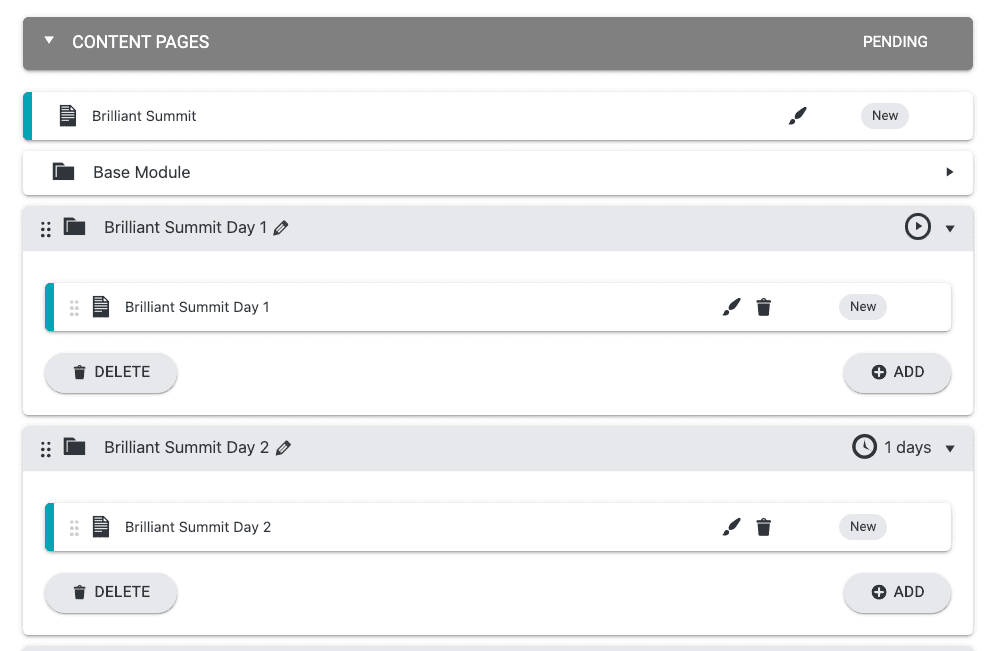
Below you’ll find a breakdown of the content pages and how they work.
The first page in the Content Pages section is the summit welcome page. This page is used to share what the experience will be like in the summit. You will find this page at the top of the content pages section right above the Base Module.

Important technical detail: This page must be used and published (not deleted or left in draft mode.) If you do not publish this page the summit participants can not see the summit.
You can add content to this page by clicking the brush icon. Content is added to this page using your WordPress theme and/or page builder.
For more details and real examples of offering welcome pages visit this article.
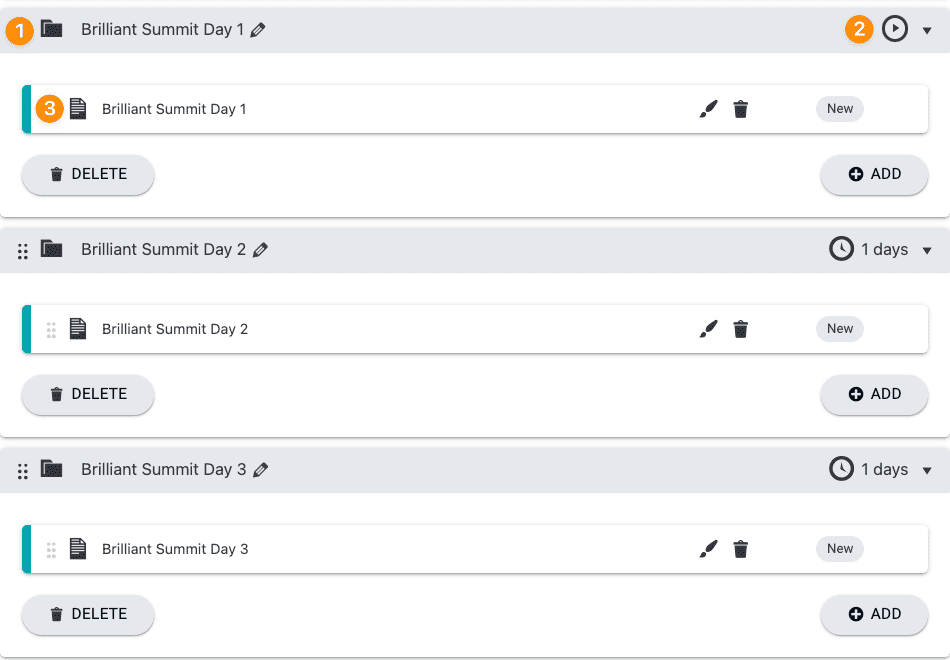
The offering template creates five summit module pages. They are set to be delivered as daily dripped content. You can rename and edit these here before saving your summit offering. You can also add or remove pages if your summit is shorter or longer.
- Module: Click pencil icon to edit. Your module tag names are created in this section. Keep the module names short Name Day 1 as long tag names are hard on the eyes for you and your team!
- Release: Click the timer to edit when this content is released. By default the first day will be immediately released upon signup with a 1 day in between each module.
- Page: Click brush icon to edit. Your page name (URL) is created in this section. We recommend using “Name Day 1″ versus “Name and Really Long Title of This Page That is Descriptive” as this wording will also be in the menu for your summit.
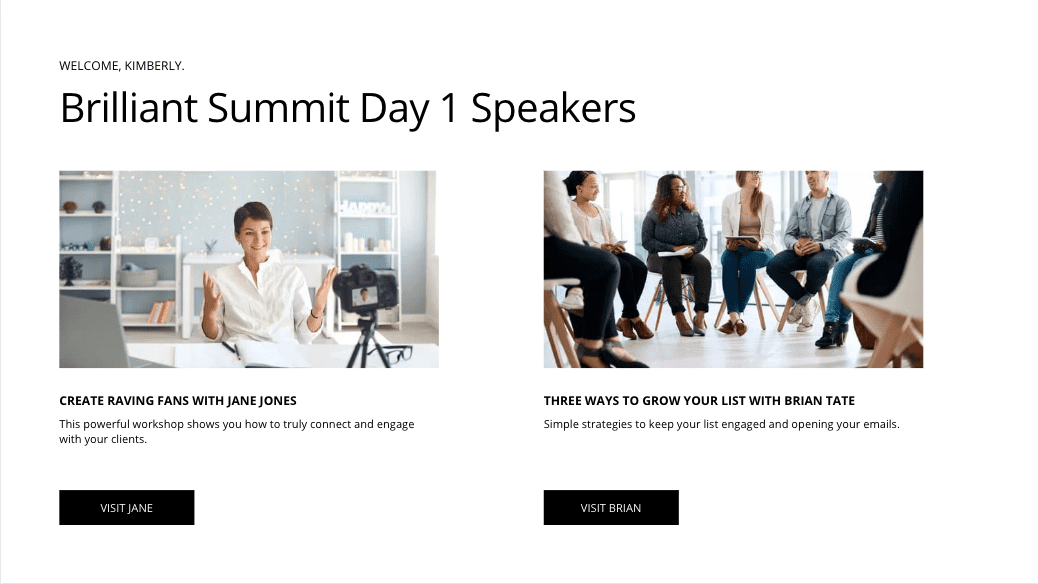
There are two popular options for the setup of your summit speaker pages. Access to these pages will be controlled by AccessAlly, but built/designed using your WordPress theme and/or page builder.
Option 1: The module page features multiple speakers.
This option is quicker as there are less pages to build. If you have a 5 day summit you’ll have 5 module pages. This is the default option.
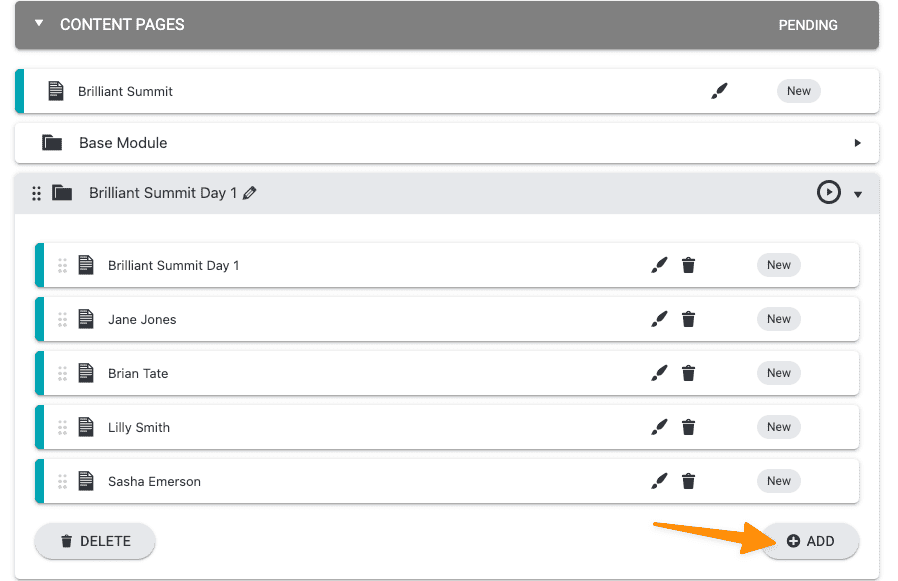
Option 2: Create a new page for each speaker.
This option is the most flexible. It allows you to really showcase your speakers. You’ll create these pages inside your daily module pages.
- Go to the Module Day 1 and open the dropdown.
- Click “+ADD” and add a new page for each speaker.
- Rinse and repeat steps 1 and 2 for the remaining days of your summit.
Here’s an example of an individual speaker page. Remember you build this page using your WordPress theme and/or page builder. AccessAlly controls access to this page.
Forms Tab
Free Access Forms
You can create and customize your summit opt-in forms to gather everything you need and unlock the summit experience for your participants.
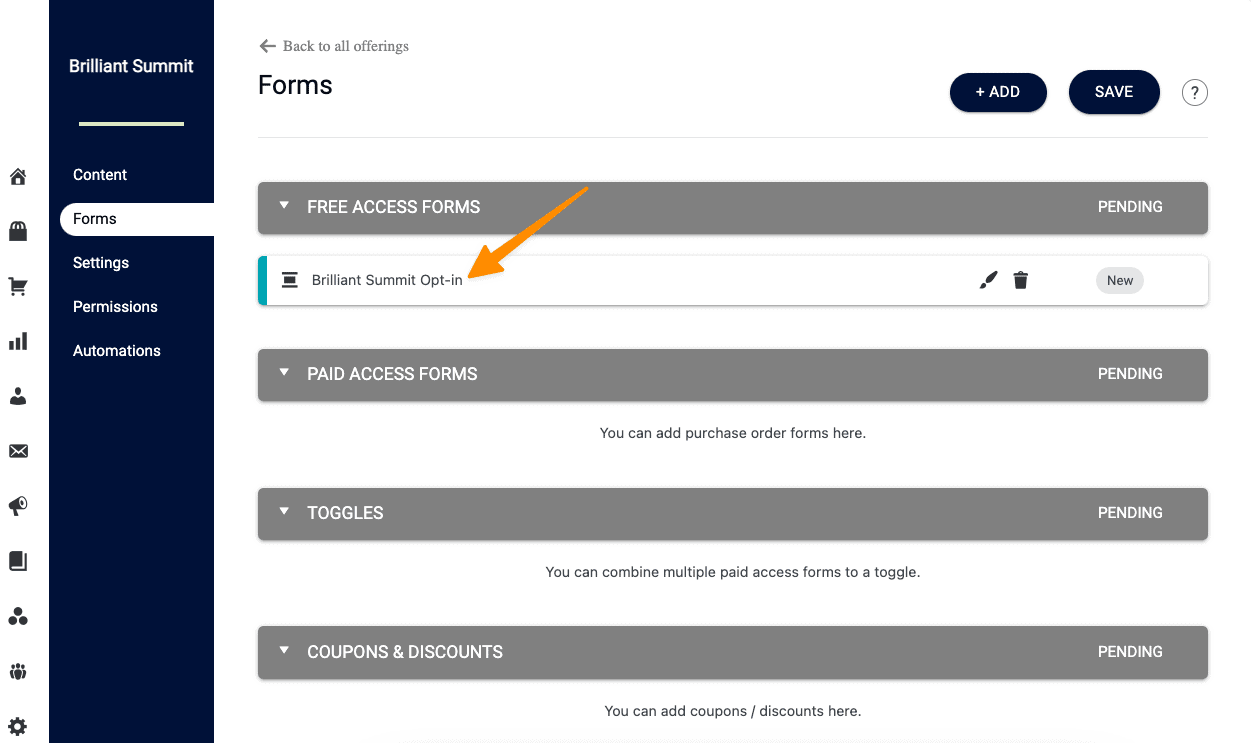
Click on the brush icon above to see important details about the free opt-in form.
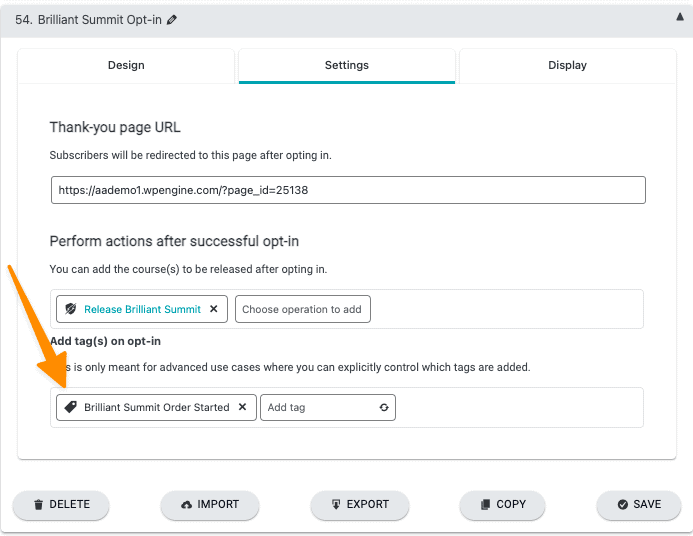
Thank you page URL:
Completing the form will automatically take a new participant to the welcome page of your summit offering. You can change the link in this section if you would like to send them to a thank you page instead.
Perform actions after successful opt-in:
This gives access to the summit using the Release custom operation. This ensures that the content in your summit gets dripped to your participants.
Add tag(s) on opt-in
You can add any tag to this section if you would like your CRM to start a marketing automation for your participants. In the example below the Summit Order Started tag was added.
Tip: This could be used to start a marketing campaign for the paid all access pass.
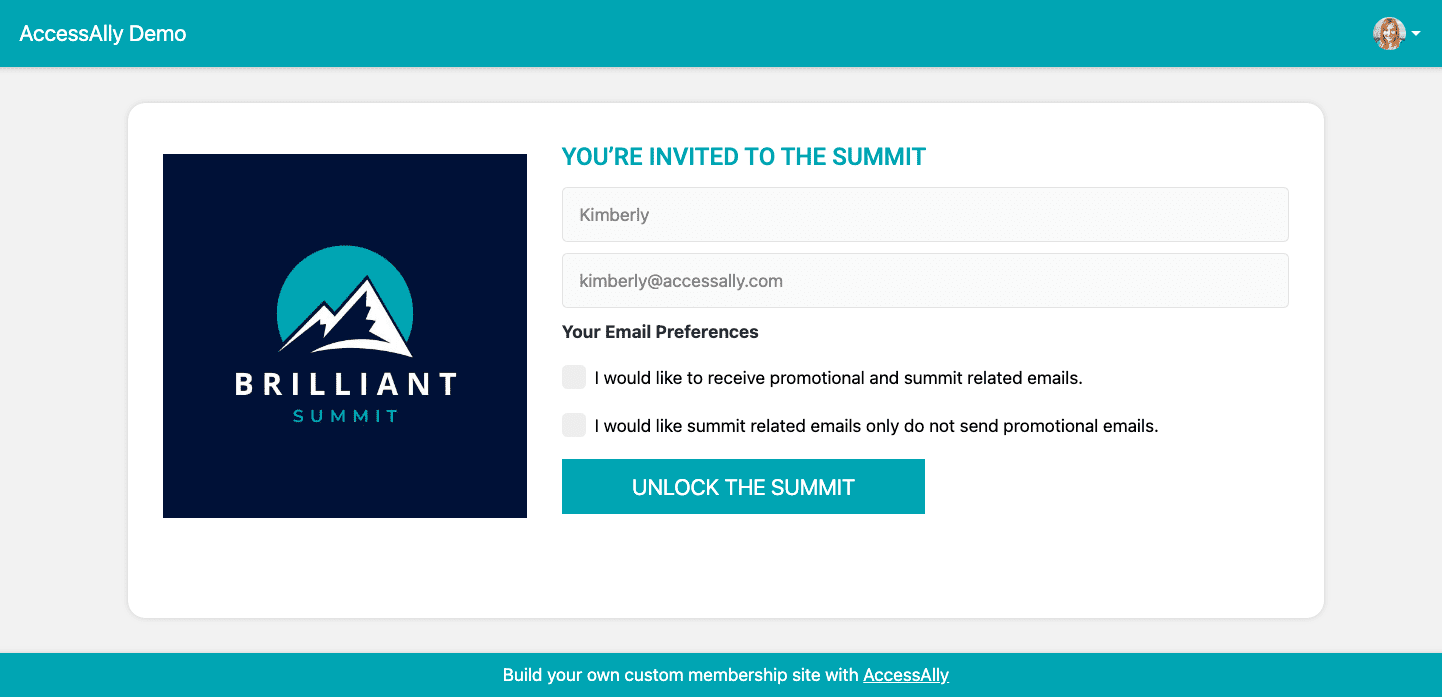
Here is an example of what this form looks like after adding an image to the WordPress page to go along with the form. Remember you can customize the form to your specific needs!
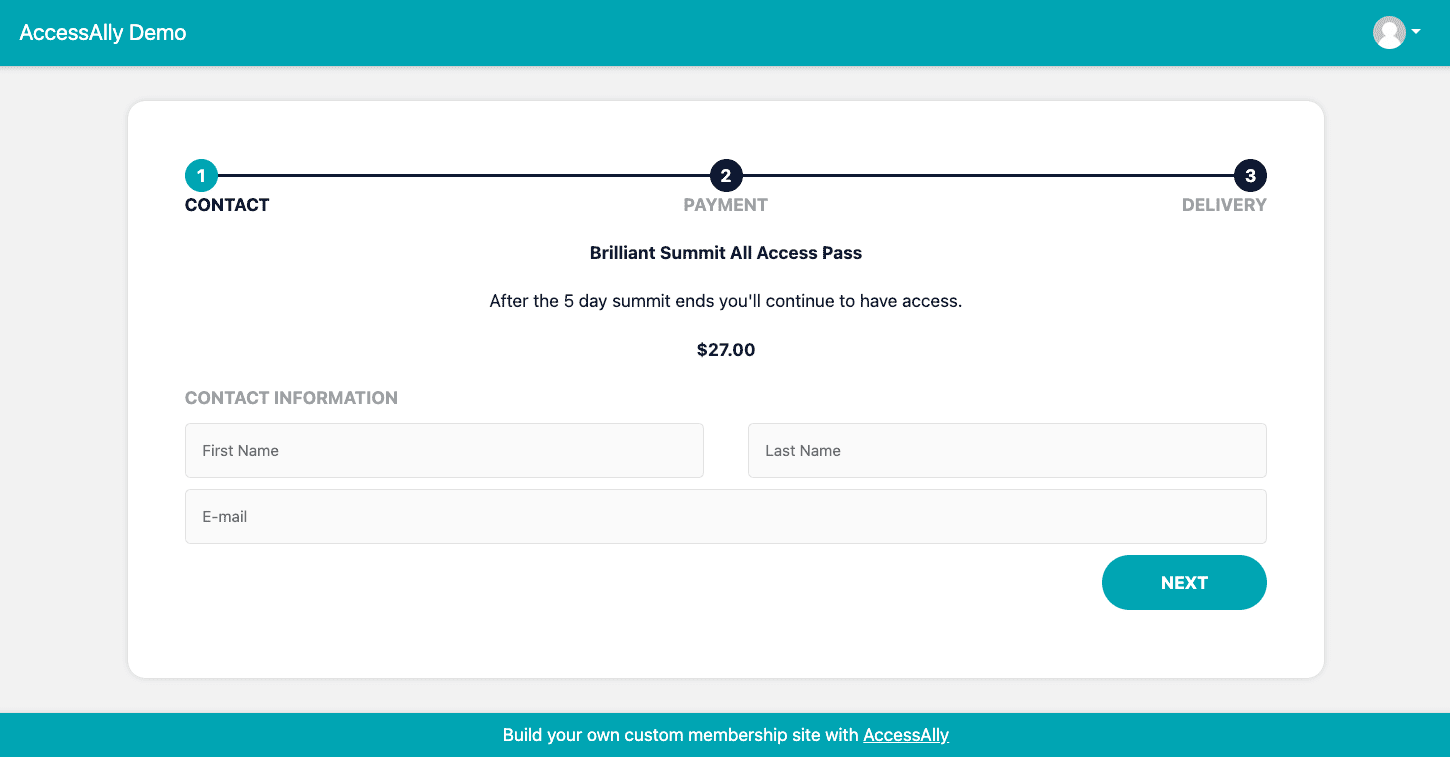
Paid Access Forms
Now it is time to create the paid all access pass option. You can even add additional forms if you would like to offer different prices for your all access pass to market at different times.
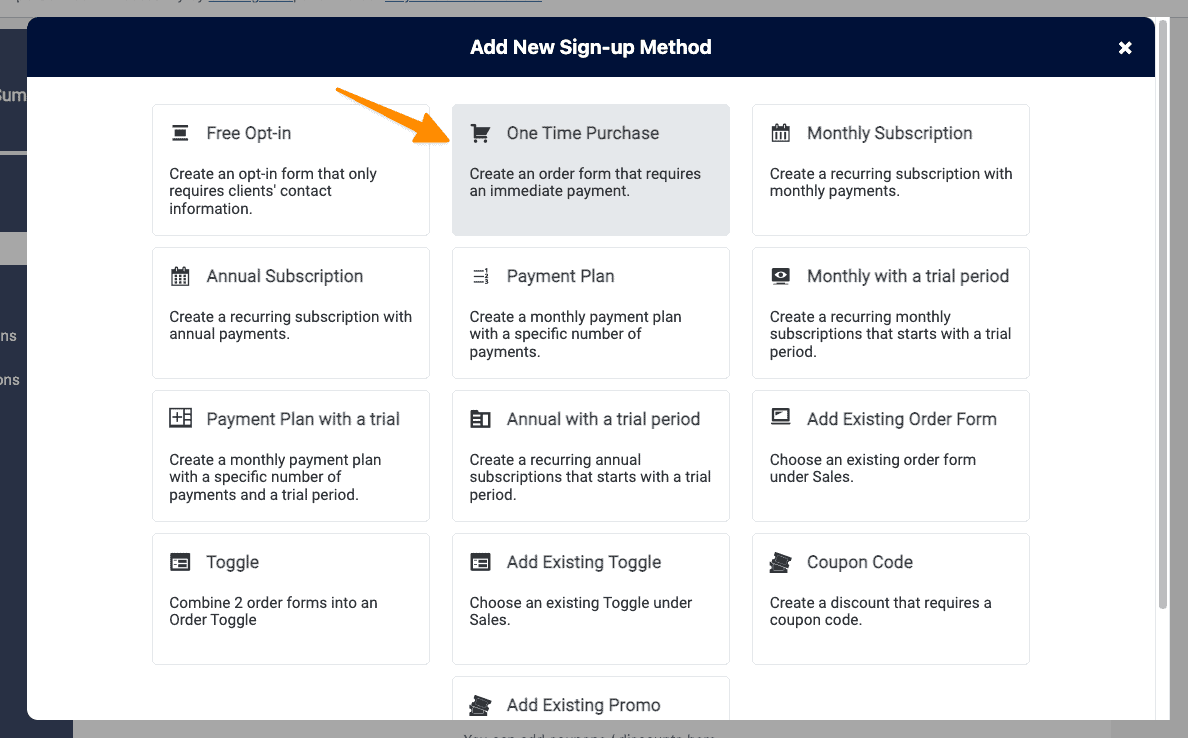
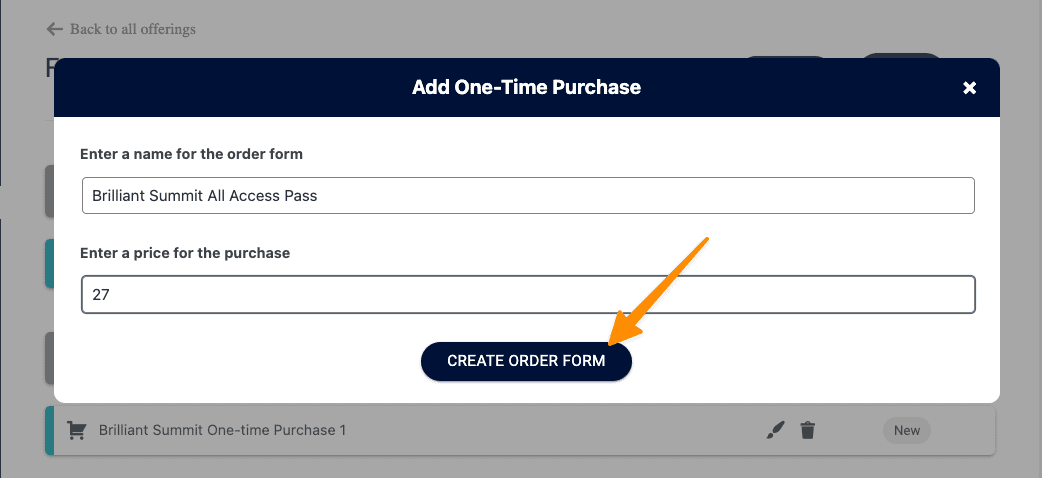
Name your order form and add the price for your all access pass.
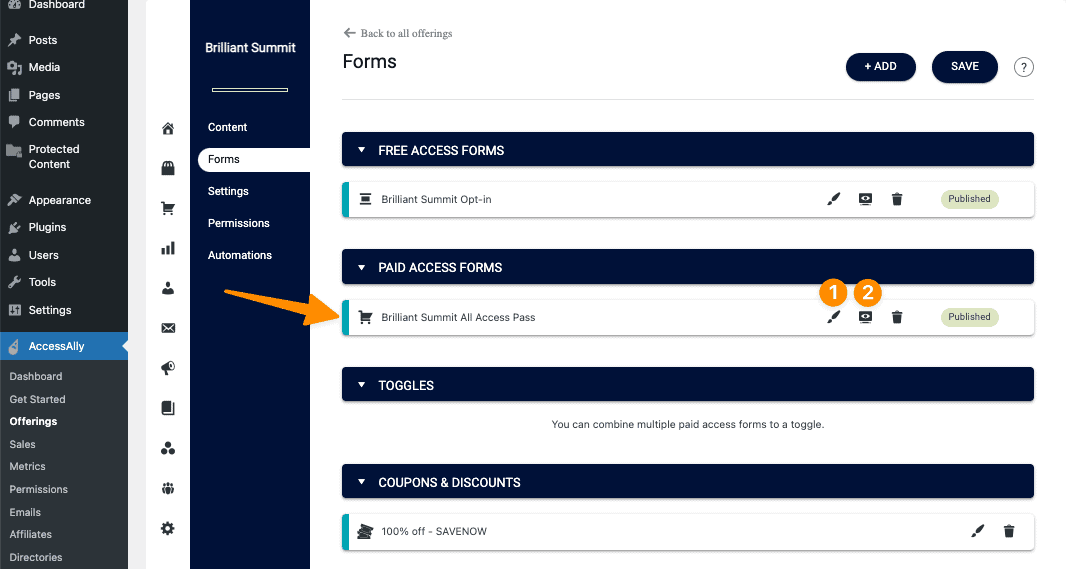
Your order form(s) will appear in the Paid Access Forms section.
- Click the Brush icon to edit the form.
- Click the View icon to see the form on your website. If you are using a sales page copy and paste the link from this page to use on your buy buttons.
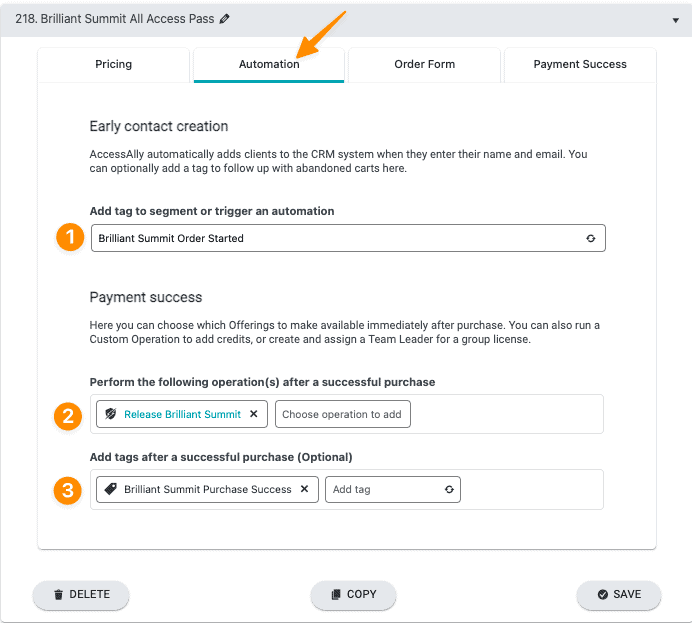
Important details about the form!
Under the automations tab you’ll see three important pieces for the order form.
- Early contact creation tag. This is used for your abandon cart sequence. Users on the free opt-in can be tagged with this tag so you can send marketing emails to upgrade to the all access pass option.
- Release after successful purchase. Gives content to the participant.
- Add tags after successful purchase. This one shows you who has paid for the all access pass so you won’t remove access to the summit for users with this tag when the free period ends.
Here is an example of the front end view of the order form. You can customize order forms using the AccessAlly Order Form Designer or use the tried and true (shown below) which is easy to use right out of the box.
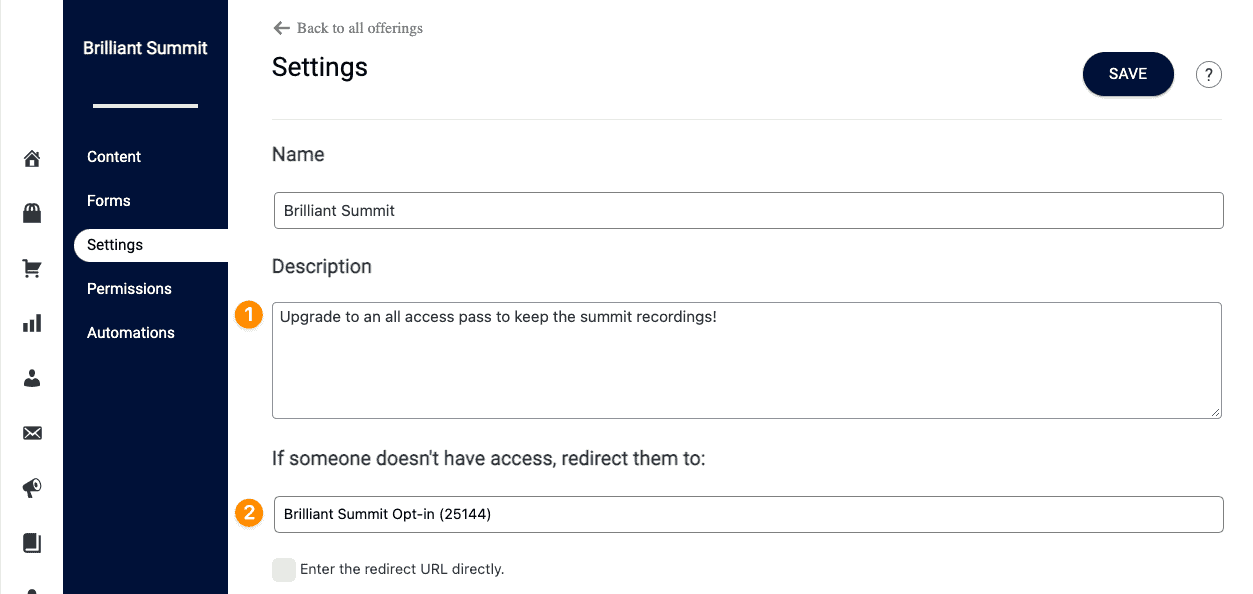
Settings Tab
The settings tab shows important details about the summit.
- Add a description for your all access pass order form.
- Add a redirect to your free summit opt-in page so existing members of your site can sign up.
Now it’s time to look at your summit dashboard icons and menu settings.
- In this section you can keep the default AccessAlly gradient shaded icons or add your own custom images.
- If using the default gradient shaded icons you can adjust the text.
- A WordPress menu is created for your Summit (we recommend keeping this as is, but you can adjust this in the dropdown.)
- Delete This Offering – only use this if you no longer need this offering.
![]()
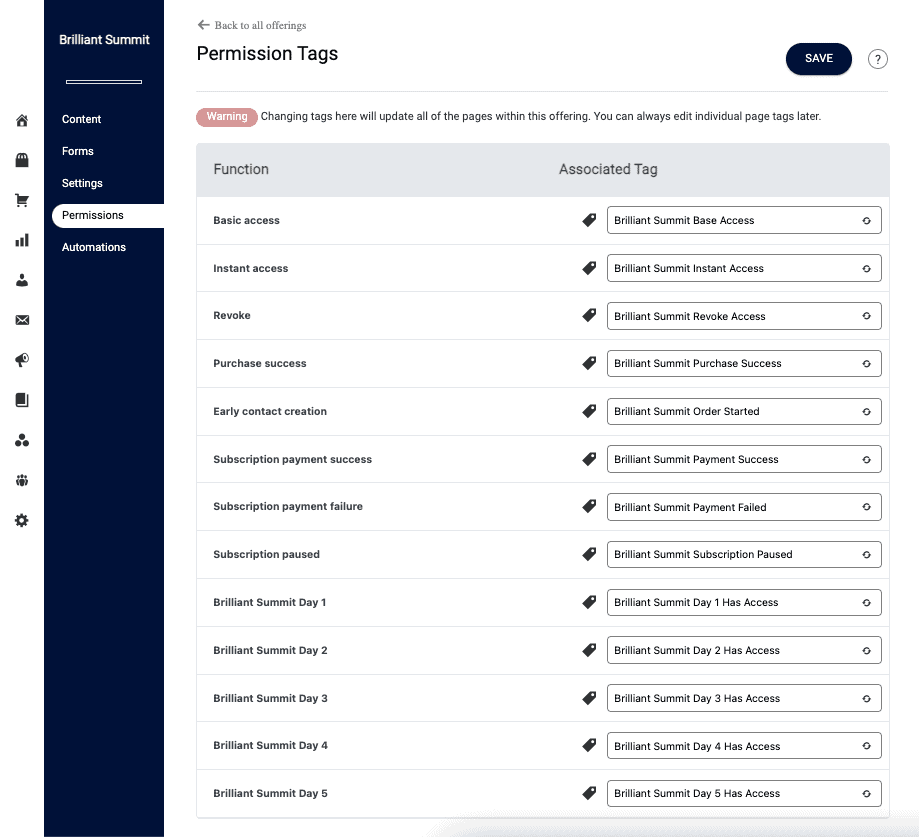
Permissions Tab
This tab shows all the tags that are in use for your summit. These tags are used by AccessAlly and/or your CRM system.
- Basic access: grants access to the welcome page of your summit
- Instant access: grants access to the entire summit (without daily drips.)
- Revoke: removes access if someone wants a refund for the paid all access pass option.
- Purchase success: shows that a user purchased the all access page.
- Early contact creation: this is used as an abandon cart trigger in your CRM.
- Subscription payment success: not used in this article, but is used if your all access pass has recurring payments.
- Subscription payment failure: not used in this article, but is used to start a failed payment automation for recurring payment plans.
- Subscription paused: not used in this article, but is used to pause subscription payments without removing access.
- Module Tags (Has Access): used to unlock each day of the summit.
Automations Tab
Release Automations
There are two ways this summit could be unlocked daily for your participants. Via AccessAlly Emails or via your CRM system. The automations tab shows how to deliver the summit content from inside your CRM system.
How do you know which option to use?
- Participants sign up and start immediately. With this option AccessAlly Emails can unlock each day of the summit and send a reminder email. Click here to see how to use AccessAlly Emails.
- Participants sign up and start on a future date. With this option you’ll follow the steps in the Dripped Release section to use your CRM to deliver the summit content to your participants.
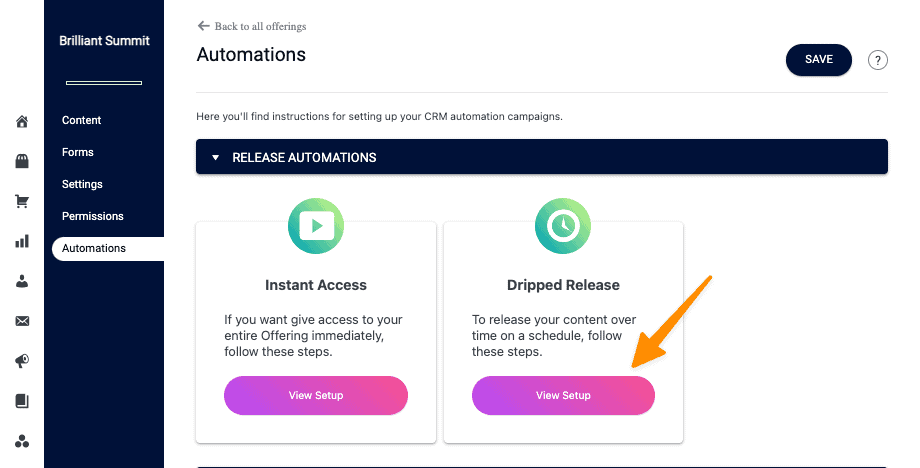
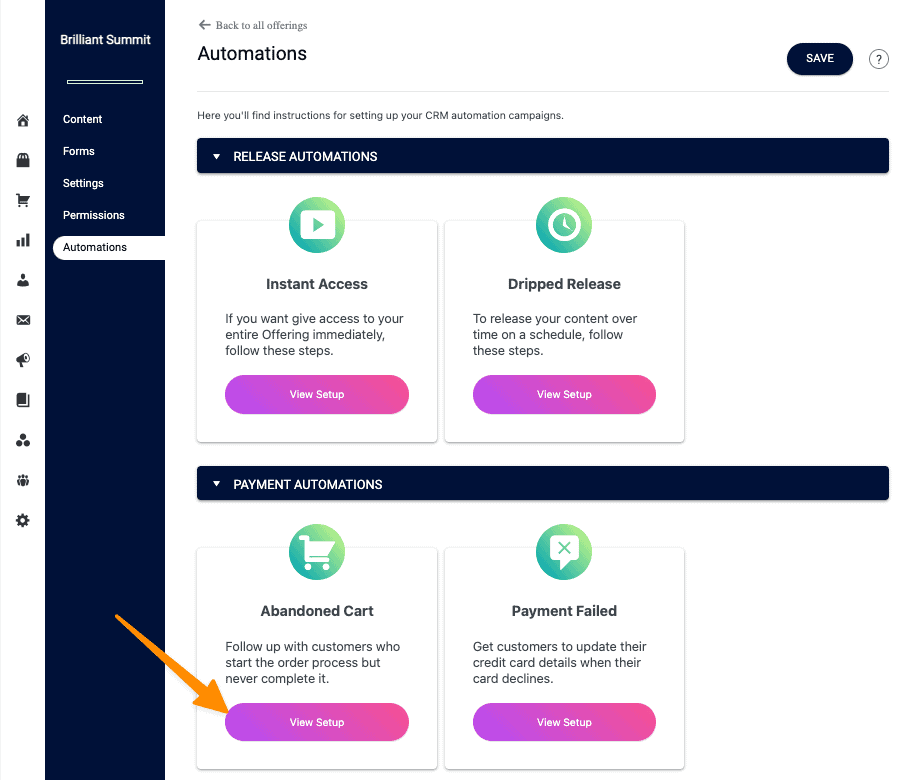
Payment Automations
In this section you can create CRM automations for your free summit participants to guide them to purchase the paid all access pass.
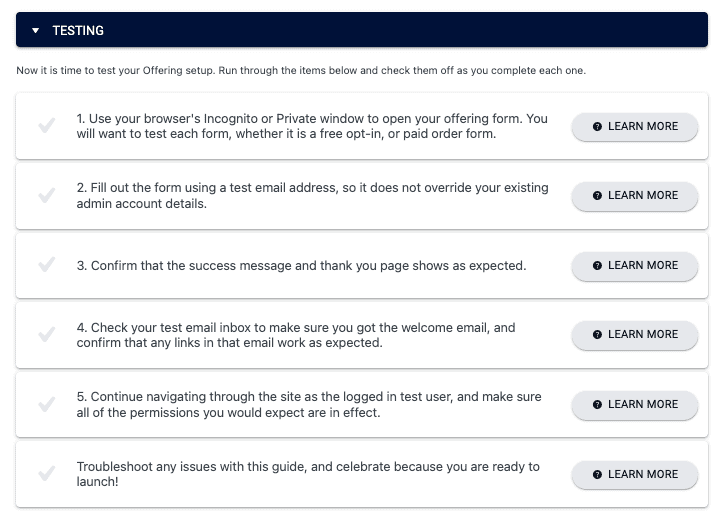
Testing
This is the most important part! After you have created your summit and any emails that need to be sent. You will want to test both the free summit opt-in and the paid all access pass option.
This will keep you looking professional by finding out if there are any issues with your summit offering… BEFORE you have participants. It only takes a few minutes to test, but it is so worth it as it prevents “launch day” stress (and support requests.)