In this tutorial, you’ll see how to undertake your LearnDash Migration project to make sure that all of your content and permissions get imported properly into AccessAlly.
When you’re migrating from LearnDash to AccessAlly, it’s important to use our free conversion tool, although you can certainly do manual course re-creations (copy + paste) if you choose.
This is because LearnDash creates content as custom posts inside WordPress. Once LearnDash is deactivated, the content on those custom posts becomes inaccessible.
ARTICLE CONTENT:
Important! Trying to Migrate Payments from LearnDash?
When you’re moving to AccessAlly order forms from a different payment system it’s not possible to migrate payment information or migrate payment plans. We currently have a feature request for this functionality.
We’re sharing four of our favorite tips to help you transition your payments from your current system to AccessAlly order forms while creating an amazing experience for everyone!
The Difference Between LearnDash and AccessAlly Course Format
Before you begin the migration process, it’s a good idea to become familiar with the difference in how LearnDash and AccessAlly are designed to work.
LearnDash includes a 3-tier course format: Courses, Lessons, and Topics.
With AccessAlly courses, the focus is not on the tiers (since you use regular WordPress pages, you get to decide how “deep” the course goes). Rather, the focus is on the access permission tags, and whether you want to release all course content at once, or “drip” it out slowly over time.
With this in mind, you’ll be moving your courses into one of two formats:
- Standalone – where the entire course has a single permission tag. Choose this option if you want to release all the course content at once.
- Stage-Release – where you split your course up into modules. Each module can have its own permission tag, so that you can release the content within each module separately from the others.
How The LearnDash Conversion Tool Works
Our conversion tool changes the custom posts created by LearnDash to regular, standard WordPress pages. Then, when LearnDash is deactivated, you will still have access to the content.
Optionally, the conversion tool can also replicate the LearnDash structure as an AccessAlly Course Wizard course – so you can easily manage, edit, and view the course in your new AccessAlly-built membership site.
This conversion tool does not import past student data or things like your quizzes, certificates, etc. Instead, it focuses on converting the WordPress Custom Post content that LearnDash creates, so don’t disappear when you disable the LearnDash plugin.
How to Download and Use the Conversion Tool
Download the LearnDash conversion tool here:
Or search for “AccessAlly™ LMS Migration from LearnDash®” in the WordPress plugin directory.
Backing Up Your Site & Staging Sites
Before you get started, we recommend that you create a backup of your site, and then create a staging site to perform the migration on. This way, if anything “goes wrong”, you’re not sacrificing the live site.
With a staging site, you’re free to make changes and ensure everything is working properly before the site goes live. If you’re unfamiliar with this process, please read our guide here and consult a developer for assistance.
Setup Steps (After installing the LearnDash Conversion Tool)
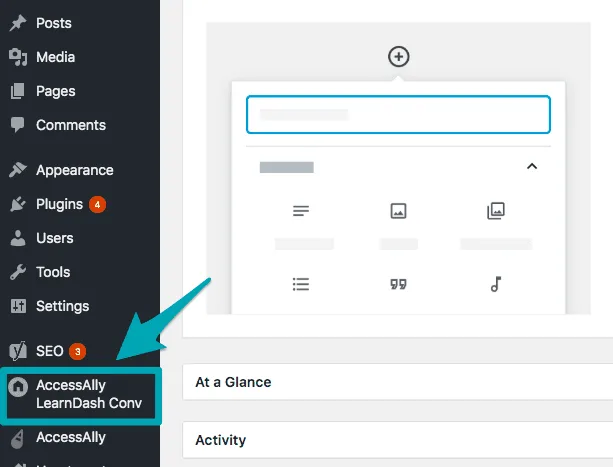
Step 1: Open up the AccessAlly LearnDash Conversion Tool
You can find this on the left sidebar of your WordPress website dashboard.
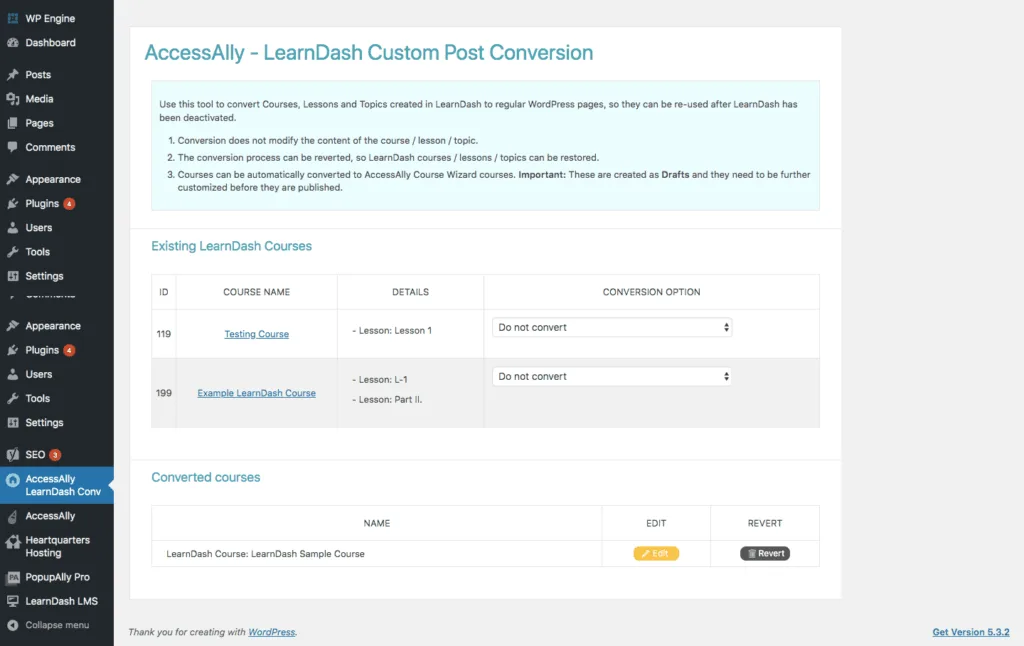
Step 2: Decide Which Courses You’d Like to Convert
When you open up the LearnDash Conversion tool, you can see a list of all the courses you’ve created with LearnDash, along with the content associated with it.
For best results convert one course at a time and complete the steps below before starting the next one.
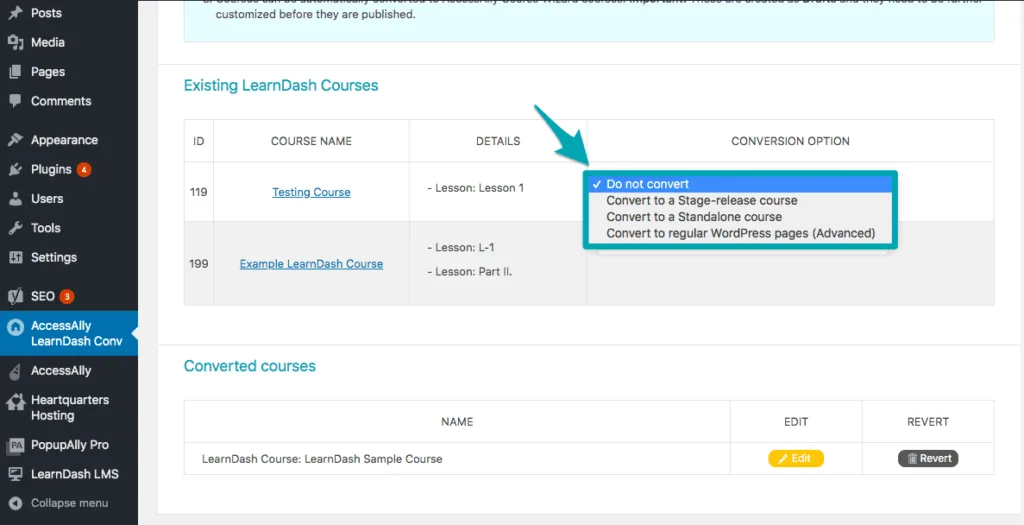
Step 3: Choose the Type of Course You’ll Convert it to in AccessAlly
Under “Conversion Option”, you can choose how you’d like to convert each LearnDash Course, using the following options:
- Stage-Release Course – this type of course is drip-fed, and can be released over time.
- Standalone Course – this type of course is not drip-fed, but is released as an entire course, all at once.
- Convert to Regular WordPress Pages (Advanced)
Step 4: Convert and Edit the Course
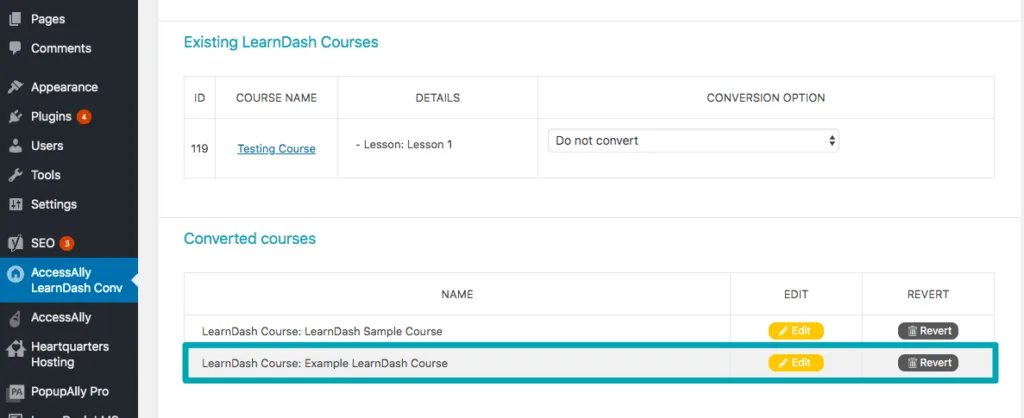
Once you select the corresponding conversion option from the dropdown, a yellow “Convert” button will appear.
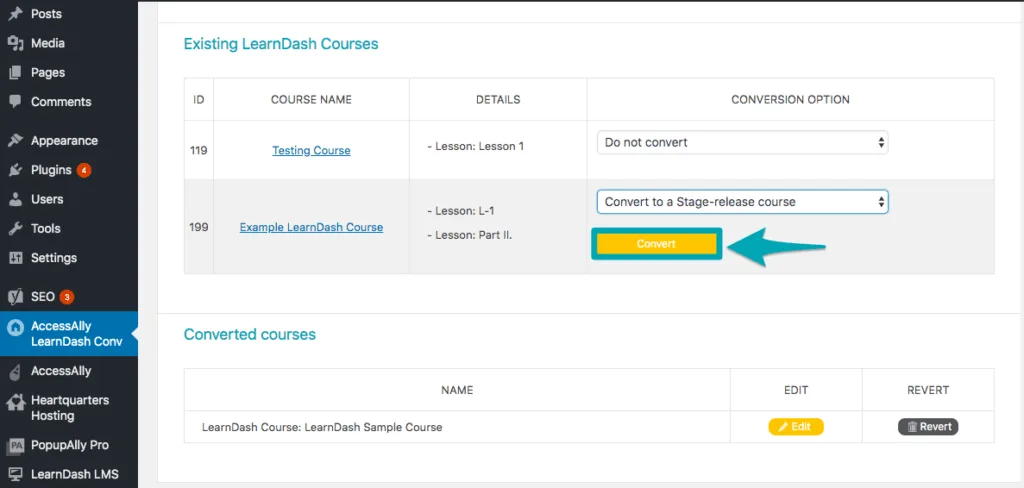
Once you’ve clicked the yellow Convert button, the course will appear on the page under the “Converted Courses” section. You have the option to complete the conversion process by editing it or reverting it to its original LearnDash format.
Clicking the yellow Edit button will allow you to edit the converted course inside the AccessAlly Course Wizard.
Step 5: Complete the Conversion With the AccessAlly Course Wizard
Click on the dropdown options below to see how each type of course is edited inside the AccessAlly Course Creation Wizard:
Standalone Course Conversion
As mentioned in Step 4, once you’ve converted the course, it’s time to edit it in the AccessAlly Course Wizard. This step will:
- Create the Course Name
- Assign the Active/Inactive Icons required for your Course Dashboard
- Create a course menu
- Assign (or create) the permission tags
- Edit/Confirm course content
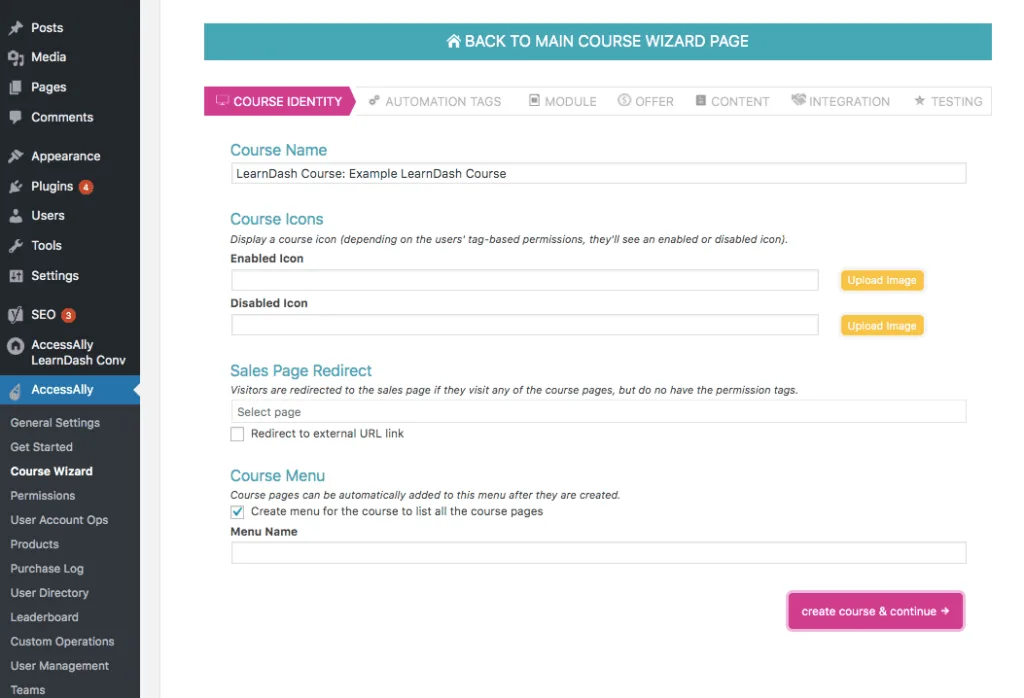
Step A: Course Identity
The first section of the AccessAlly Course Creation Wizard allows you to confirm (or edit) the course name, assign enabled/disable icons, create a sales page redirect, and create a custom course menu.

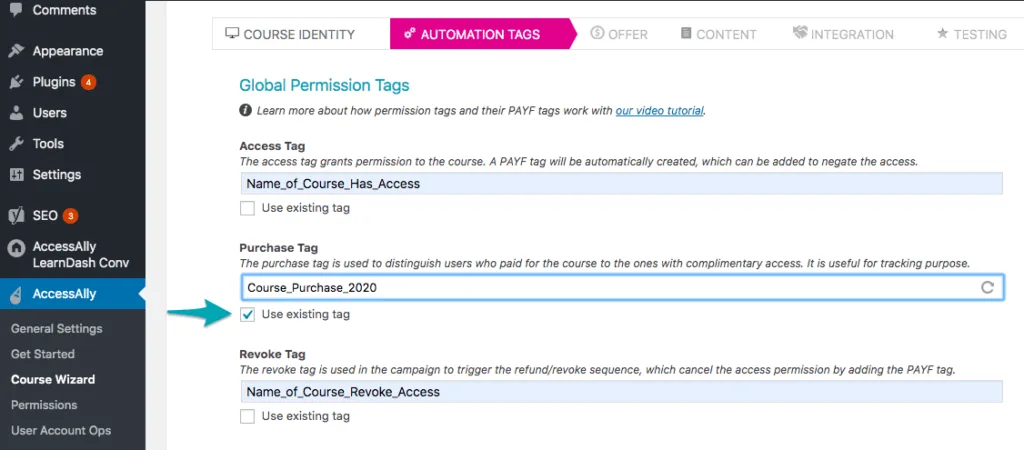
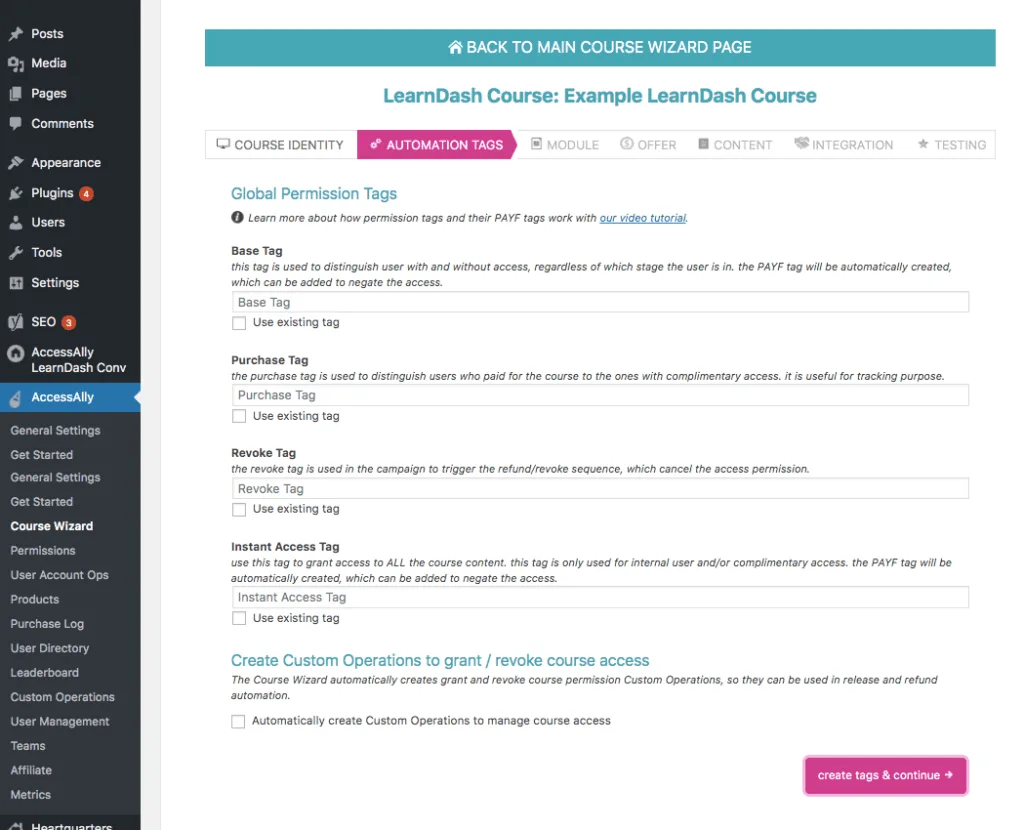
Step B: Assign Automation Tags
Here, you can either create a new set of permission tags for your converted course or simply select a tag that already exists inside your CRM.
Step C: Edit & Confirm Your Course Content
Because this is a standalone course, the Conversion tool does not retain the hierarchy that existed in the original course. ZippyCourse “Units” are simply created as pages alongside the rest of your content.
(See the Stage-Release conversion if you prefer the hierarchy).
Clicking on the course page arrows will reveal additional options. You can either leave the settings as-is for a clean transfer, or you can re-organize your course by creating a new page or deleting the transferred page.
Step D: Create Your Standalone Course Automation inside Your CRM
The Integration tab in the course creation wizard illustrates the next step you should take to fully automate your new AccessAlly Course.
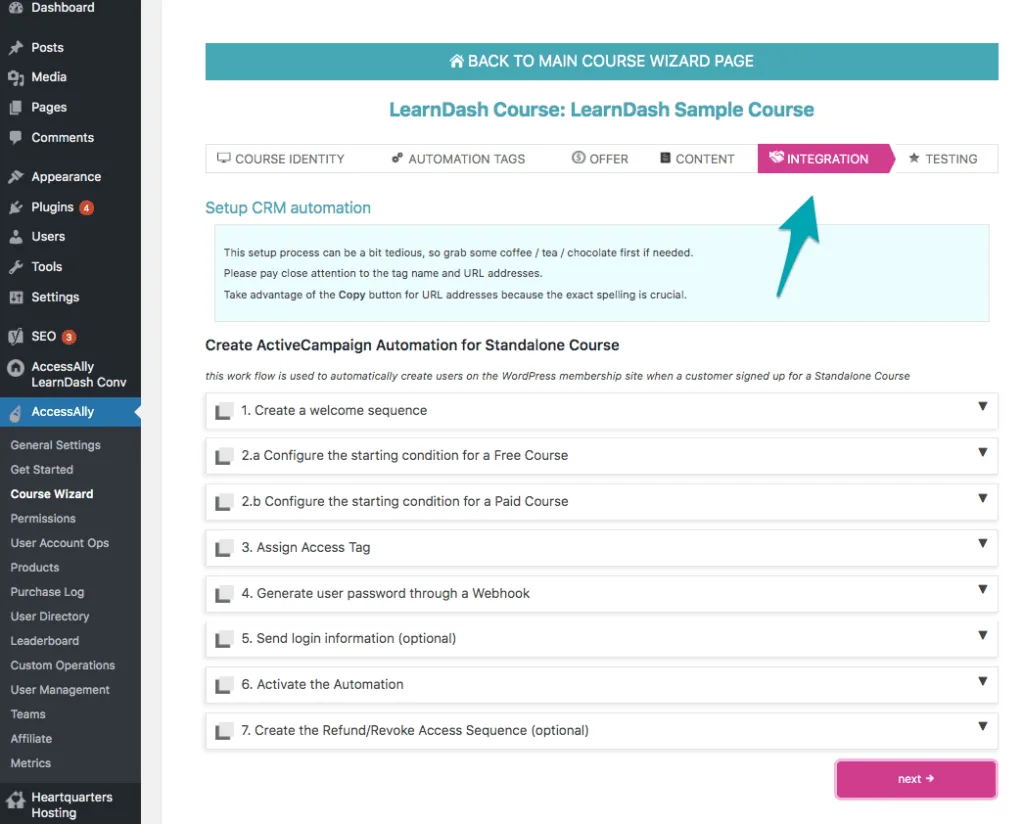
To configure the corresponding course automation inside your CRM, please see the corresponding tutorial for your CRM.
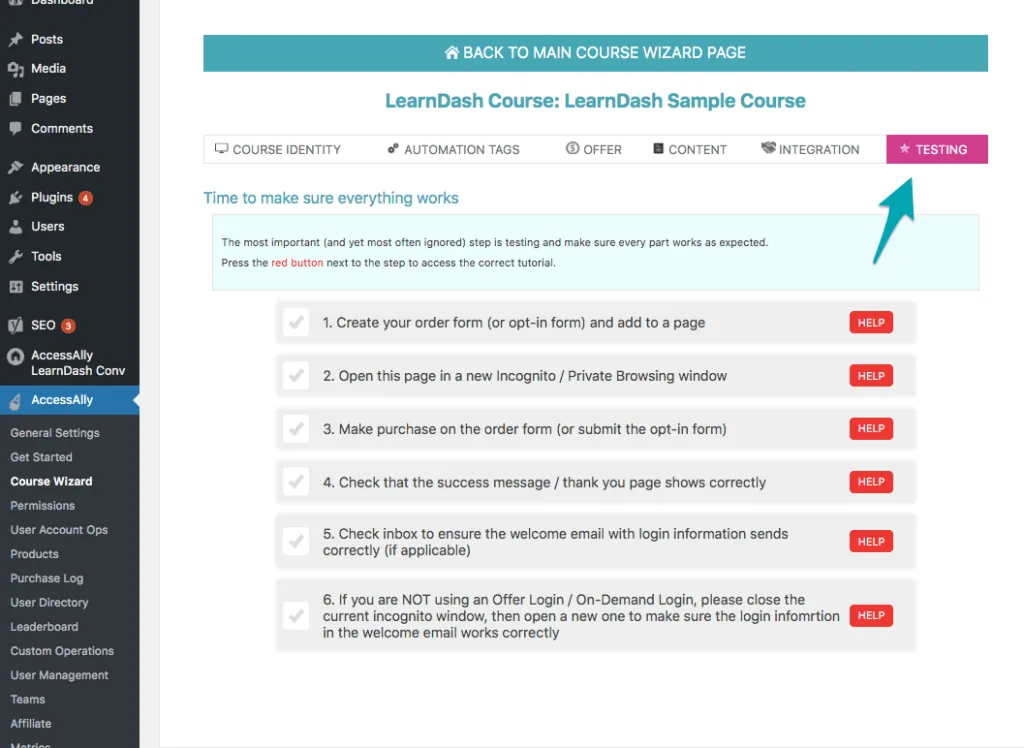
Step E. Testing
You’ll complete your stand-alone course by Testing to ensure that this course is ready to launch!
Stage-Release Course Conversion
As mentioned in Step 4, once you’ve converted the course, it’s time to edit it in the AccessAlly Course Wizard. This step will:
- Create the Course Name
- Assign the Active/Inactive Icons required for your Course Dashboard
- Create a course menu
- Assign (or create) the permission tags
- Edit/Confirm course content
Step A: Course Identity
The first section of the AccessAlly Course Creation Wizard allows you to confirm (or edit) the course name, assign enabled/disable icons, create a sales page redirect, and create a custom course menu.
Step B: Assign Automation Tags
Here, you can either create a new set of permission tags for your converted course or simply select a tag that already exists inside your CRM.
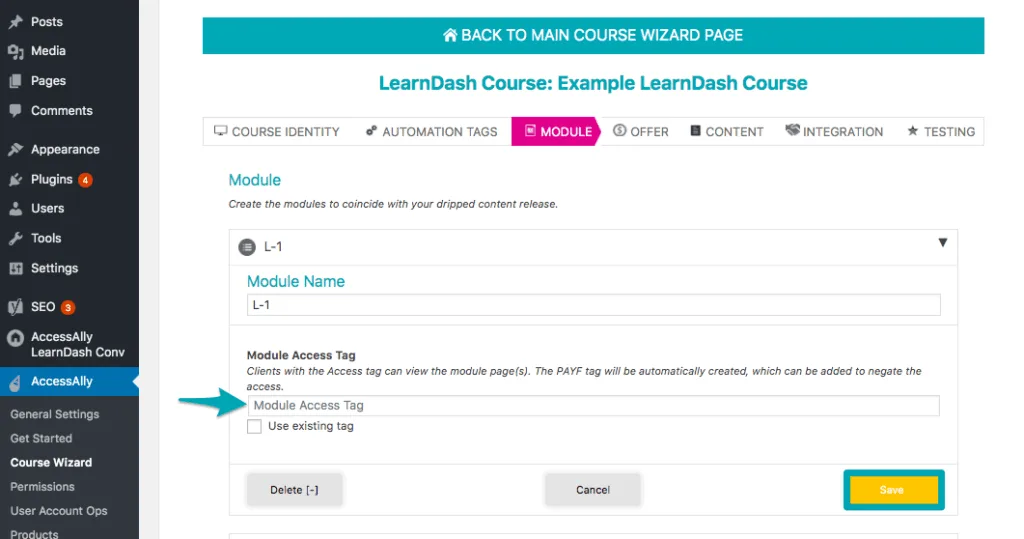
Step C: Configure Your Modules
In AccessAlly Stage-release courses, modules correspond to the LearnDash Course “Lesson” or “Topic”. Each module includes its own access tag. This access tag allows you to release one lesson or topic at a time to your students.
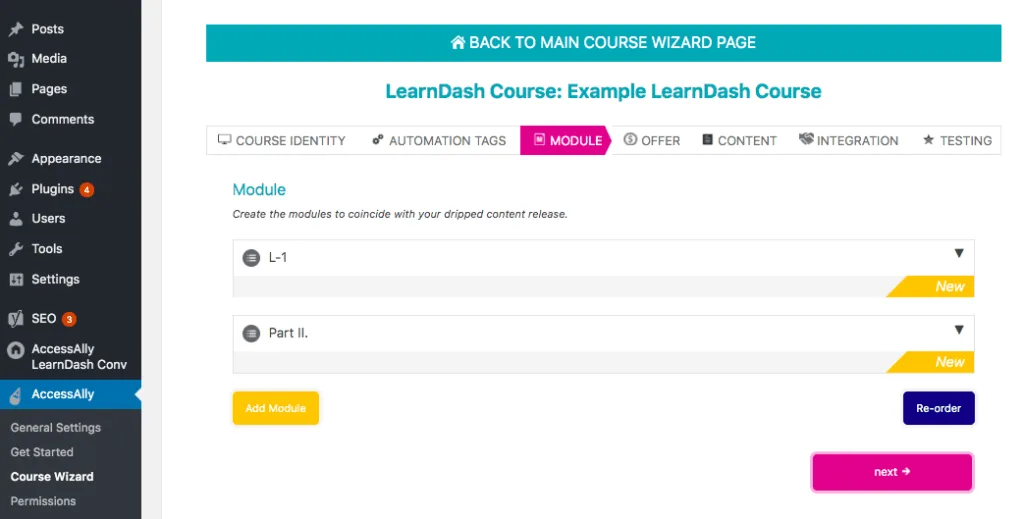
You can add as many modules as you’d like in this step, and assign permission tags to each. The next step will allow you to assign WordPress pages to each lesson and/or topic.
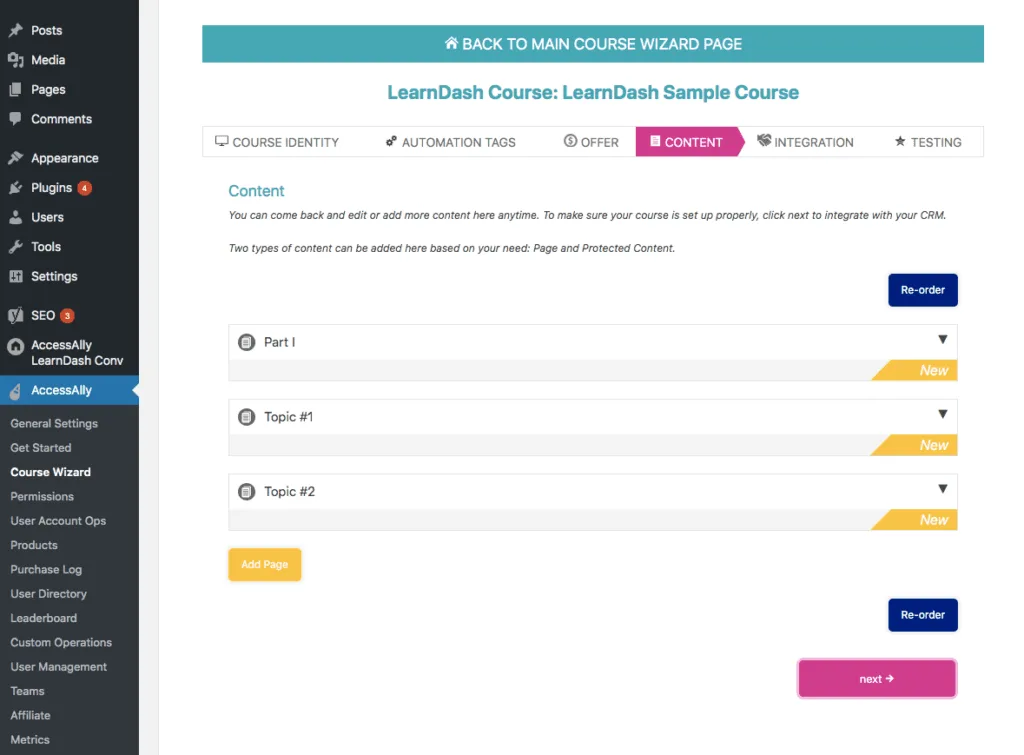
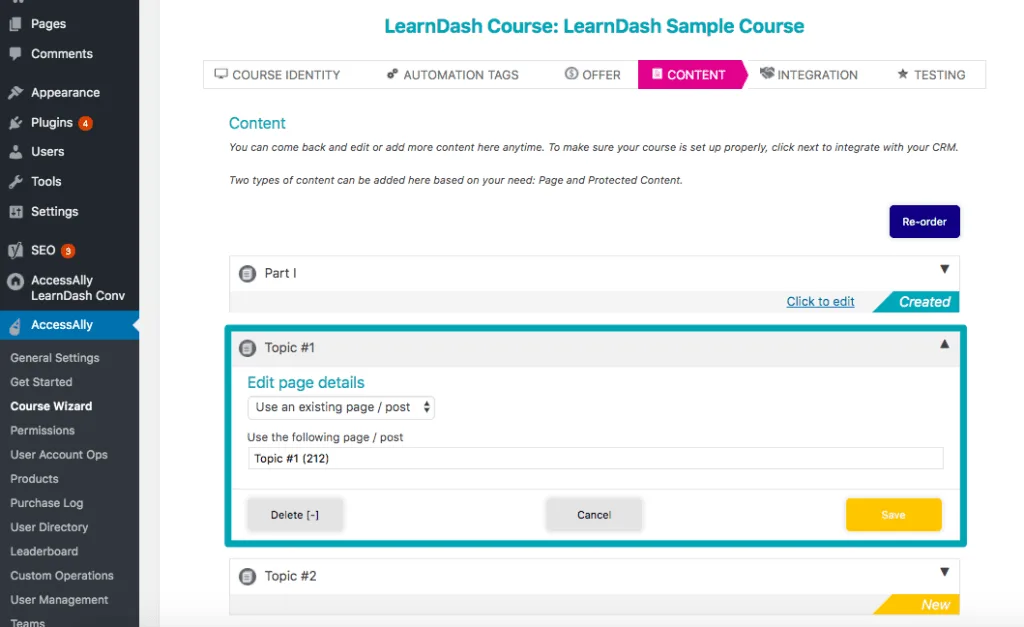
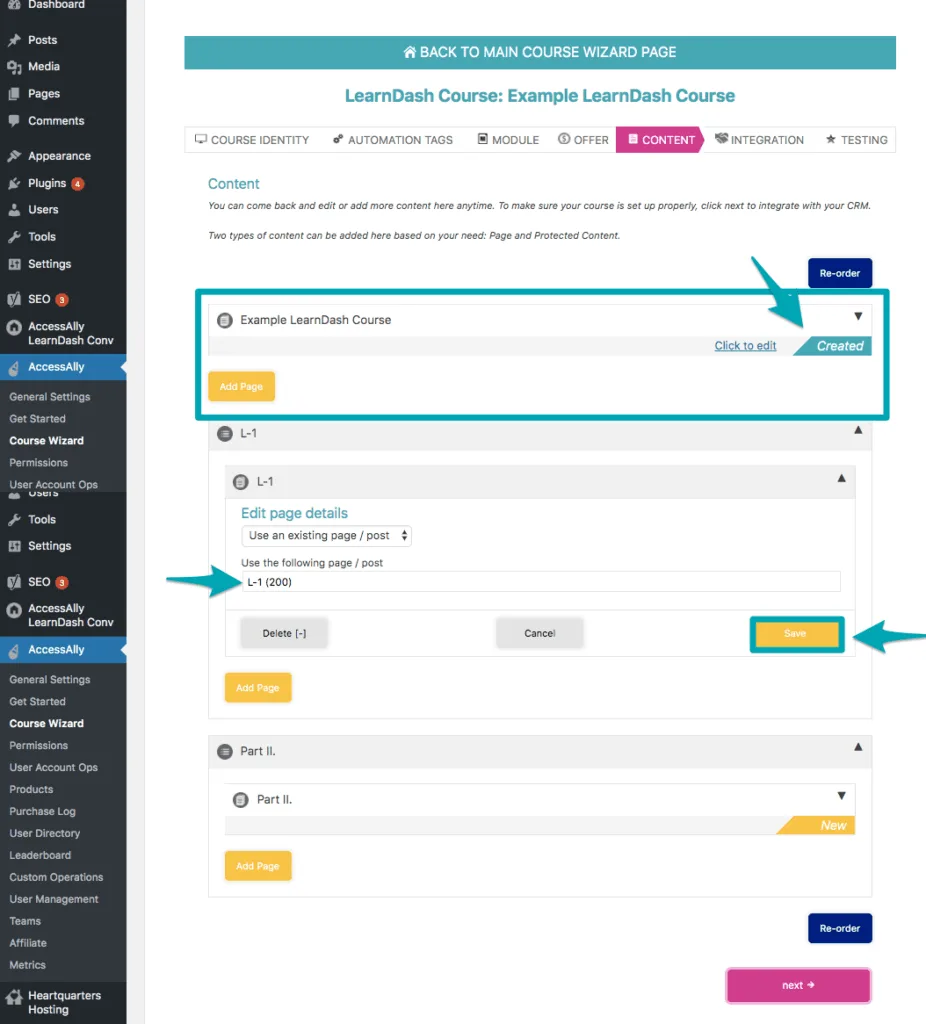
Step D: Configure Your Course Content
After you’ve configured the modules and permission tags, it’s time to make sure the individual course pages are set up the way you’d like them to be when you import the course from LearnDash.
In the first example below, all pages placed inside the L-1 box (teal box) will be released together with the L-1 automation tag. The content inside the Part II box (navy box) will be released together with the Part II automation tag.
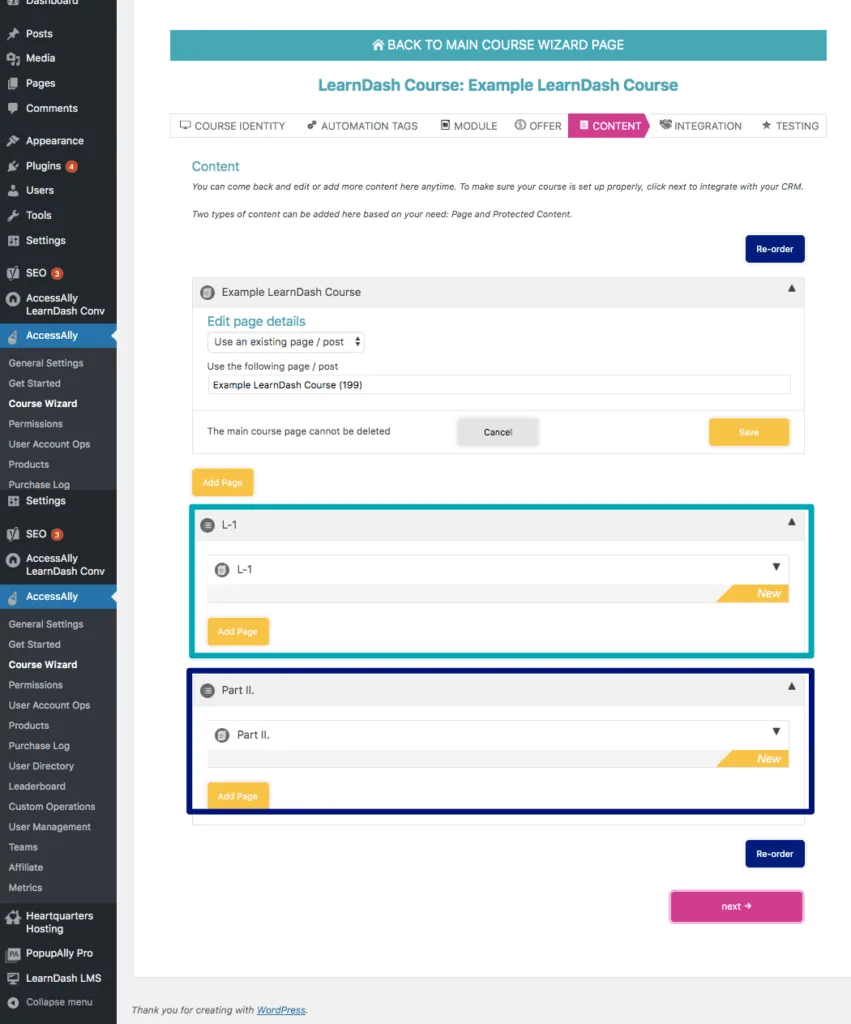
Important! Save Your Pages
All pages in the course wizard need to be saved and show the blue “Created” by them in order for the content to be visible on your site!
Step E: Create Your Stage-Released Course Automation inside Your CRM
Next, you’ll create the delivery automation for your course inside your CRM
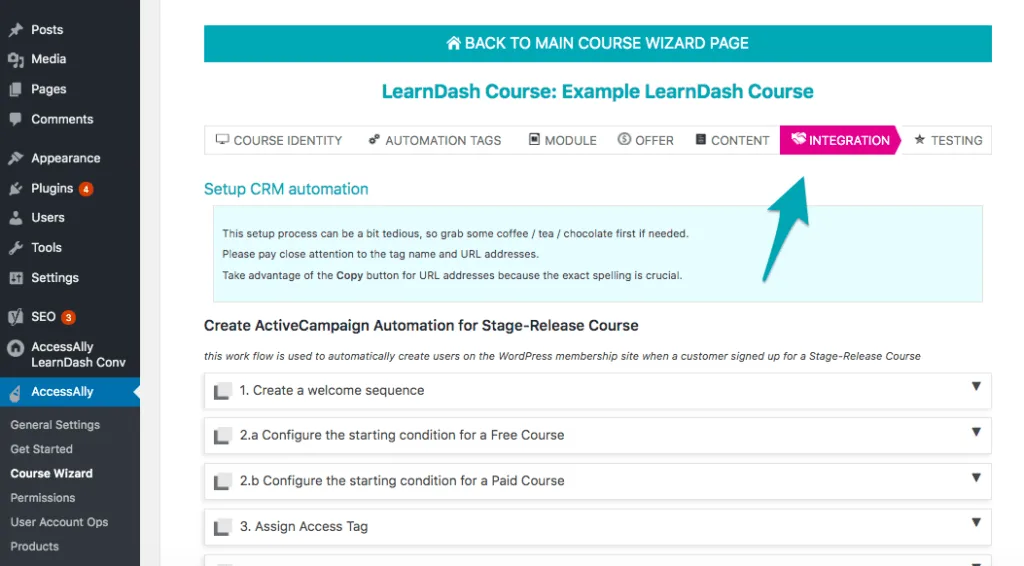
To configure the corresponding course automation inside your CRM, please see the corresponding tutorial for your CRM.
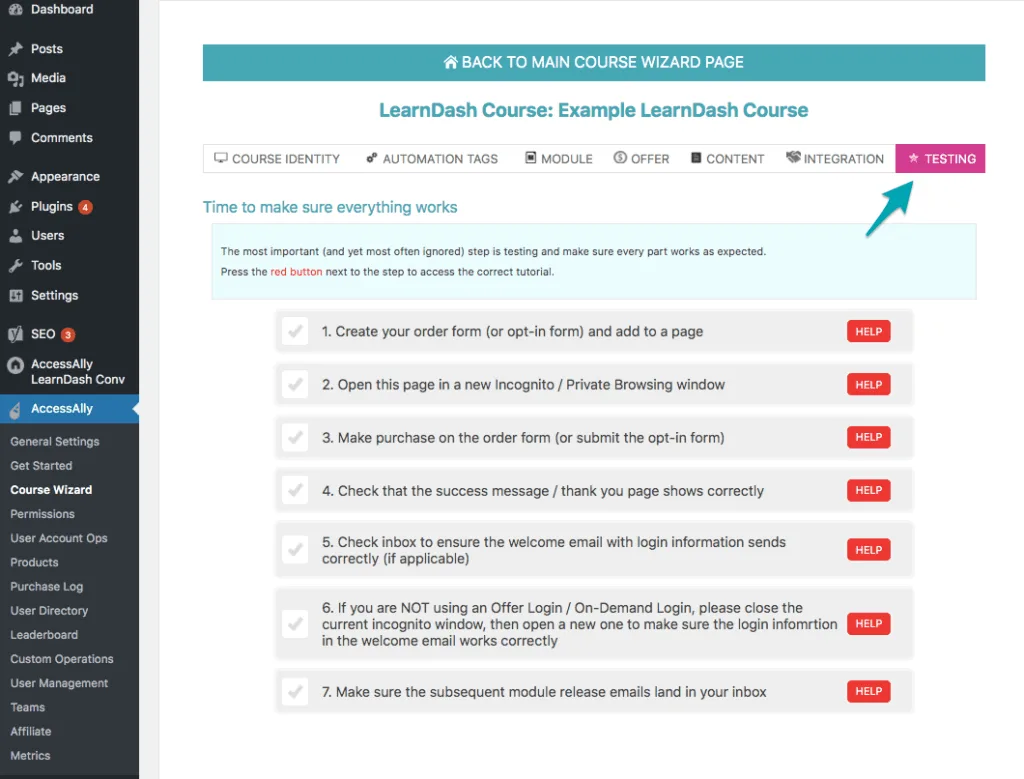
Step F: Testing
You’ll complete your stage-released course by Testing to ensure that this course is ready to launch!
Regular WordPress Pages (Advanced for Developers) – Not Recommended
This option will only convert your LearnDash content to regular WordPress pages.
If you opt to convert your LearnDash content as “Regular WordPress Pages”, the imported content, otherwise known as converted course will appear as follows:
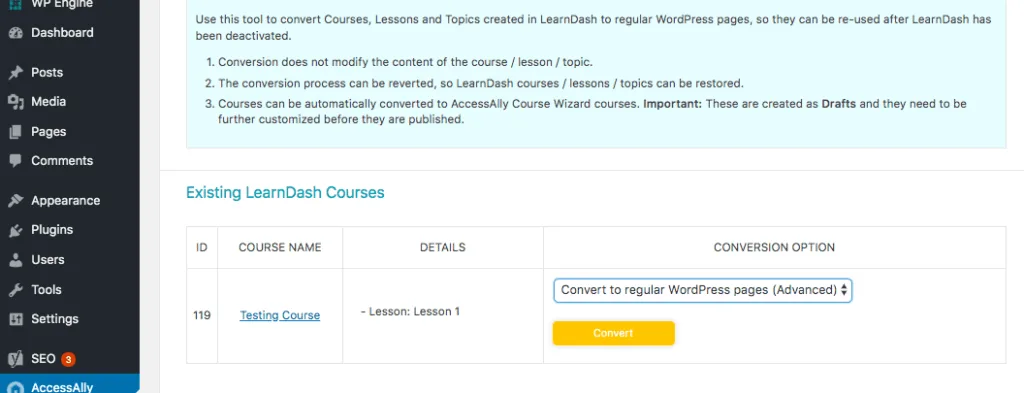
We do not recommend this option as you can not edit the course inside AccessAlly’s Course Creation Wizard.
All permission tagging, content editing, and menu creation (if you want to do this) must be done manually by searching for the WordPress pages and editing them one-by-one.
Your LearnDash Course Migration is Complete… Now Make Sure to Import Members
The LearnDash Conversion tool helps you convert your LearnDash content into AccessAlly courses, but it doesn’t handle the importing/converting of your WordPress users who are your course participants.
To handle that you’ll want to follow our Member Migration tutorial here.
Review Your Changes
Before deactivating the LearnDash plugin, please ensure that the following steps have been taken and work successfully:
- AccessAlly plugin is set up and integrated with your CRM
- All AccessAlly “key pages” (login, dashboard, logout link, etc.) are configured and working properly
- LearnDash courses are all “cloned” into AccessAlly format, using the LearnDash Migration Plugin.
- If using AccessAlly Pro: All quizzes, progress tracking, and certificates have been created in ProgressAlly.
- AccessAlly order forms are in place to allow courses to be purchased by future users
- All CRM automations for course access and release are configured and working properly in your CRM
- All current course users are migrated into your CRM and have the proper permission tags so they don’t lose access to course content
- AND MORE: Even though this list covers the basics of a membership site/online course area built with AccessAlly, we cannot anticipate all “custom” needs you might have. Please consult with your developer to ensure every part of your course setup is re-configured properly with AccessAlly, so you don’t lose any functionality when LearnDash is deactivated.
Once you’re satisfied, deactivate the LearnDash plugin, and re-check all items listed above.
When LearnDash is deactivated and everything is working properly, create a second backup for your live site. This way, if something goes wrong when making your staging site live, you can simply restore the backup.
Please dedicate additional time to re-checking the new live site for any possible errors.
