You can create a points or credit system in AccessAlly using custom field operations where logged in users can earn (and spend!) points. It’s a great way to keep your members engaged and excited about your membership site or online course area.
This functionality is often used to create a credit system or reward points tally. You can also set up Custom Field Operations to trigger automations inside your CRM.
ARTICLE CONTENT:
Step 1: Create a Custom Field in Your CRM
The next step is to set up a corresponding custom field inside your CRM system. AccessAlly will use this custom field to serve as the user’s “bank account” to maintain a balance of credit. This is a necessary step if you want to use AccessAlly’s Credit System for your logged in members.
For all versions of ActiveCampaign, you will create a Text Input custom field that stores the number of points or credits a user has. This field should have a unique name like Member Points.
How to create a custom field in ActiveCampaign
- For Kit, you will create a unique Field Name for your custom field with something descriptive like Member Points and you will leave the Field Value blank.
How to create a custom field in Kit
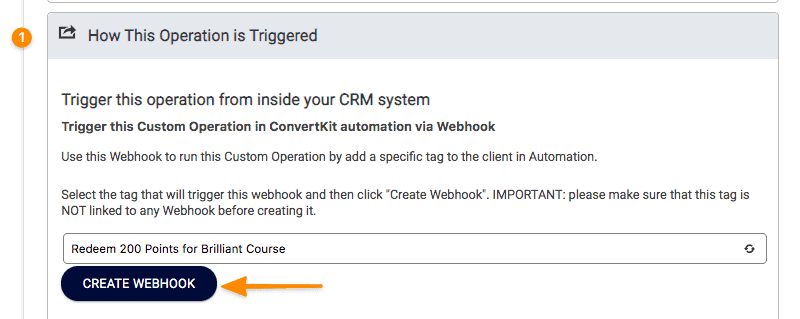
2. Now you will need a unique tag created in your Kit account that is used to create a webhook when points are issued to a user. This tag should have a descriptive name like Add Member Points
How to create a tag in Kit
For Drip, you will create a unique Custom Field for the value of your points with a descriptive identifier for the name like Member Points.
How to create a custom field in Drip
For all versions of Keap, you will create a Whole Number custom field that stores the number of points or credits a user has. This field should have a unique name like Member Points.
- How to create a custom field in Keap Max Classic
- How to create a custom field in Keap Lite, Pro, Max
For Ontraport, you will create a Numeric custom field that stores the number of points or credits a user has. This field should have a unique name like Member Points.
How to create a custom field in Ontraport
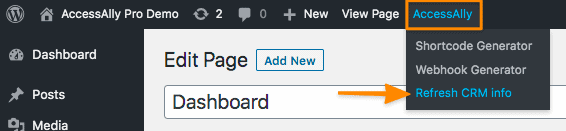
Step 2: Refresh CRM Info
After creating the custom field that stores points in your CRM you’ll Refresh CRM Info to pull your newly created custom field into your AccessAlly site so it can be used.
At the top of any admin page inside your site, hover over AccessAlly and click Refresh CRM Info. After clicking OK to run the refresh you will also need to refresh the page in your browser too!
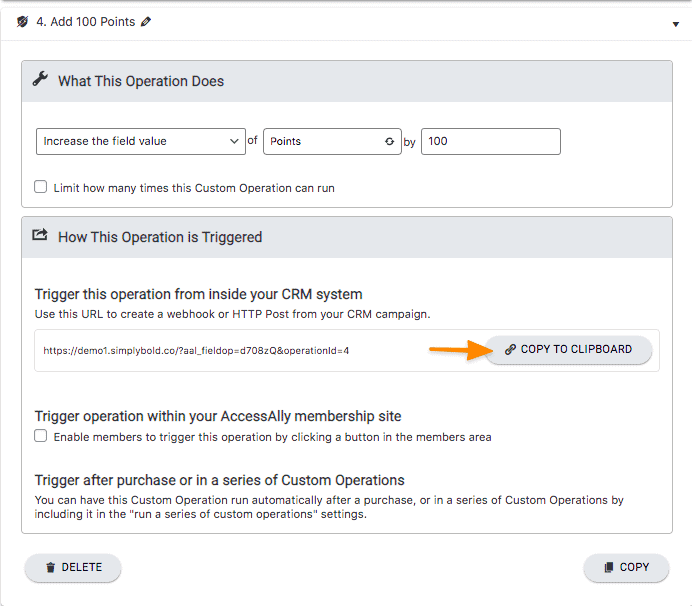
Step 3: Create an Increase Custom Operation
The increase the field value custom operation allows you to give your members points. You choose how many points you’d like your members to have. A great use case scenario for this is adding 100 points when a member of your ongoing membership makes a monthly payment.
- Go to AccessAlly > Settings > Custom Operations
- In the What This Operation Does section choose to Increase the field value of the [name of the custom field] you created in your CRM
- Type the number of points you’d like the member to receive (for example 100 points)
- Optional! Set the global or contact specific limit for the number of times you’d like the operation to run. This is useful for cases like the first 10 members receive points or the contact receives points only one time.
- In the How This Operation is Triggered section click the COPY TO CLIPBOARD button you’ll use this link in Step 5 below.
- Save your changes.
- Go to AccessAlly > Settings > Custom Operations
- In the What This Operation Does section choose to Increase the field value of the [name of the custom field] you created in your CRM
- Type the number of points you’d like the member to receive (for example 100 points)
- Optional! Set the global or contact specific limit for the number of times you’d like the operation to run. This is useful for cases like the first 10 members receive points or the contact receives points only one time.
- Next, add the tag that you created in Kit to release your points. After adding the tag click the Create Webhook button to generate the webhook to your Kit Automation Rules. Remember to check that only one webhook was created in your Kit account for this tag.
- Save your changes.

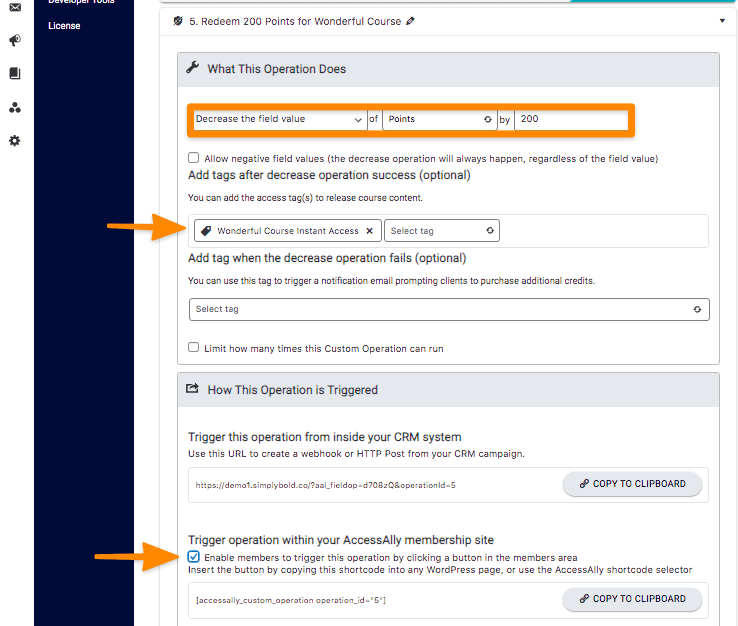
Step 4: Create a Decrease Custom Operation
The Decrease the field value operation is used when a user redeems their points! A great use case for this operation is creating a page your members visit to select what they’d like to get with their points.
- Go to AccessAlly > Settings > Custom Operations and click the + NEW OPERATION button.
- In the What This Operation Does section choose to Decrease the field value of the custom field you created to store points in your CRM by the number of points this item is.
- If the item is an offering on your AccessAlly site you can add the access tags to release the course content.
- There are two ways to trigger the points decrease!
- Option 1 (Admin-initiated): Trigger this operation in your CRM. If you would like to send an email and have a user click a link to redeem points for this item click the COPY TO CLIPBOARD link and paste this into an email.
- Option 2 (User-initiated): Trigger this operation within your AccessAlly site via a button click. If you would like the member to click a button to redeem points for this item click the COPY TO CLIPBOARD link and paste the code on a page on your AccessAlly site.
- Go to AccessAlly > Settings > Custom Operations and click the + NEW OPERATION button.
- In the What This Operation Does section choose to Decrease the field value of the custom field you created to store points in your CRM by the number of points this item is.
- If the item is an offering on your AccessAlly site you can add the relevant access tags to release the course content.

- There are two ways to trigger the points decrease!
- Option 1 (Admin-initiated): Trigger this operation in your CRM. If you would like to send an email and have a user click a link to redeem points for this item. You will need to create a unique tag in Kit to create an automation rule to use via email.
%22%20transform%3D%22translate(1.6%201.6)%20scale(3.125)%22%20fill-opacity%3D%22.5%22%3E%3Cellipse%20fill%3D%22%23cbcbcb%22%20rx%3D%221%22%20ry%3D%221%22%20transform%3D%22rotate(32.2%2012.3%20147)%20scale(47.79092%20171.64663)%22%2F%3E%3Cellipse%20fill%3D%22%23fff%22%20cx%3D%22206%22%20cy%3D%2298%22%20rx%3D%22107%22%20ry%3D%22107%22%2F%3E%3Cellipse%20fill%3D%22%23a6a6a6%22%20cx%3D%2244%22%20cy%3D%2295%22%20rx%3D%2224%22%20ry%3D%2224%22%2F%3E%3Cellipse%20fill%3D%22%23fff%22%20rx%3D%221%22%20ry%3D%221%22%20transform%3D%22matrix(-34.86693%20-48.63099%2096.87693%20-69.4578%20202%2052.2)%22%2F%3E%3C%2Fg%3E%3C%2Fsvg%3E)
- Option 2 (User-initiated): Trigger this operation within your AccessAlly site via a button click. If you would like the member to click a button to redeem points for this item click the COPY TO CLIPBOARD link and paste the code on a page on your AccessAlly site. You can edit the optional items to create your own button text and messages.
- Option 1 (Admin-initiated): Trigger this operation in your CRM. If you would like to send an email and have a user click a link to redeem points for this item. You will need to create a unique tag in Kit to create an automation rule to use via email.

Step 5: How Users Earn Credits / Points Via the CRM
Members can earn points in different ways, but the most common use case is points are added to a member when their monthly membership payment is successful.
- Create a new automation in ActiveCampaign using the Payment Success tag for your membership as the starting point. This automation should be set to run multiple times.
- Under Conditions and Workflow choose Webhook and paste the link you copied from Step 3 above.
- Optional: After the webhook, you can add additional items to this automation like a follow-up email letting the member know they’ve earned points.
- Remove the Payment Success tag so it can be added with future successful payments.
Below you will see an example of an ActiveCampaign automation that you can season to taste!

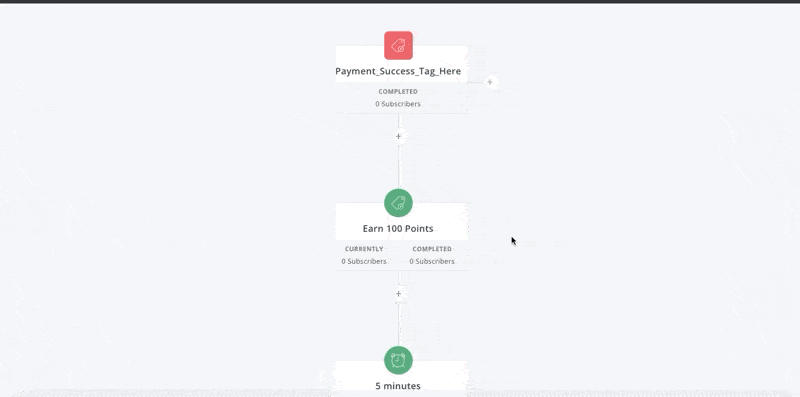
- Create a new automation in Kit with the starting tag as the Payment Success tag for your membership.
- Add the tag you created in Step 1 of this article that triggers your points webhook automation rule in Kit.
- Add a 5-minute delay.
- Remove the tag that triggers your points webhook automation rule so it can run again in the future.
- Optional: Send an email sequence letting the user know that points have been added. This sequence should be set to send multiple times.
- Continue with any additional information you would like to add to this automation.
Below you will see an example that you can season to taste!
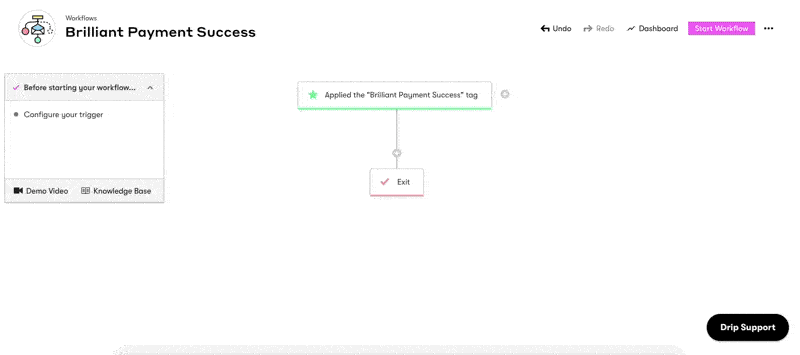
- Create a new Workflow in Drip (or use an existing one) with the Payment Success tag for your membership as the starting trigger.
- Click the “+” and choose Action > Send an HTTP Post > Paste the link you copied from Step 3 above > Update Trigger
- Click the “+” and choose Action > Remove a tag > Remove the Payment Success tag so this automation can run again in the future > Update Trigger
- Continue the automation with anything else you’d like to add and don’t forget to add a Goal at the end of when the Payment Failure tag is applied.
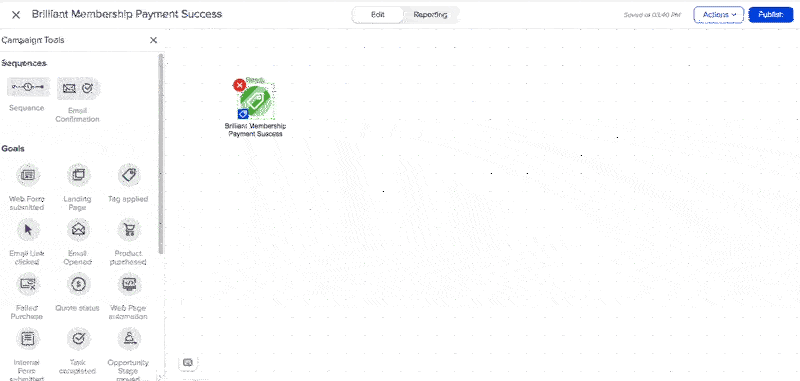
- Start a new campaign (or tweak an existing one) that starts with the Payment Success tag for your membership.
- Drag a new Email Sequence into the campaign.
- Click into the Email Sequence, drag over an HTTP post goal, paste in the link you copied in Step 3 above, drag over a tag add/remove and remove the Payment Success tag (so this can be applied again in the future.) Take this from draft to ready.
- Use the back arrow to go back to the main sequence, drag a tag add/remove, add the Payment Failed tag for your membership (this acts as a goal to end this automation when a payment failed tag is applied.
- Publish the campaign.
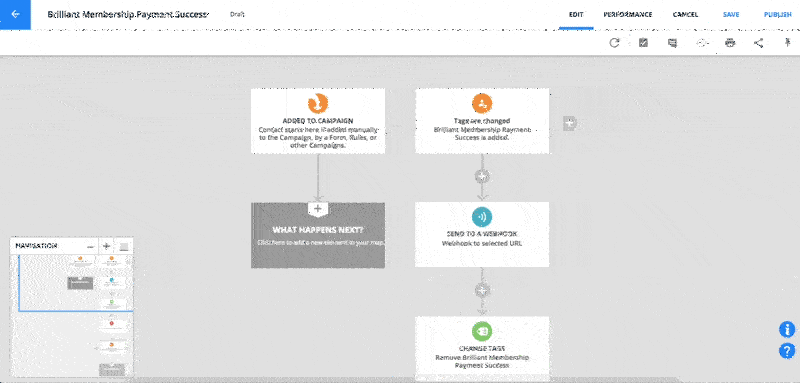
- Create or edit your existing Payment Success Campaign in Ontraport the starting point is when the Payment Success tag is added for your membership.
- Click the “+” sign and choose Advanced > Send to a Webhook, in Settings > Destination URL paste the link you copied from Step 3 above, in Add the data to send click the arrow icon > type Contact ID and click on this when it appears. Click the orange Done button.
- Click the “+” sign and choose Popular > Change Tags, in this section choose Remove from the dropdown and remove the Payment Success tag used to start this campaign so it can run again in the future.
- Continue with your campaign if there is anything you would like to add and the bottom of this campaign should end with a Goal > Contact is added to a tag > Your Membership Payment Failed tag.
Step 6: How to Display User Credits / Points
If you’d like your membership site users to see their points “balance”, you can do so with the Show the Value for a Custom Operation AccessAlly shortcode.
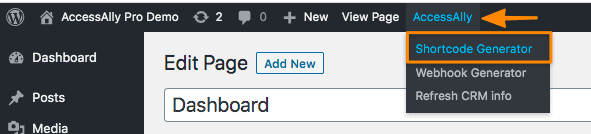
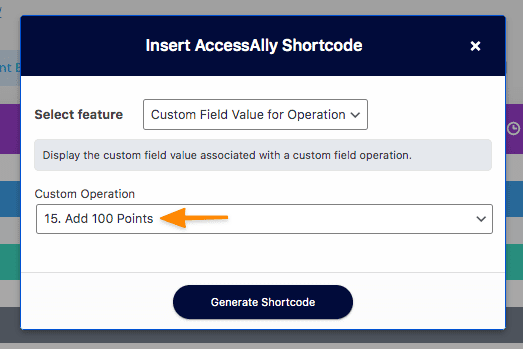
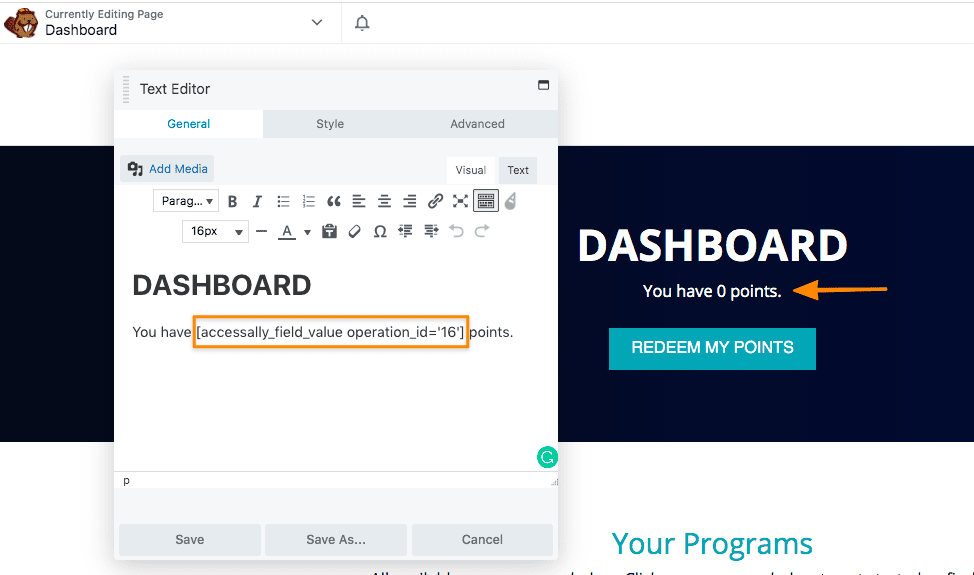
Choose Custom Field Value for Operation and select the custom field you used for your points increase in the CRM. Then click Generate Shortcode.
Paste the shortcode into your website where you’d like the points balance to be displayed. This could be the dashboard page of your AccessAlly site or the My Account page. Once added to the page, this shortcode will show the number of points the user has to spend.
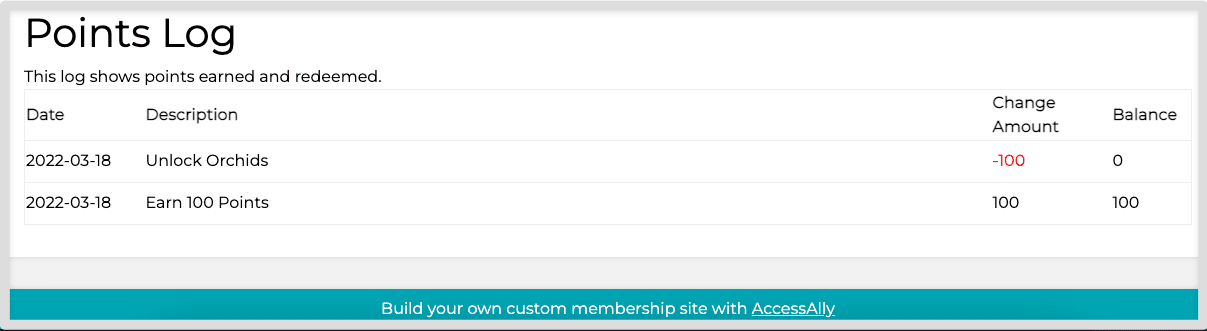
You can also display a log that includes:
- How someone earned or spent points
- The date of the event
- The balance at that point in time
Here’s an example of what this looks like:
This shortcode is not in the shortcode adder, but you can set up like this:
[accessally_custom_operation_log operation_id='200' num='90' prefix='']
Required Arguments:
- operation_id: id of custom operation that can display the field (required)
Optional arguments:
- num: maximum number of log listings to display (Default: 30)
- prefix: prefix of css class (Default: “”)
Step 7: How Users Redeem Points
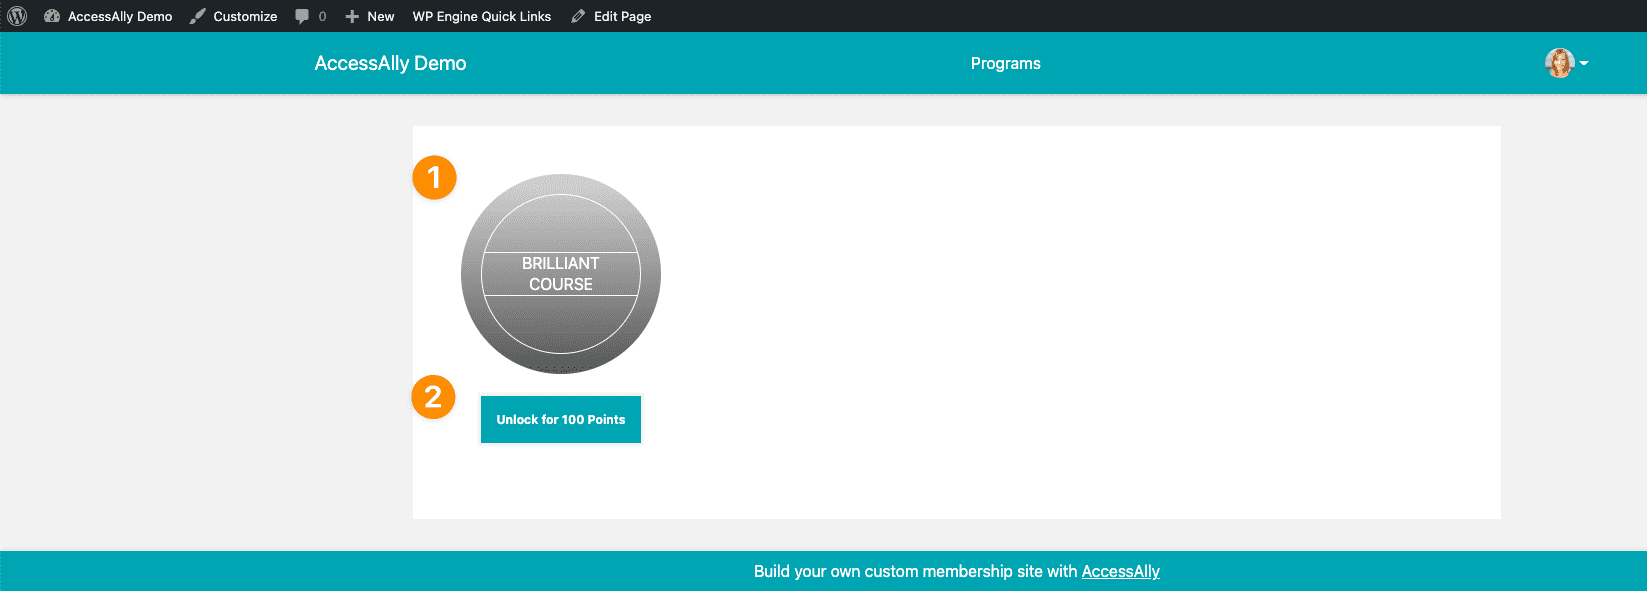
In step 4 above you created a decrease points custom operation. This operation creates a button that when added to a page on your site allows a user with the correct amount of points to “purchase” that item on your site.
The redeem points custom operation button can be placed on any page of your site and you may choose to place it underneath the item that is unlocked if it is an offering on your site.
- Shortcode for the offering that is unlocked
- Custom operation button (found in the Shortcode Generator) for the custom operation you created in step 4 of this article.
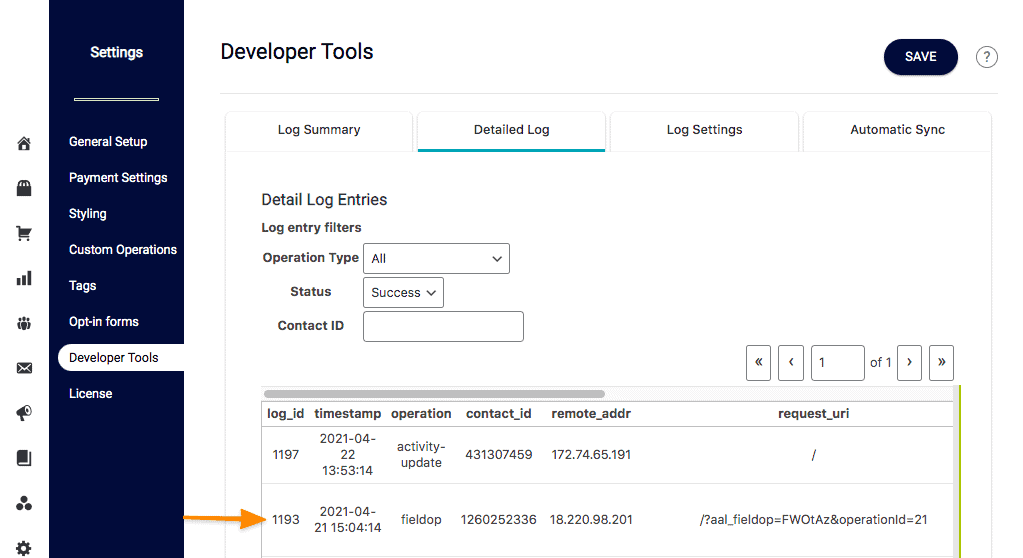
Step 8: Viewing the Detailed Log
Under AccessAlly > Settings > Developer Tools > Detailed Log you can see when and how each user has spent (or earned) credits inside your membership site.
Creating a Points Leaderboard?
With AccessAlly directories you can also display member points in a Leaderboard that gets sorted based on people’s point balances. Read the full Points Leaderboard tutorial here.
Frequently Asked Questions About This Article
If you are using the default gradient AccessAlly icons you can edit the text on the page and add the shortcode for that page to your site using the AccessAlly Shortcode Generator.
- Go to the page that you would like to edit and scroll to the AccessAlly Permissions section.
- Check the box by Customize icon text and add your desired text.
- In the branding section note the number of the page (example: 22816).
- Save your changes.
![]()
Using custom images instead of the gradient icons? Click on the pencil by the icons to add your custom image.
Next you’ll use the Shortcode Generator to create the page icon for this page and add it to the page on your site where you would like to display the unlock with points button for this page.
![]()
