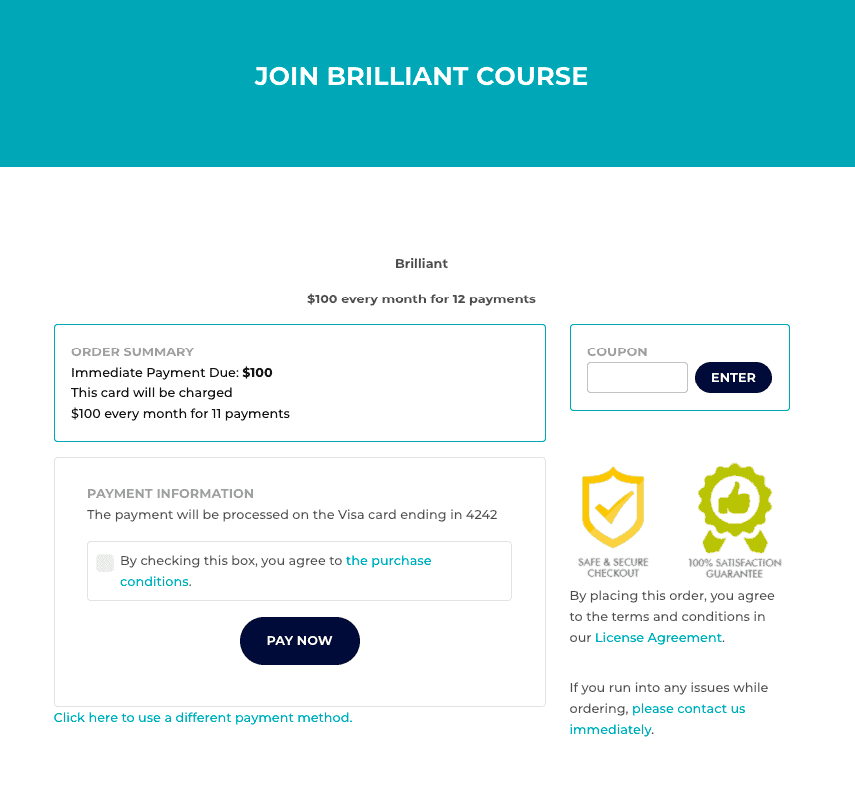
The tag-based split testing feature in AccessAlly allows you to split test different emails and automation sequences in your CRM and/or split test different content on your membership site. This is a powerful feature with lots of use case scenarios. Below you’ll find an example of how you might use this feature.
ARTICLE CONTENT:
Example Scenario
You recently delivered a free 5-Day Challenge from your AccessAlly site. Now you’d like to beta test pricing for a paid course. For this split test, you’ll present past challenge participants with one of two options:
- One-time payment of $1000
- Payment plan with twelve payments of $100/month
This will be a 50/50 split test – 50% of past challenge participants will be tagged with option #1 and 50% will see option #2. This allows you to beta test copy, offers, and even launch sequences to see what your audience prefers.
Let’s dive in!
1. Create a Tag-Based Split Test
Go to AccessAlly > Settings > Custom Operations click the +NEW OPERATION button. In the dropdown under What This Operation Does > choose the Tag-based split testing option.

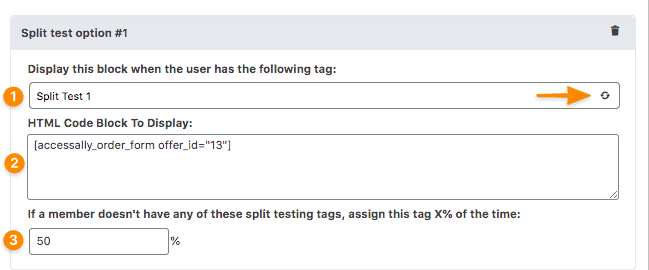
- Add the unique tag for split test option #1 – if you need to create a new tag in your CRM you’ll click the gray refresh icon to sync your new tag.
- Add split test #1 content – you can add text, images, AccessAlly order form shortcodes (shown in the example above), HTML code, or anything you would like!
- Split test #1 display percentage – used to weight assignment of this split test tag for users that visit the page without a tag or users that are tagged from a split test via a CRM automation.
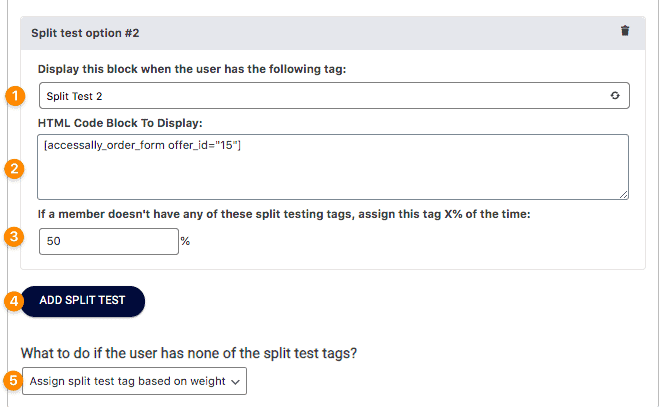
- Add the unique tag for split test option #2 – if you need to create a new tag in your CRM you’ll click the gray refresh icon to sync your new tag.
- Add split test #2 content – you can add text, images, AccessAlly order form shortcodes (shown in the example above), HTML code, or anything you would like!
- Split test #2 display percentage – used to weight assignment of this split test tag for users that visit the page without a tag or users that are tagged from a split test via a CRM automation.
- Add additional split test options to create 3+ split tests.
- Choose what happens if a user does not have any of the split testing tags when they visit the page.
- Option 1: Show nothing (users will not be tagged)
- Option 2: Assign the split test tag to this member based on weight (percentage)
- SAVE your changes by clicking the blue SAVE button at the top of the page.
2. Deliver Your Split Test
There are two ways to use your newly created split test!
- Via your CRM system – the contact moves through a CRM automation that determines the split test tag they are assigned based on percentage.
- Via your AccessAlly site by inserting the block on your pages – logged-in users are shown the split test based on tags. They can be assigned to a split test if they visit the page without a tag.
Option 1: Split Test via Your CRM
There are many ways to create automations with Keap – from simple to complex. The outline below is designed to show you how to use the pieces necessary for your split test.
Step 1: Copy the HTTP post from your AccessAlly split test custom operation
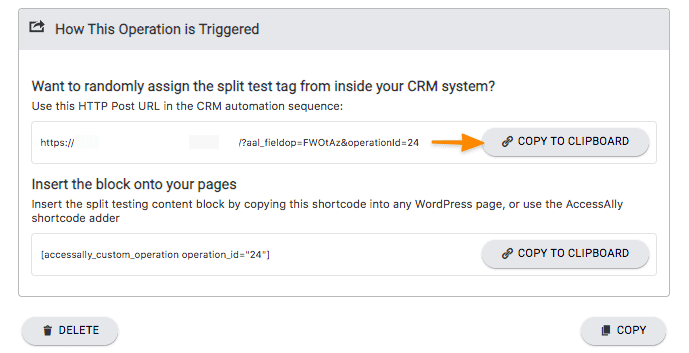
Step 2: Create a new Keap campaign (or tweak an existing one)
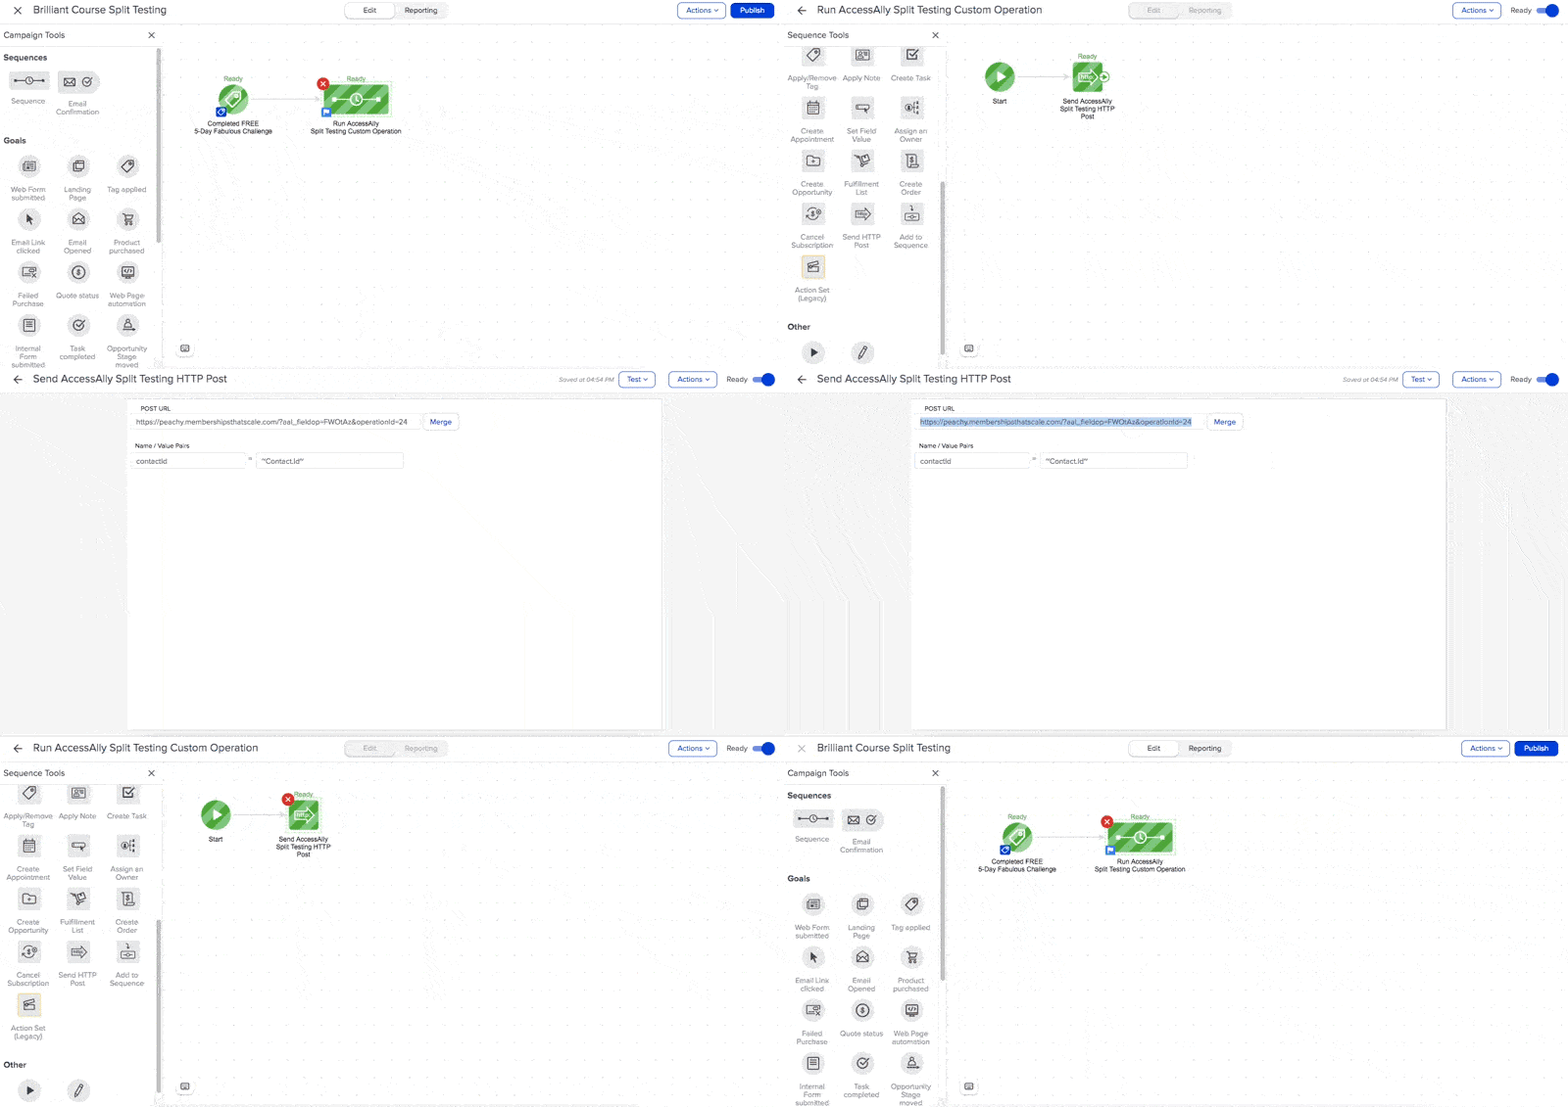
Drag a new sequence over, open it, then drag a new HTTP post in. Paste the link from the step above. Switch from draft to ready, go back to the sequence, switch from draft to ready.
Step 3: Create the split test tagging options.
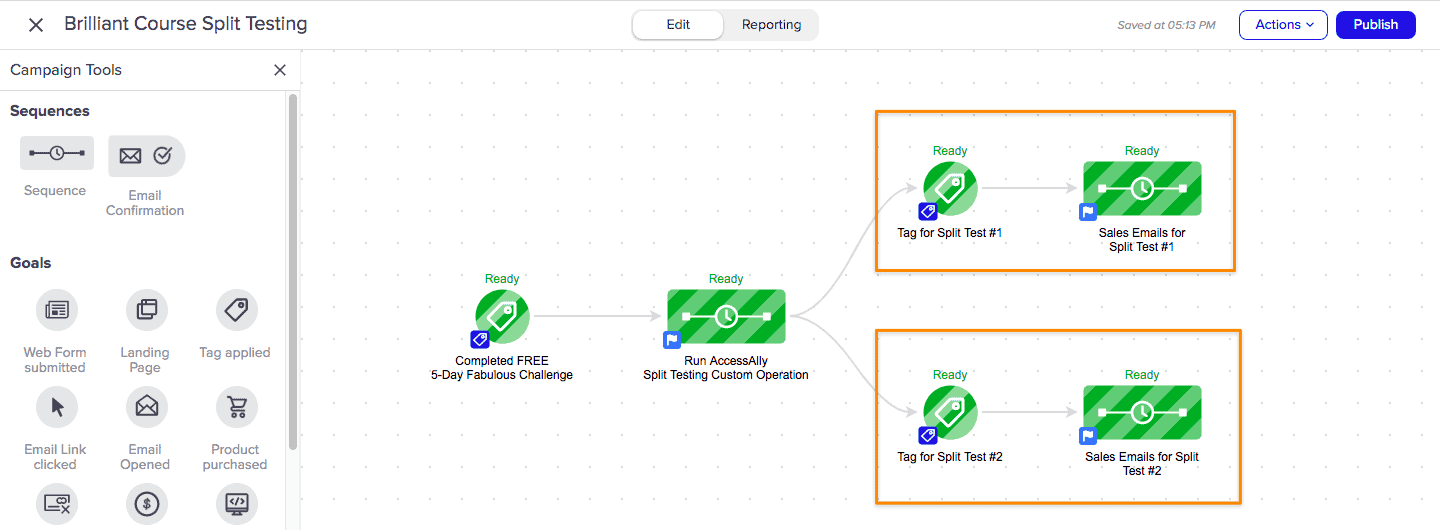
- Use the tag applied option to add each of your split testing options as separate branches.
- Next, add one or more email sequences with links to your offer. If you would like to test the effectiveness of your emails you can use email link click goals. Here is an article from Keap with more information.
- Use the image below as a guide! Don’t forget to test and publish your campaign when ready. If using a tag to trigger the start of this campaign (like the tag for completing a free challenge) make sure you’ve added this tag to your existing contacts.
- A contact does not have to be a user on your AccessAlly site to move through split test. Any contact in your Keap account will be tagged using the split test custom operation, but they will not be added as users to your site.
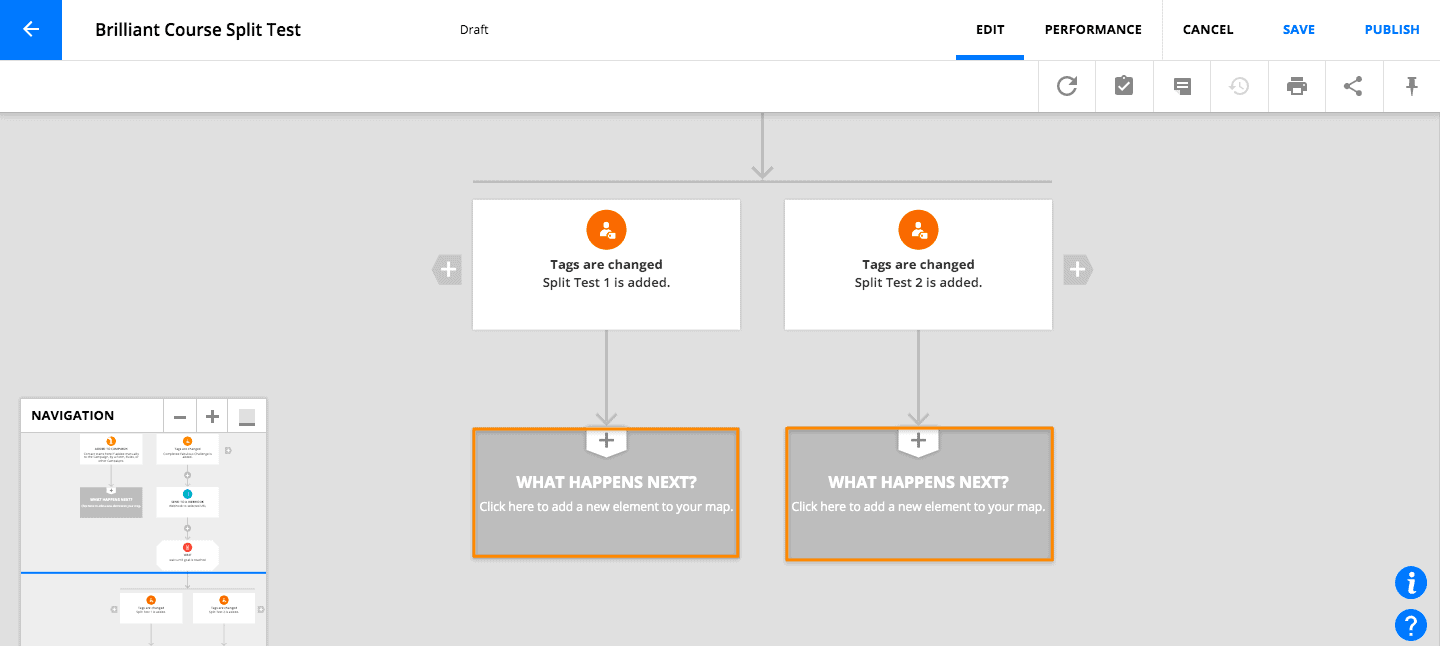
There are many ways to create split testing automations with Ontraport – from simple to complex. The outline below is designed to show the pieces needed to run the webhook for your split test. You can reach out to Ontraport if you have additional CRM-related questions.
Step 1: Copy the HTTP post from your AccessAlly split test custom operation

Step 2: Create a new Ontraport campaign (or tweak an existing one) to run your webhook
- Choose a tag to trigger this campaign – the example below shows a challenge completion tag, but any tag you’d like to use will work as long as the contacts are added to this tag.
- In the What happens next section, click on Advanced, choose to SEND TO A WEBHOOK, the Destination URL is the HTTP post from your AccessAlly split test custom operation. Remember to click the icon by Add the data to send and add the Contact ID field
- As new contacts move through this campaign they will be tagged with one of your split testing tags. They do not have to be a user on your site to be tagged in the CRM. You can end this campaign.
- Now you can create additional email sequences (that start with each of your split testing tags) to split test different email copy and different sales page offers.
Step 1: Copy the HTTP post from your AccessAlly split test custom operation
There are many ways to create split testing automations with ActiveCampaign – from simple to complex. The outline below is designed to show the pieces needed to run the webhook for your split test. You can reach out to ActiveCampaign if you have additional CRM-related questions.

- Create a new automation in ActiveCampaign. The starting point of this automation will be when a tag is applied. You can use any tag to start this automation (except your split testing tags!)
- Click the “+” then choose Conditions and Workflow, choose Webhook. Paste in the HTTP post webhook from your split test custom operation (shown in Step 1 above).
- Click Active in the top right corner to start this automation.
- As contacts enter this automation they will be tagged with one of your split testing tags based on the percentage you selected.
- Now you can create different automations (one for each split testing tag) to test different launch email sequences.
There are many ways to create split test automations with Kit – from simple to complex. The outline below is designed to show the pieces needed to run the webhook for your split test. You can reach out to Kit if you have additional CRM-related questions.
Step 1: Create a unique tag in Kit
This tag will be used to create an automation rule in Kit it should have a descriptive name like naming it after the split test you created in AccessAlly.

Step 2: Create an automation rule using the Webhook Generator.
Select the custom operation you created for the split test. Refresh your tags using the gray icon on the right, add the unique tag, click CREATE WEBHOOK.

3. Add the unique tag to the Kit contacts you’d like to split test.
After adding the tag your contacts will be randomly tagged with one of your split testing tags based on the percentage for each split testing option. Contacts do not have to be users on your AccessAlly site to be tagged with split testing tags.
4. Create additional automations and/or email sequences in Kit that start with each split testing tag. This makes it easy to test different launch offers, email copy, and pages on your site.
Step 1: Copy the HTTP post from your AccessAlly split test custom operation
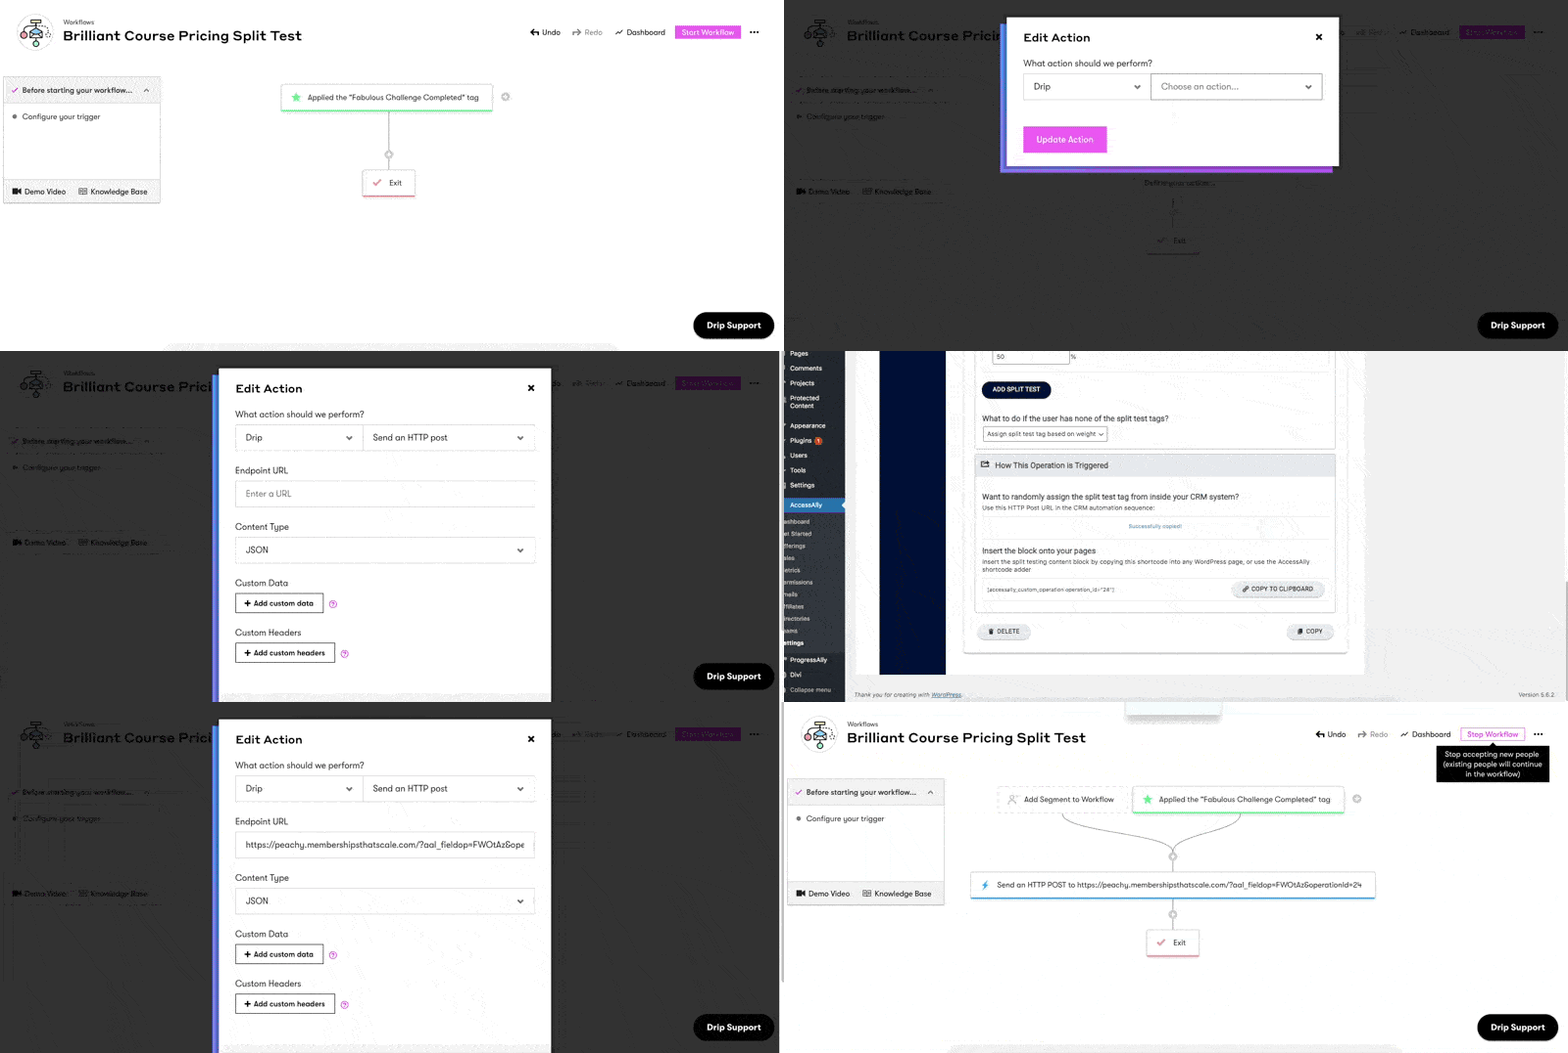
There are many ways to create split testing automations with Drip – from simple to complex. The outline below is designed to show the pieces needed to run the webhook for your split test. You can reach out to Drip if you have additional CRM-related questions.

- Create a new Workflow in Drip. The starting point of this automation will be when a tag is applied. You can use any tag to start this automation (except your split testing tags!)
- Click the “+” then choose Conditions and Workflow, choose Webhook. Paste in the HTTP post webhook from your split test custom operation (shown in Step 1 above).
- Click Active in the top right corner to start this automation.
- As contacts enter this automation they will be tagged with one of your split testing tags based on the percentage you selected.
- Now you can create different workflows (one for each split testing tag) to test different launch email sequences.
Option 2: Split Test via Your AccessAlly Site
This option works for all users of your AccessAlly site. The user must be a logged-in user to see the split test when using this option.
Step 1: Click the COPY TO CLIPBOARD button in your split test custom operation.
 Step 2: Paste the shortcode link into a WordPress page using your theme and/or builder.
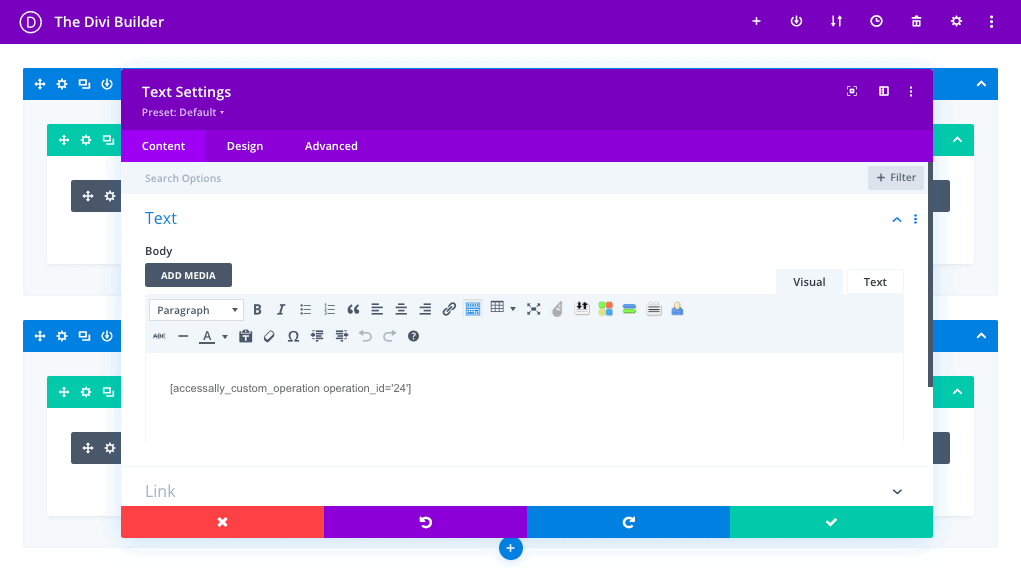
Step 3: Test with an existing user to see your split test in action.
