If you would like to create a community group inside your AccessAlly site. You’ll love this A-Z walkthrough guide.
ARTICLE CONTENT:
Resources on Creating Groups
You will need CommunityAlly an add-on option for AccessAlly Pro users.
About
There are many ways that you can create a free community group inside your AccessAlly site. This article will outline two ways – one simple and one a bit more advanced.
Simple – Instant Access to a Group
This option allows you to easily (and quickly) create a new community group inside your site. With this option members are instantly added to your community.
Estimated time to complete – 15 minutes or less.
Step 1: Create an offering for your community.
Go to AccessAlly > Offerings > Click “+ CREATE” > Choose the Start From Scratch option.
- Give this offering a name
- Click Yes, I’m ready to add my content.
What you will see after completing Step 1.
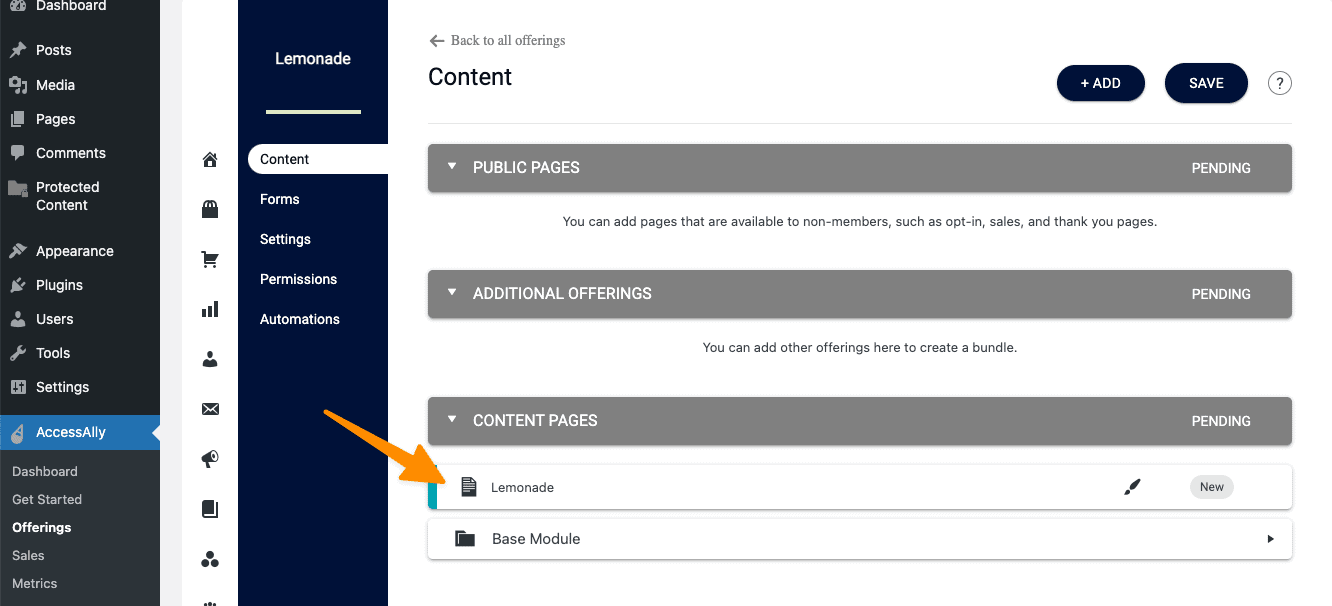
Step 2: Add content to the base page of your offering.
The base page (shown in the image above with the orange arrow) must be published and used in your offering.
Ideas for this page!
- Create a welcome video for your community.
- Share terms of use or community guidelines.
- Add anything you would like members to know.
Step 3: Add a Group to the Base Modules Content Pages section.
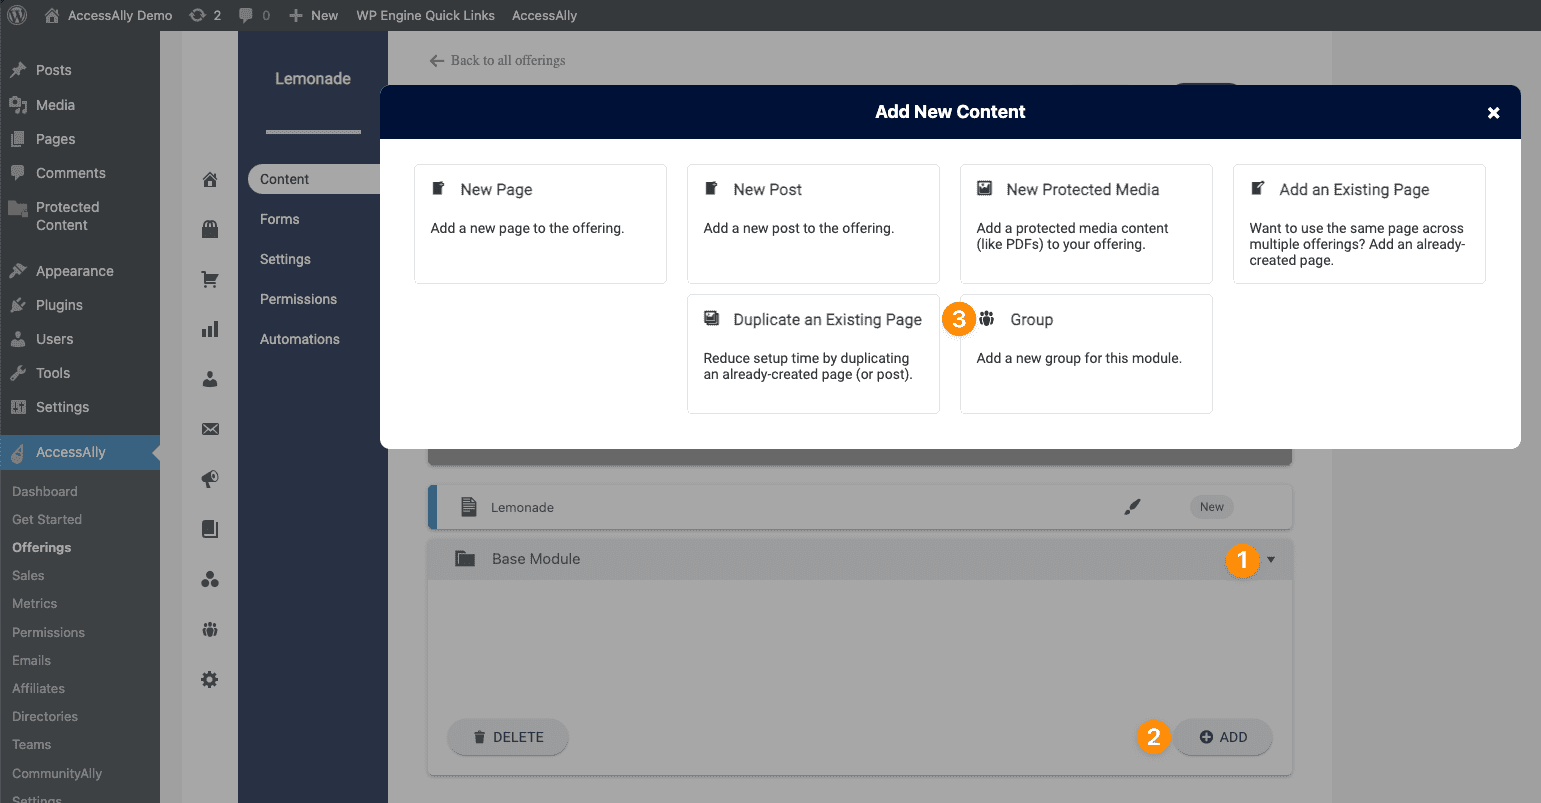
- Open the Base Module dropdown.
- Click + ADD
- Choose Group
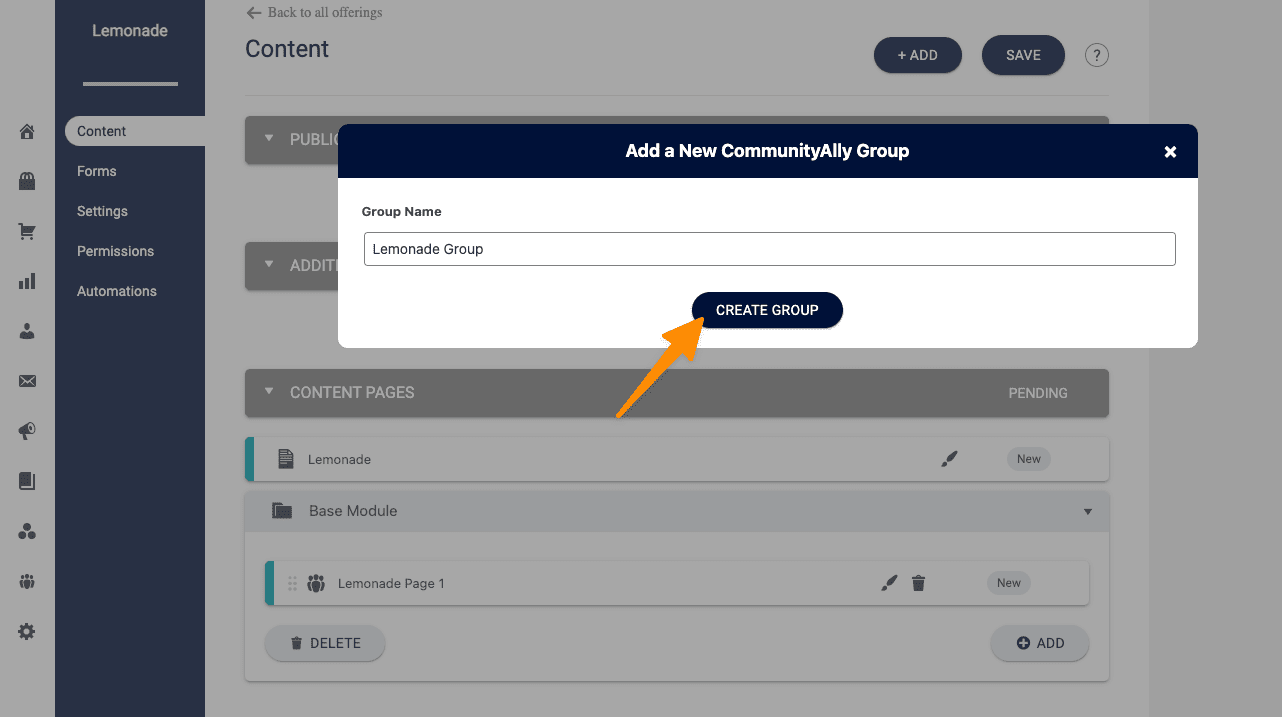
- Name your Group
Step 4: Add a Form to Your Group
Now it’s time to add a form to your offering. This could be a free opt-in form or paid order form.
- Click Forms in the left-hand blue sidebar menu.
- Click “+ ADD” and choose a free opt-in form or a paid order form option.
- Follow the steps on the screen to create your form.
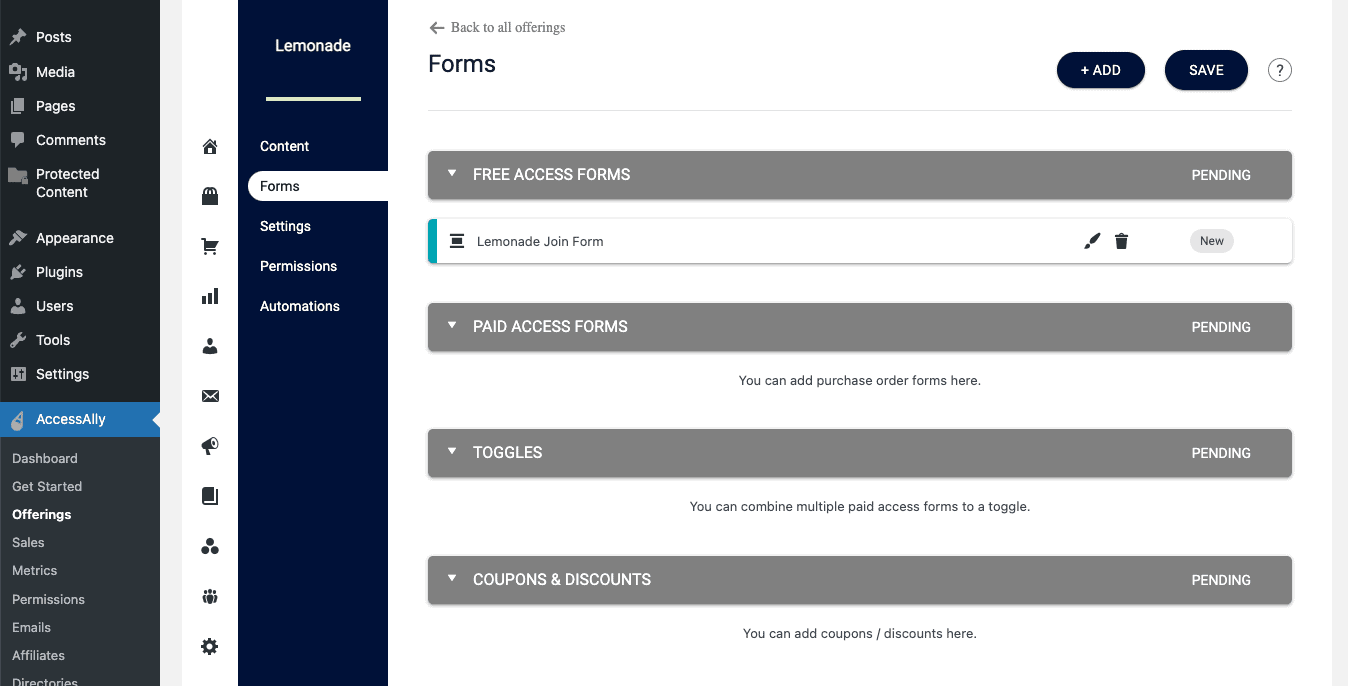
Example: This image shows the forms tab after a free opt-in form has been added.
Step 5: Save Your Offering
Now it’s time to click the SAVE button in the top right corner to save this offering.
Step 6: Deliver Your Offering
Now you can use AccessAlly Emails to deliver a Welcome Email when someone new joins your community. You can also use the Automations tab in the blue sidebar menu to create advanced CRM automations that are sent when a new member joins.
Advanced – Tag-Based Access to a Group
In the advanced path members joining your free community group will have requirements they need to complete before accessing the group. This allows you to use more robust AccessAlly features to control the user journey.
Examples of requirements could be:
- Agreeing to your community guidelines.
- Completing a user profile before being added to the community.
- Completing a series of steps or goals before seeing the community.
Estimated time to complete – 1 hour or less
Step 1: Create an offering
Go to AccessAlly > Offerings > Click “+ CREATE” > Choose the Start From Scratch option.
- Give this offering a name
- Click Yes, I’m ready to add my content.
What you will see after completing Step 1.
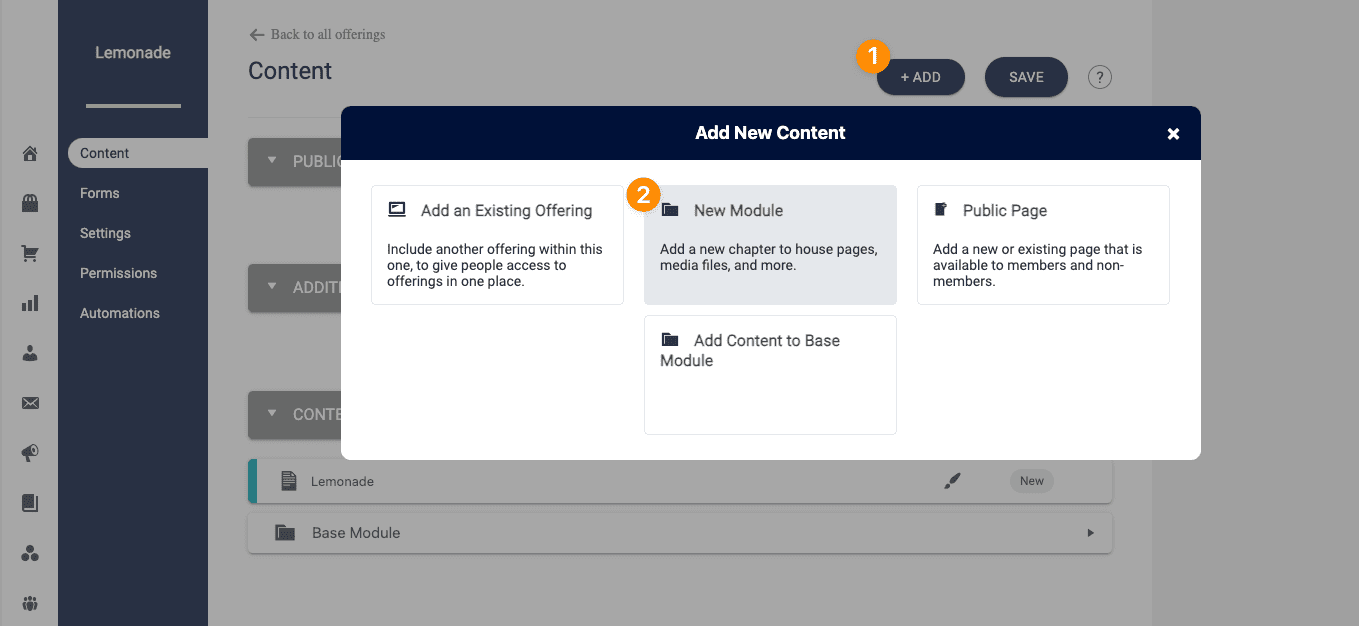
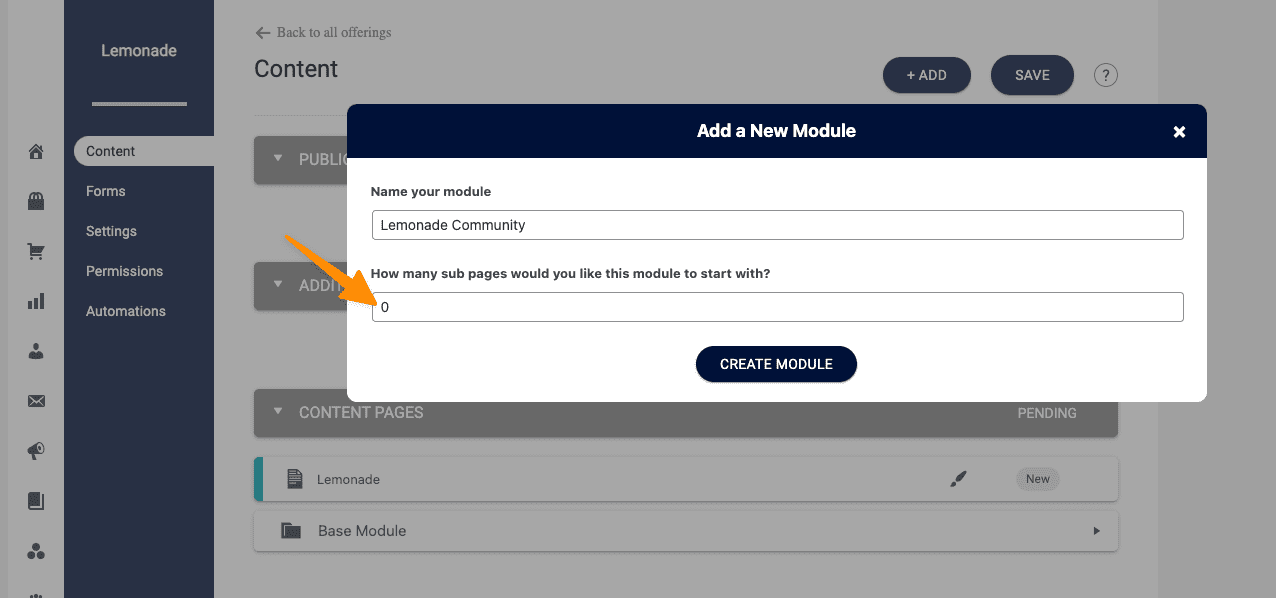
Now go to +ADD at the top right and select New Module. Keep the number of pages set to “0”.
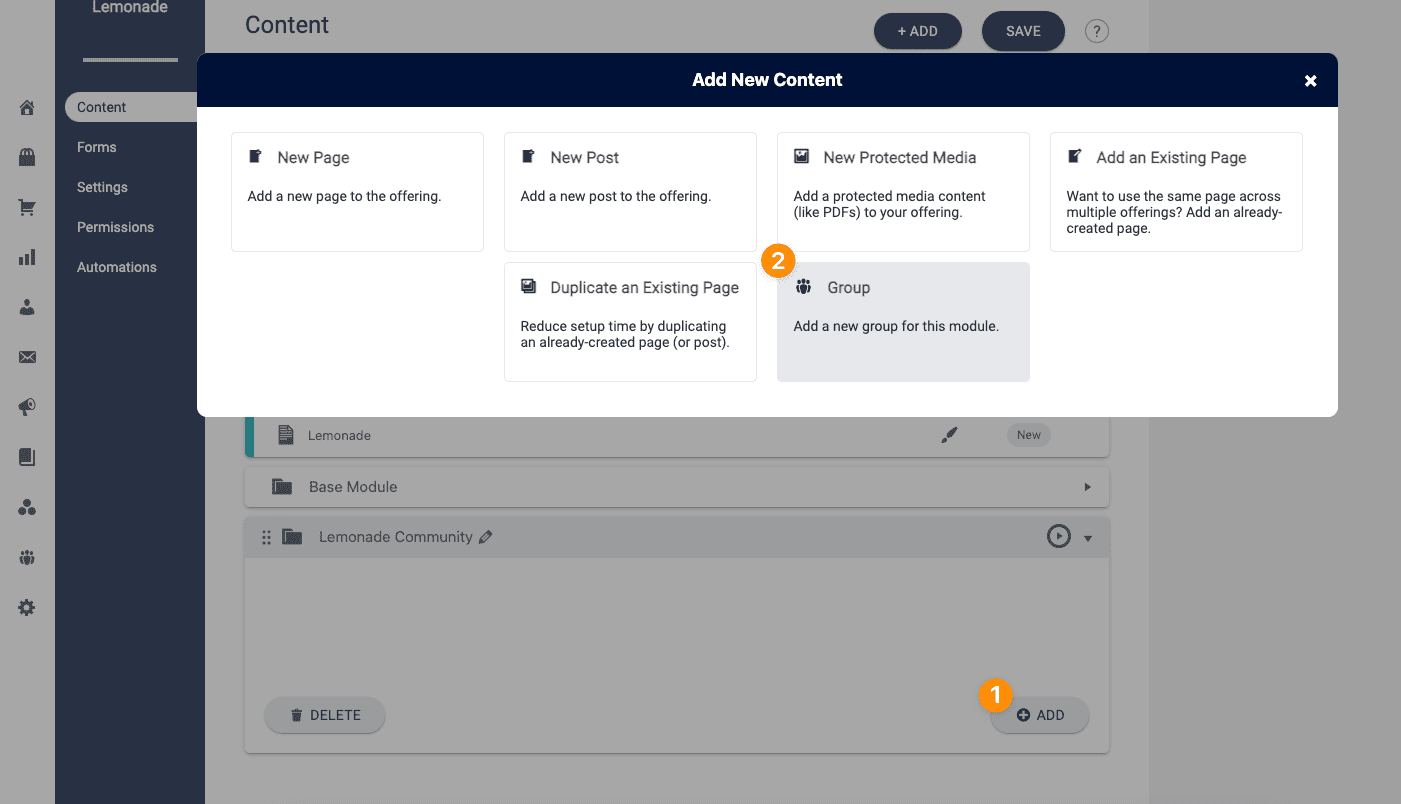
In the Module dropdown, click +ADD and choose Group.
Name your group and set the delivery timer to Do NOT release this module based on a schedule. This allows you to release the module based on tags.
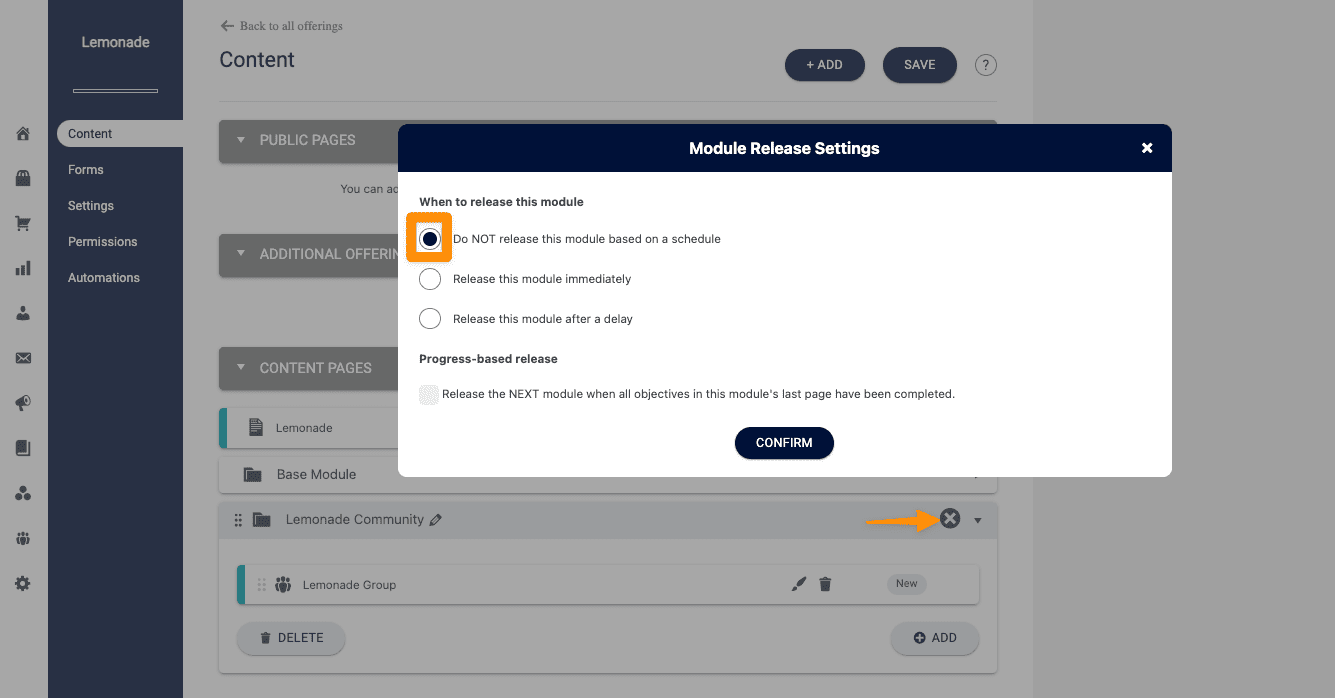
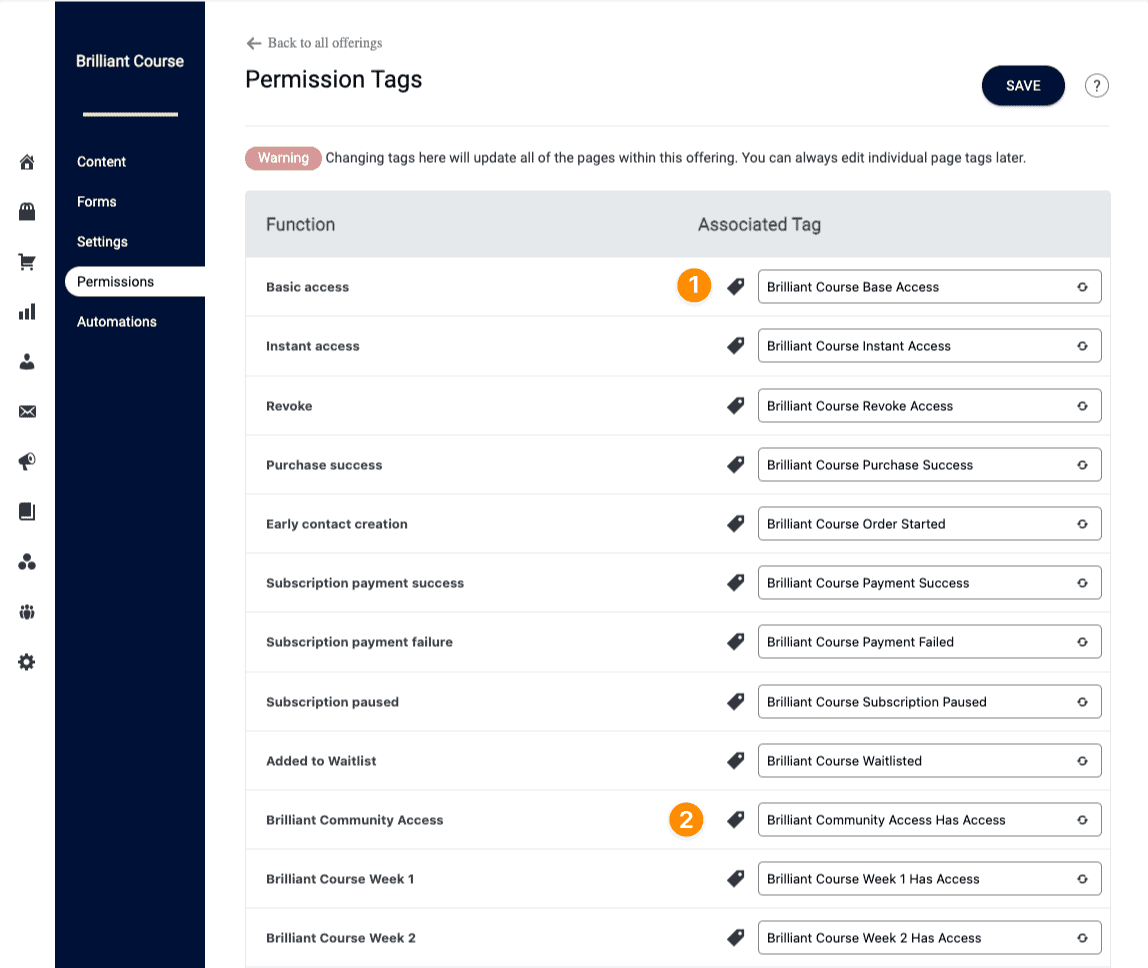
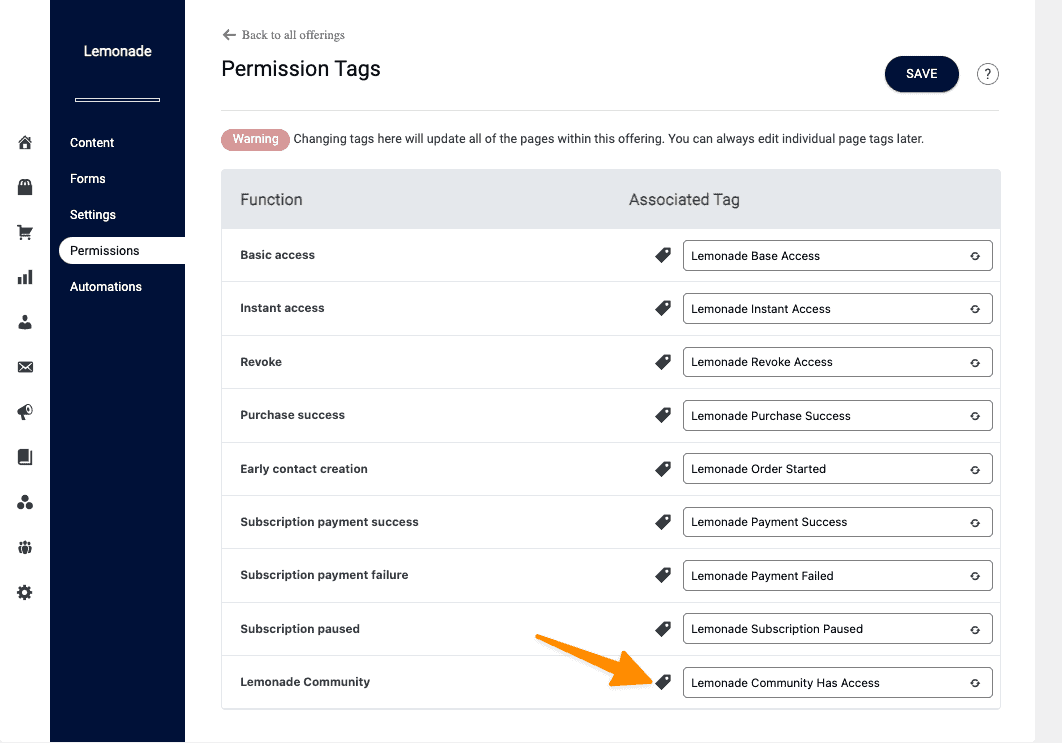
Now visit the Permissions tab to see the tag that goes with your new group. This is the access tag that you will add or remove so a new member can see the community group. Remember this tag. You will use it in later steps.
Step 2: Add a Form to Your Group
Now it’s time to add a form to your offering. This could be a free opt-in form or paid order form.
- Click Forms in the left-hand blue sidebar menu.
- Click “+ ADD” and choose a free opt-in form or a paid order form option.
- Follow the steps on the screen to create your form.
Example: This image shows the forms tab after a free opt-in form has been added.
Step 3: Save Your Offering
Now it’s time to click the SAVE button in the top right corner to save this offering.
Step 4: Add content to the base page and choose how group access is given.
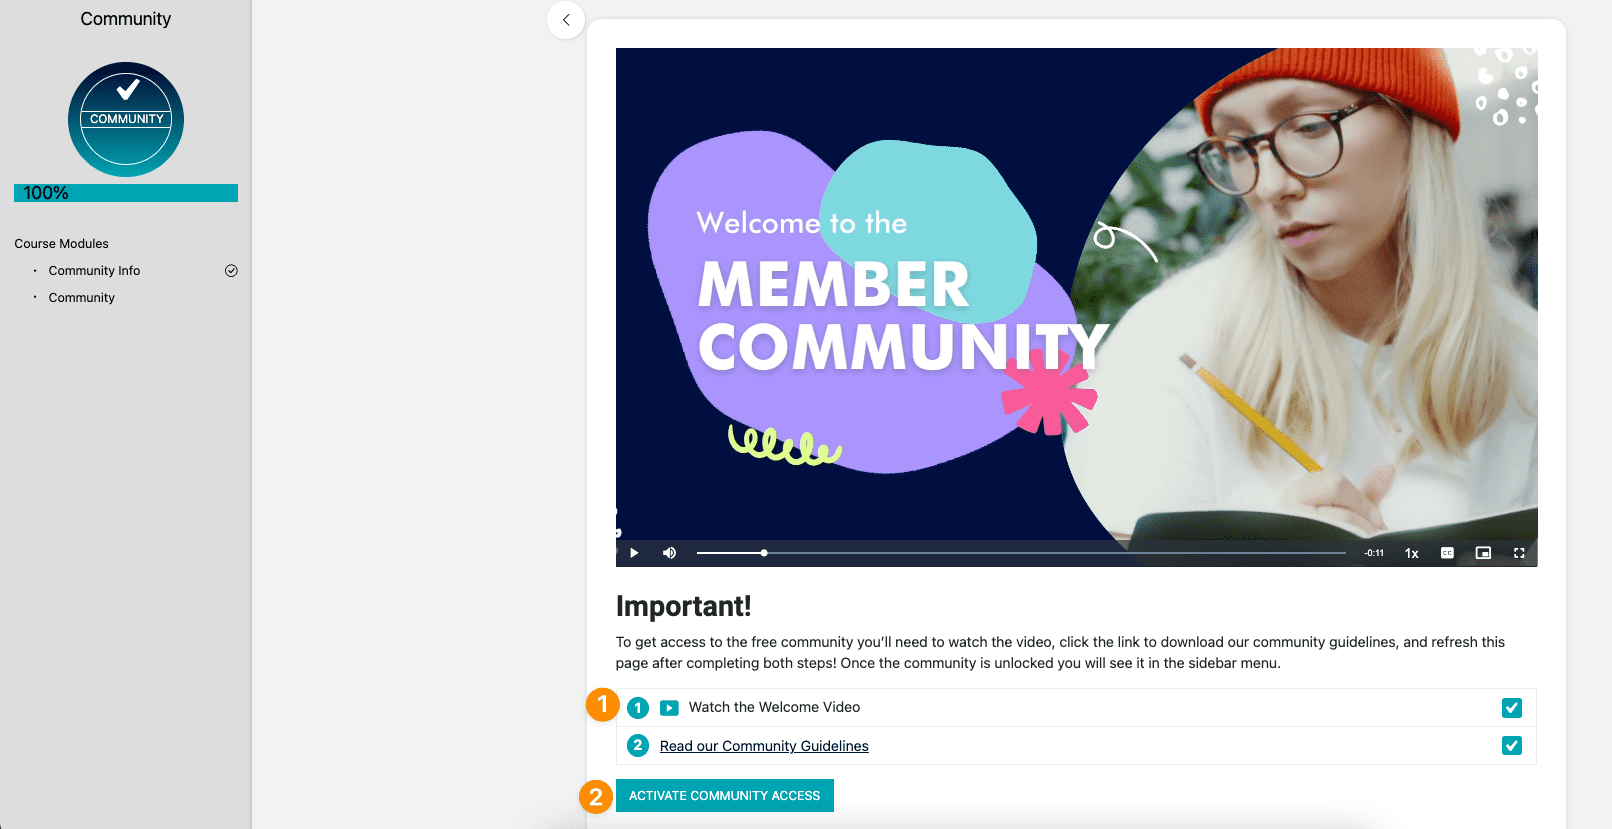
The base page (shown in the image above with the orange arrow) must be published and used in your offering. You’ll add anything you want the user to do to get access to your community on this page.
- Access is given to a member when they complete the steps in an objective checklist.
- Access is given (or removed) when a member clicks a custom operation button.
Examples! In the image below you’ll see two different ways access to the group could be given to a new member.
Step 4a: Using an Objective Checklist to give access
An objective checklist is completed which applies the tag for access to the group.
-
- Add items that you want the user to complete or agree to in ProgressAlly > Page Settings > Objectives
- Add the tag for the group module to ProgressAlly > Page Settings > Tagging
- Once the member completes the items on the objective checklist they are automatically tagged for access to the group.
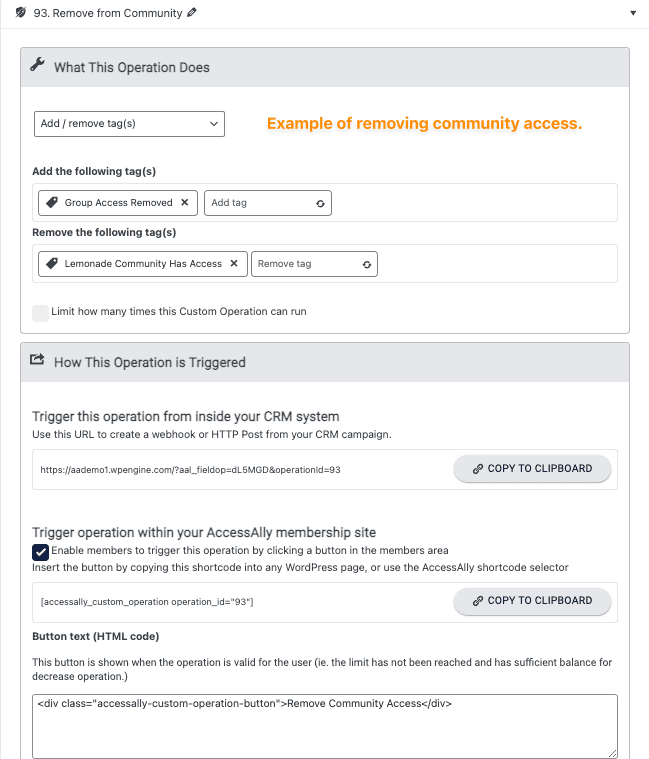
Step 4b: Using Custom Operation buttons to give or remove access
A custom operation button applies (or removes) the tag for access to the group. This is great as an option if you would like a member to self-select if they want to participate in your group or not.
-
- Go to your CRM system and create a new tag. This tag allows you to tag a user that wants to be removed from a group. Example: Lemonade Group Access Removed.
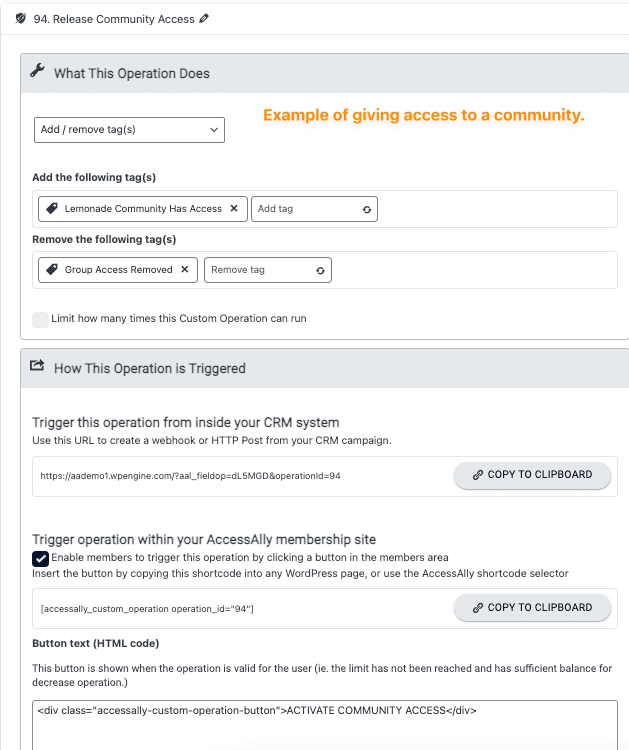
- Go to AccessAlly > Settings > Custom Operations click “+ NEW OPERATION” to add a new custom operation.
- Choose Add / remove tag(s)
- In the Add the following tag(s) section add the tag that gives access to your community group
- In the Remove the following tag(s) section add the tag that removes access tag.
- Important – add a checkmark by trigger operation within your AccessAlly membership site as this creates the button a new member clicks on to get access.
- Customize the button text with something like Activate Group Access.
- Go to AccessAlly > Settings > Custom Operations click “+ NEW OPERATION” to add a new custom operation.
- Choose Add / remove tag(s)
- In the Add the following tag(s) section add the tag that removes access to your community group
- In the Remove the following tag(s) section add the tag that gives access to your community group.
- Important – add a checkmark by trigger operation within your AccessAlly membership site as this creates the button a new member clicks to remove their access to the group.
- Customize the button text with something like Remove Group Access
Example custom operation giving access to a community group.
Example of custom operation that removes access to a community group.
Now, you can use the shortcode generator to display the custom operation buttons based on tags the member has. This option allows only the relevant button to be displayed so the member does not see both button options on the page.
An example of coding used is shown below. Remember it’s important to use the AccessAlly Shortcode Generator to create this code as it will be different for every AccessAlly site.
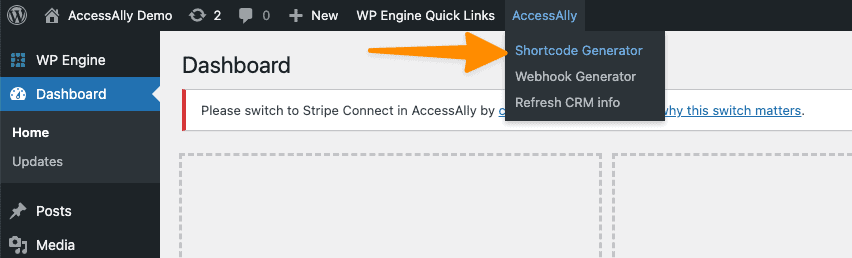
You’ll use the shortcode generator to create the codes for displaying your buttons. When the user has the tag for access to your community you will display the custom operation that removes access.
[accessally_has_any_tag tag_id=’5199′ comment=’Lemonade Community Has Access’][accessally_custom_operation operation_id=’93’][/accessally_has_any_tag]
When the user has the tag that removes access to your community you will display the custom operation button that gives access.

[accessally_has_any_tag tag_id=’5200′ comment=’Group Access Removed’][accessally_custom_operation operation_id=’94’][/accessally_has_any_tag]
Step 5: Deliver Your Offering
Now you can use AccessAlly Emails to deliver a Welcome Email when someone new joins your community. They see the first page and follow the path you selected to give them access.
You can also use the Automations tab in the blue sidebar menu to create advanced CRM automations that are sent when a new member joins.
FAQs
The tag your CommunityAlly group uses is based on its location within your offering. Here are two examples:
- The Base Access tag > if your CommunityAlly group is in the base module of an offering it is instantly “unlocked” when a contact has the base access tag.
- Module Has Access tag > if your CommunityAlly group is in a module of an offering it is “unlocked” when a contact has the applicable module has access tag.