Skill Level: Advanced
Our advanced articles are created using multiple AccessAlly features in creative ways along with custom coding and/or the use of conditional shortcodes to create unique experiences for your participants.
Scenario
You would like to create one team leader administration portal where each leader chooses what items they would like to purchase and have shown to their members.
This allows you as the site owner to create two potential revenue streams from your team offerings.
- Selling more team member licenses to increase team size
- Selling more offerings to team leaders to add more courses, memberships, trainings over time
ARTICLE CONTENT:
Heads Up
This article covers the use of 1-click upsells which are only possible in this way when using AccessAlly order forms connected to Stripe as the payment processor. It is not possible to use this feature with PayPal payments or 3rd party order forms.
Part 1: Team Center Offering
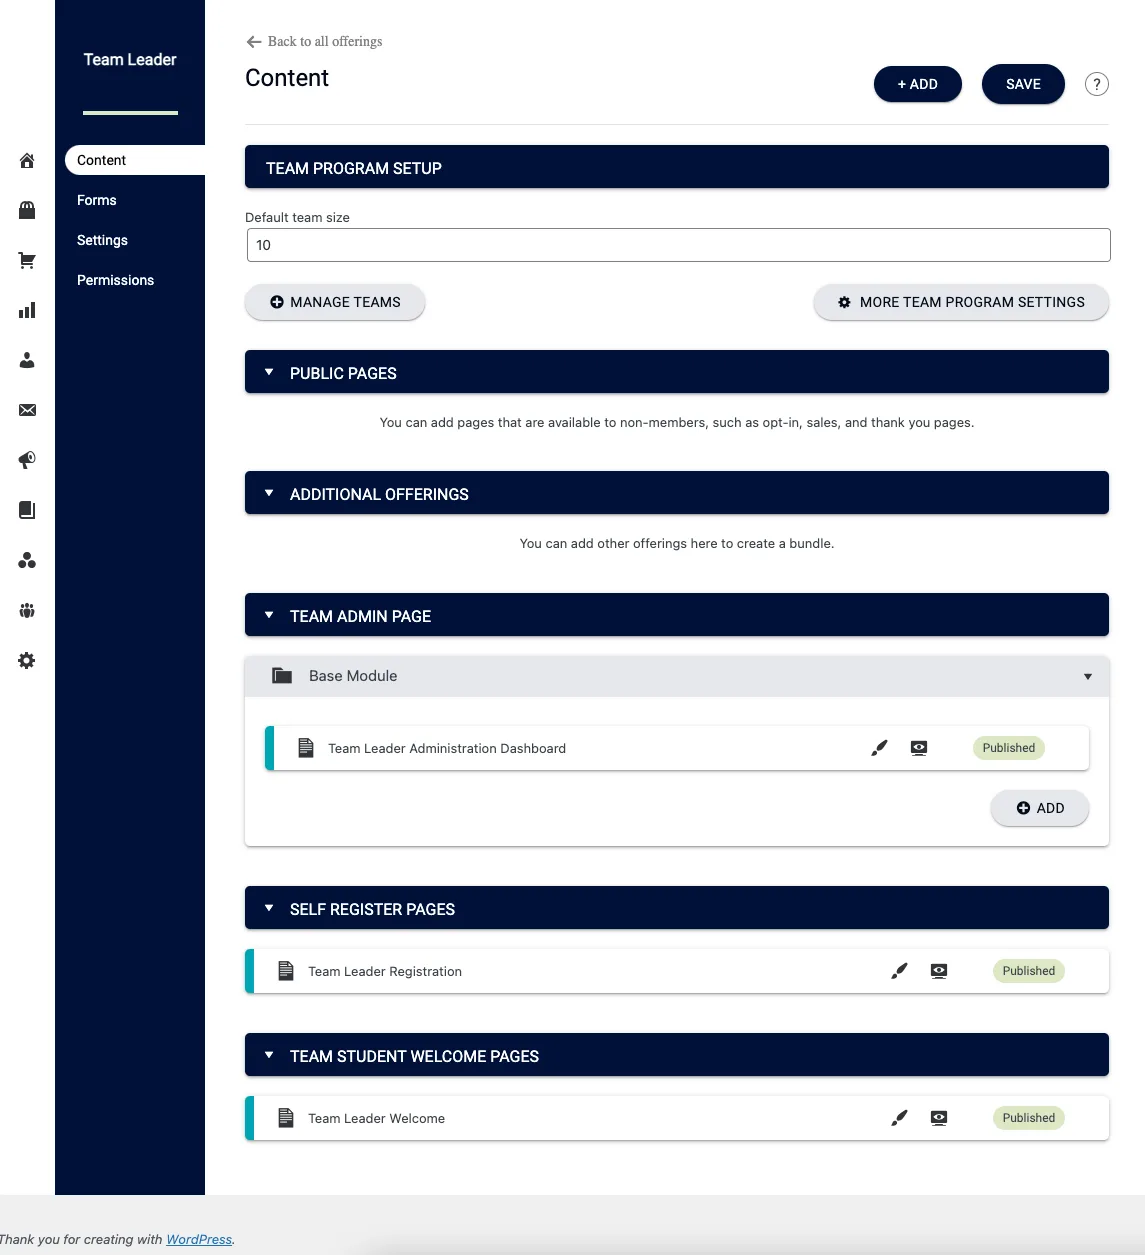
Create a new team center offering set the default number of licenses to the number that you would like to consistently sell to all team leaders.
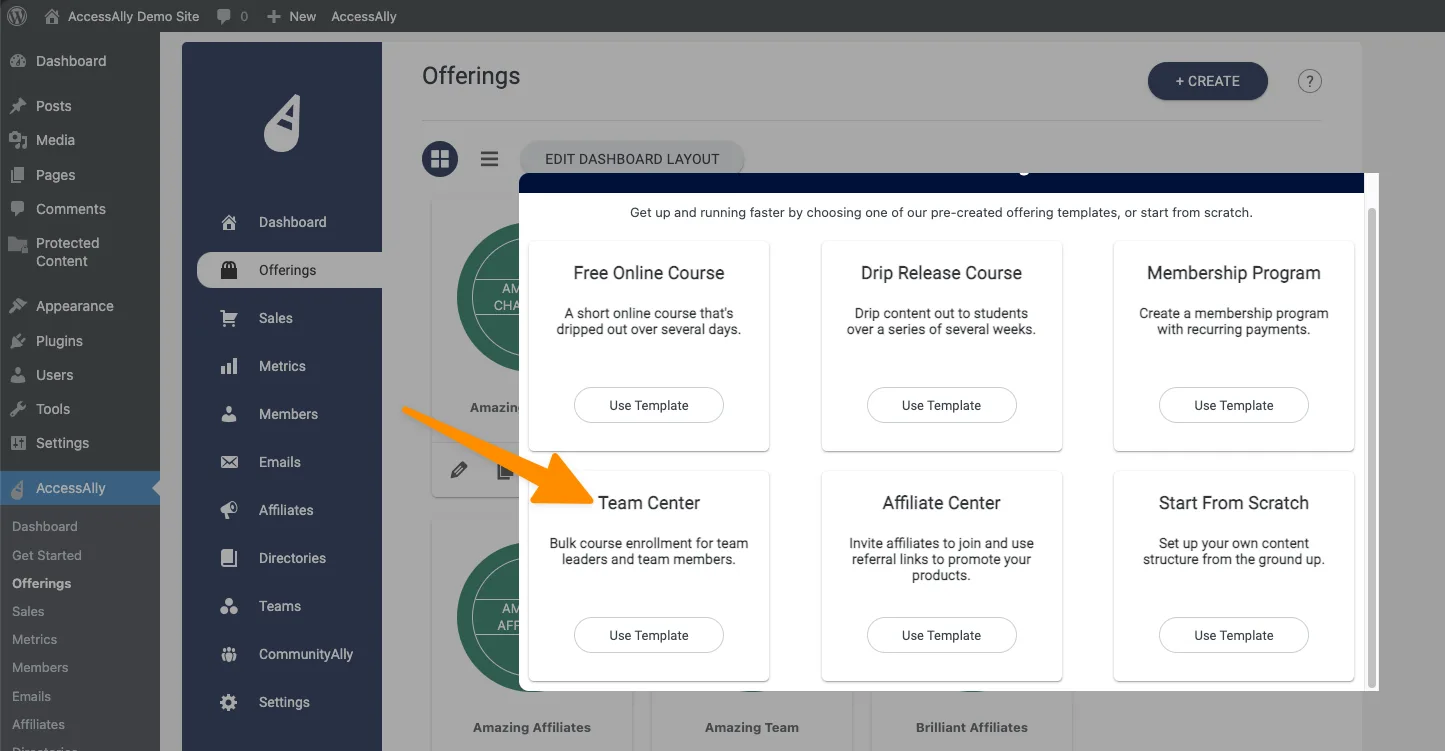
In the example we’ll use 10 licenses.
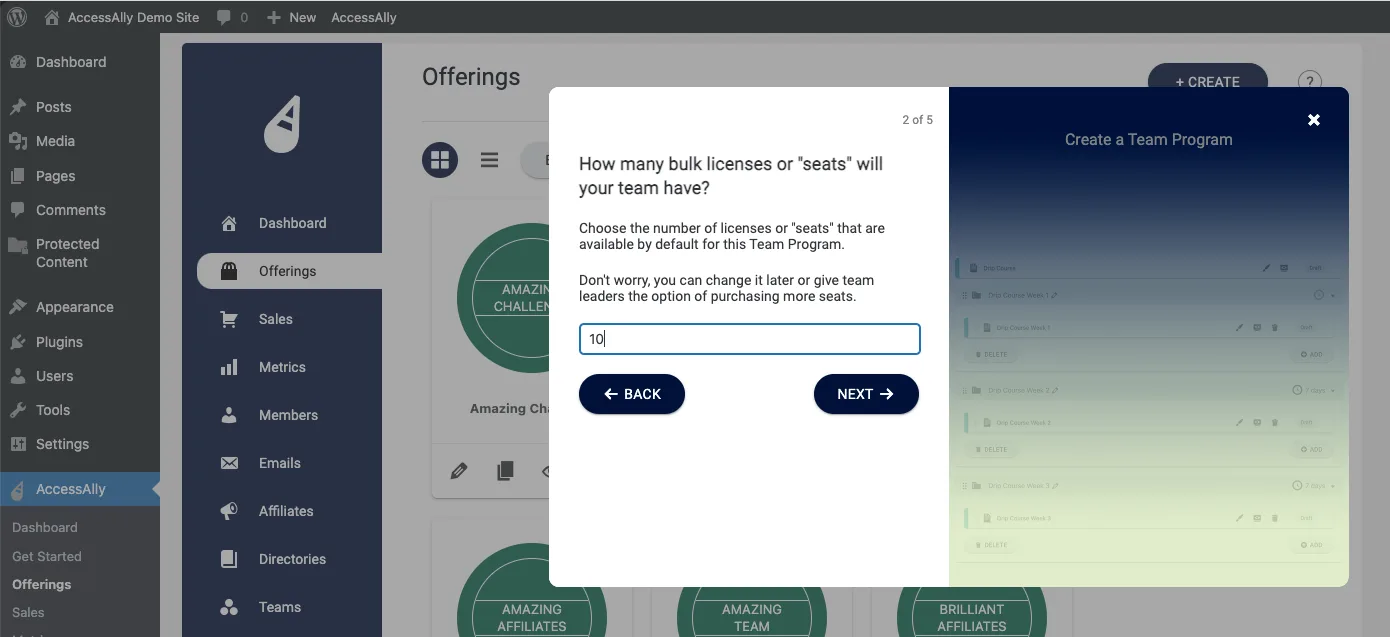
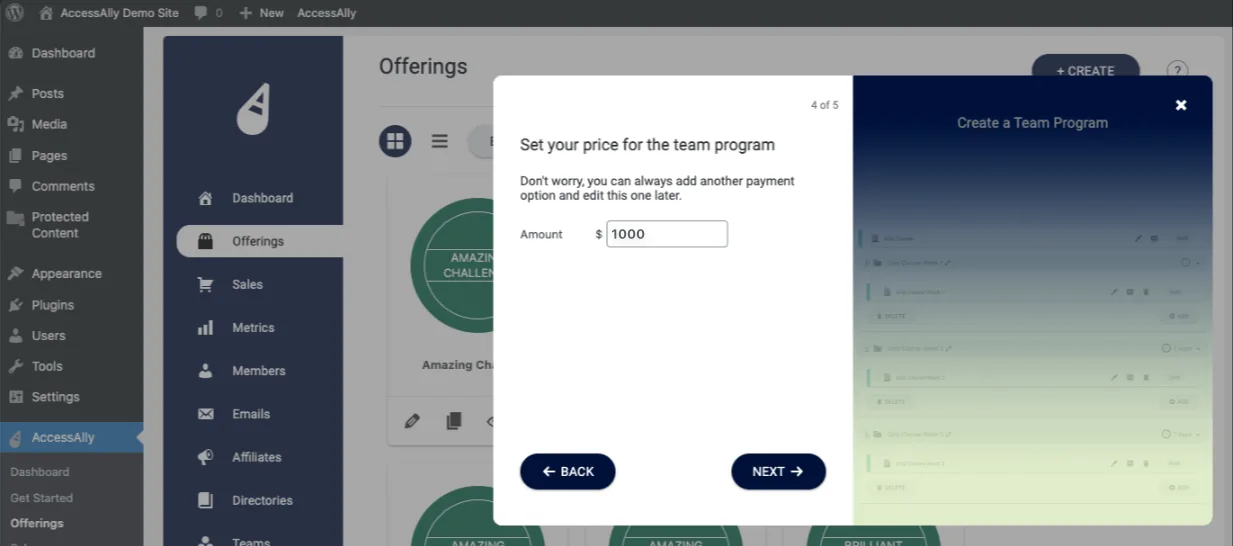
Select how much it will cost to add 10 team members to this leader’s account.
Save the offering template and publish all offering pages in the content tab. If there is an offering that ALL team leaders and ALL team members get access to when the initial team is purchased you can add that to the additional offerings section.
Remember offerings added as additional offerings will go to ALL team leaders and ALL team members!
A la carte offerings should not be added as additional offerings.
Part 2: Order form additional team member seats
There are two parts to this process. The first part is a custom operation that increases the number of team seats. The second part is an order form for the team leader to purchase more member seats.
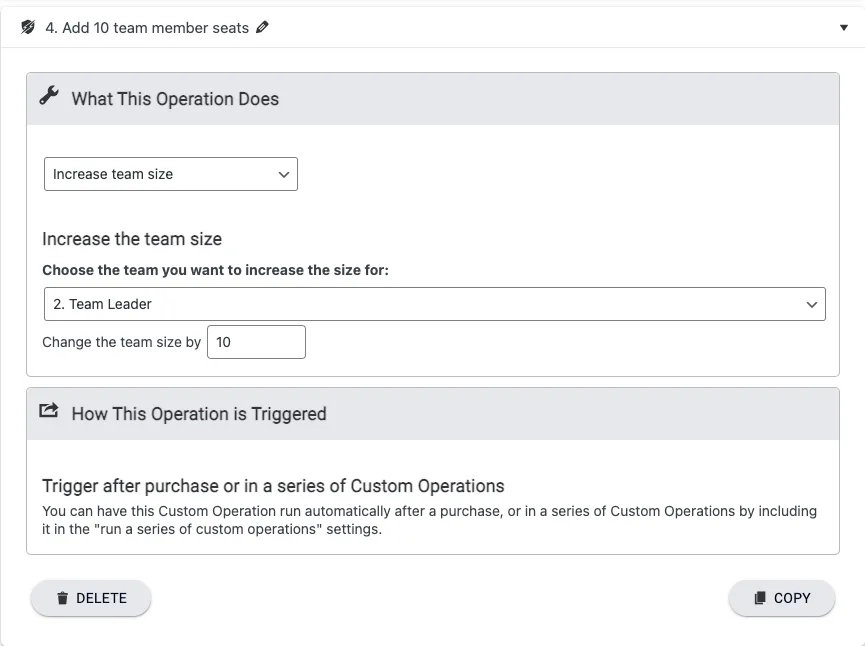
Step 1: Create an increase team custom operation
Decide how many additional team member seats you’d like to increase the team by when a purchase is made. Go to AccessAlly > Settings > Custom Operations and create a new increase team size custom operation.
Note the number in the top right corner of this custom operation you will need it in Part 2. The example here is custom operation #4.
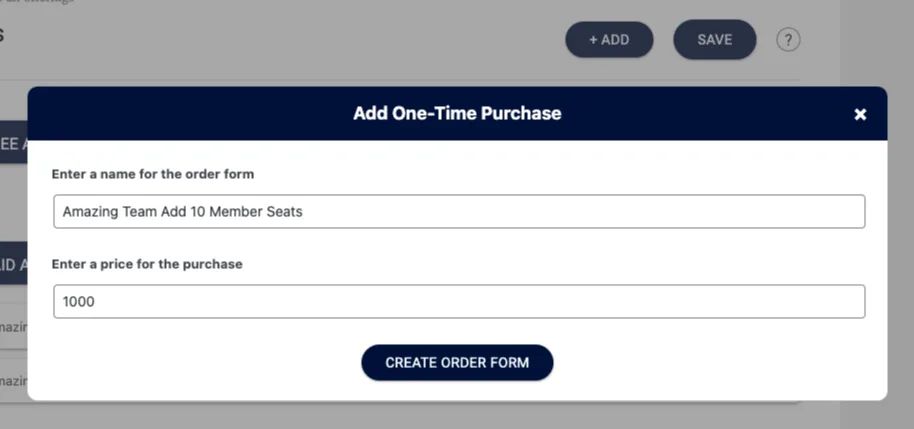
Step 2: Create increase team member seats order form
Go to AccessAlly > Offerings > Team Offering > Forms tab and make a new order form with pricing for the number of additional member seats you’d like to sell. Save the offering and click the brush icon to view the order form settings.
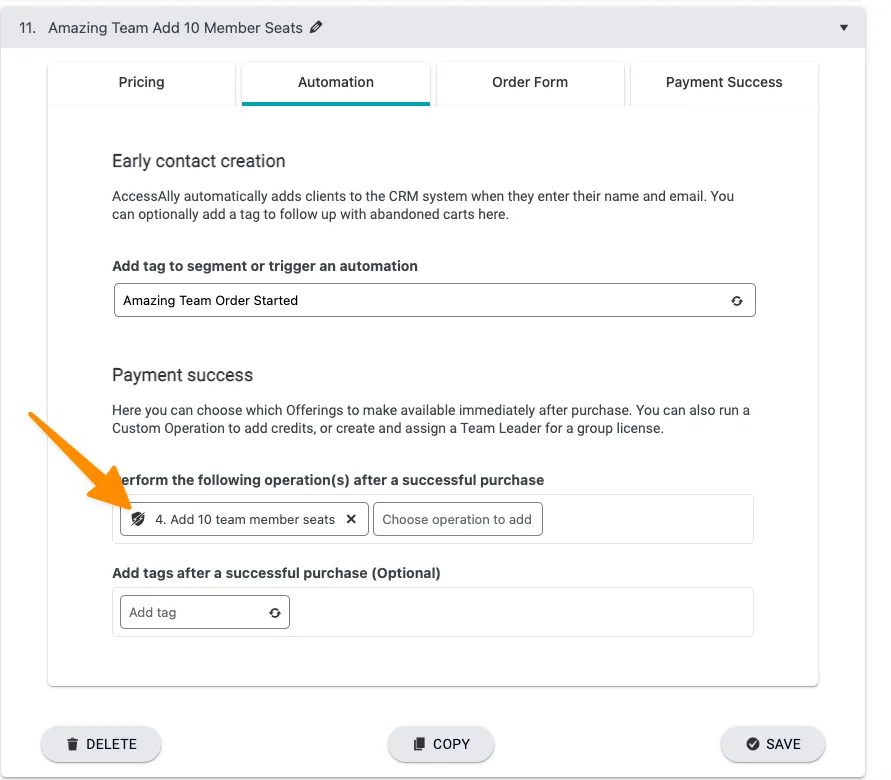
Remove the release and purchase success tags shown in the automation tab. Next, add the increase team members custom operation.
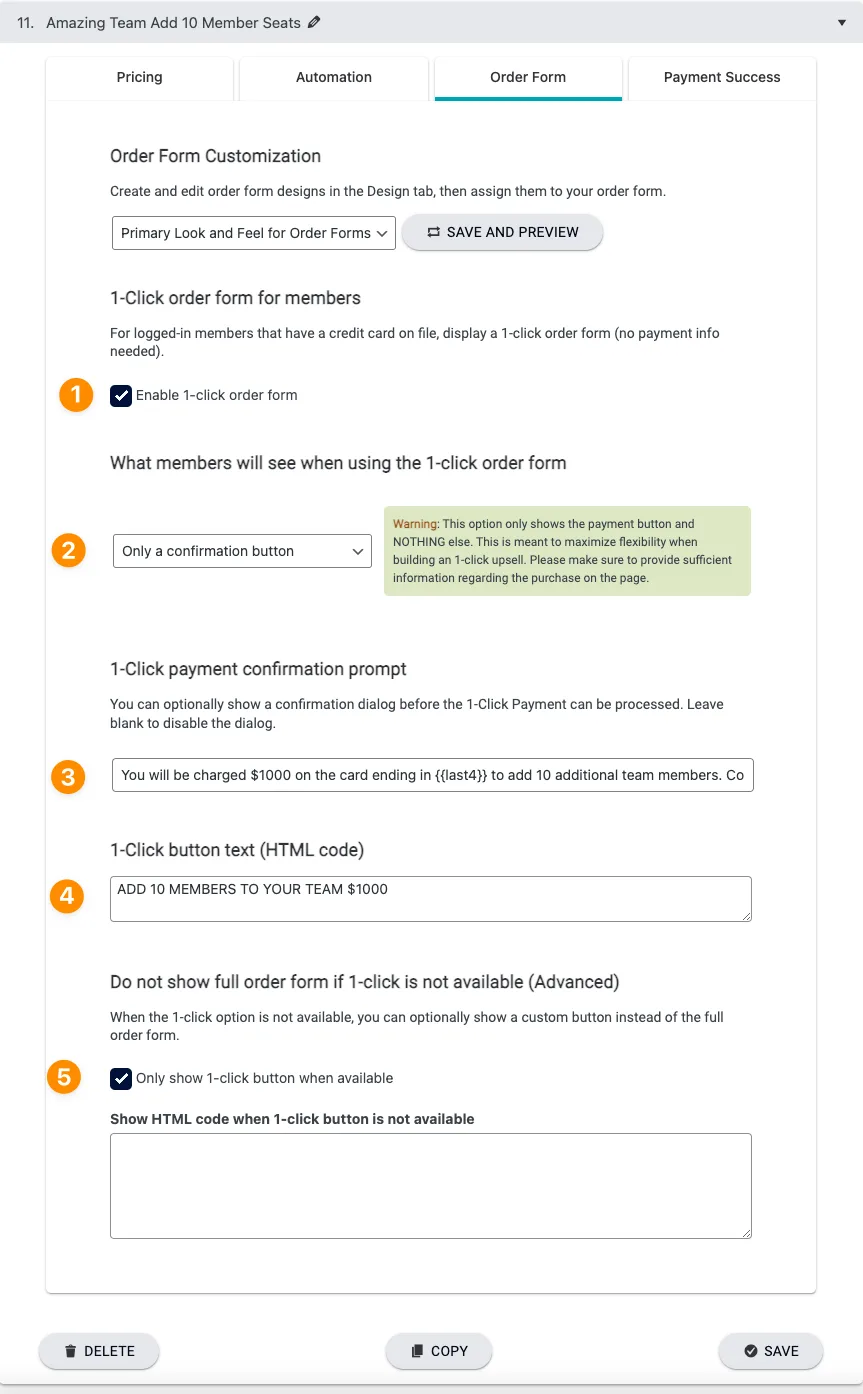
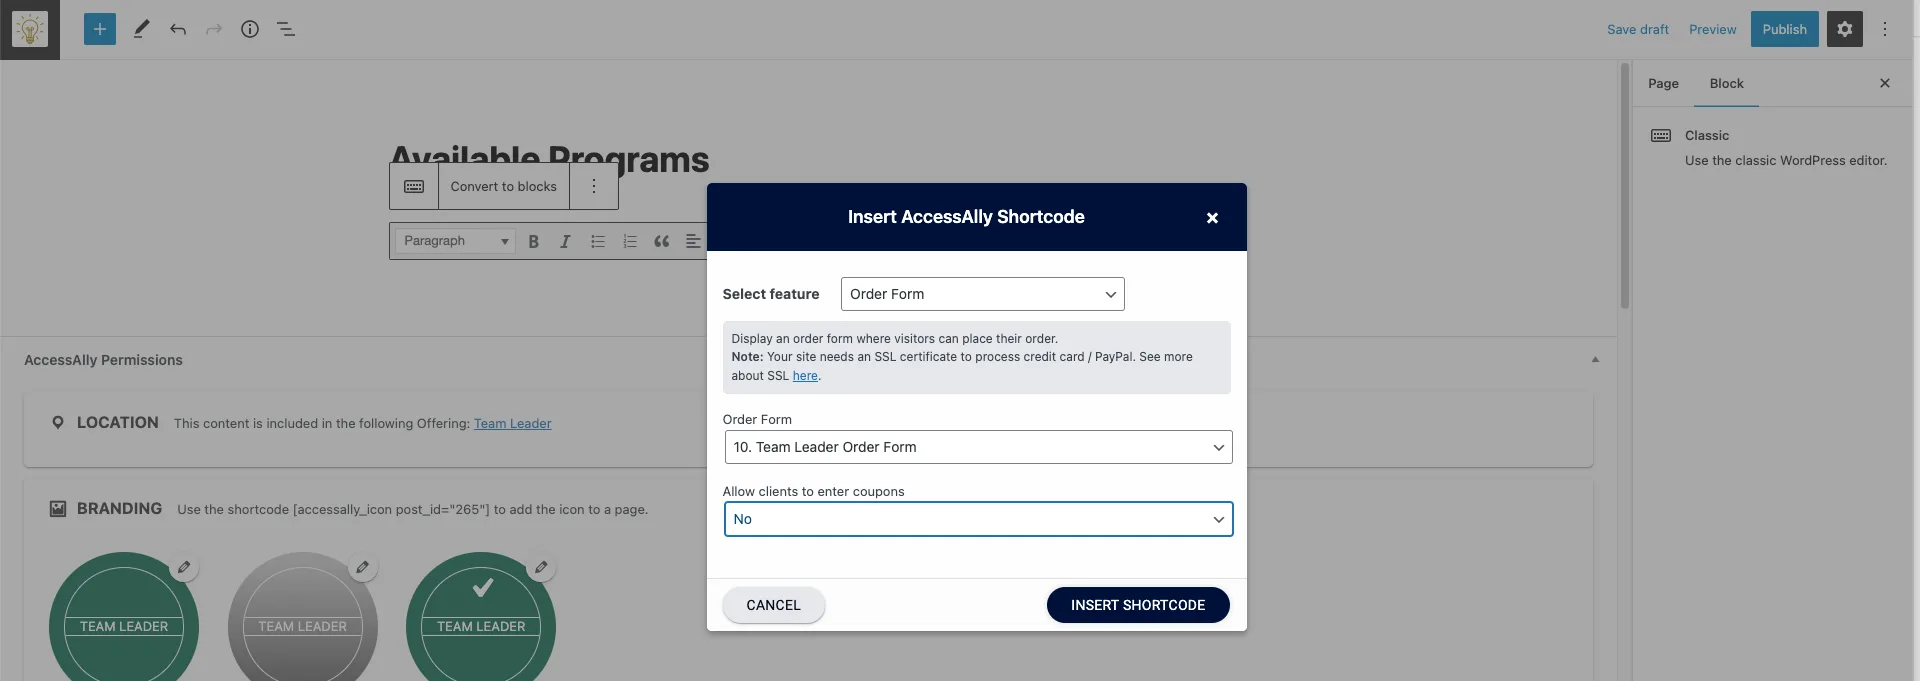
In the order form tab select 1-click upsell and adjust the settings as shown in the image below. (This works for Stripe payments only!)
- Enable 1-click order form
- Show only a confirmation button
- Add text to confirmation prompt shown to confirm purchase
- Add 1-click button text
- Select only show 1-click button when available
Adjust payment success message to take the team leader to the administration page via the thank you page URL option. This allows for a page refresh so the new license count appears.
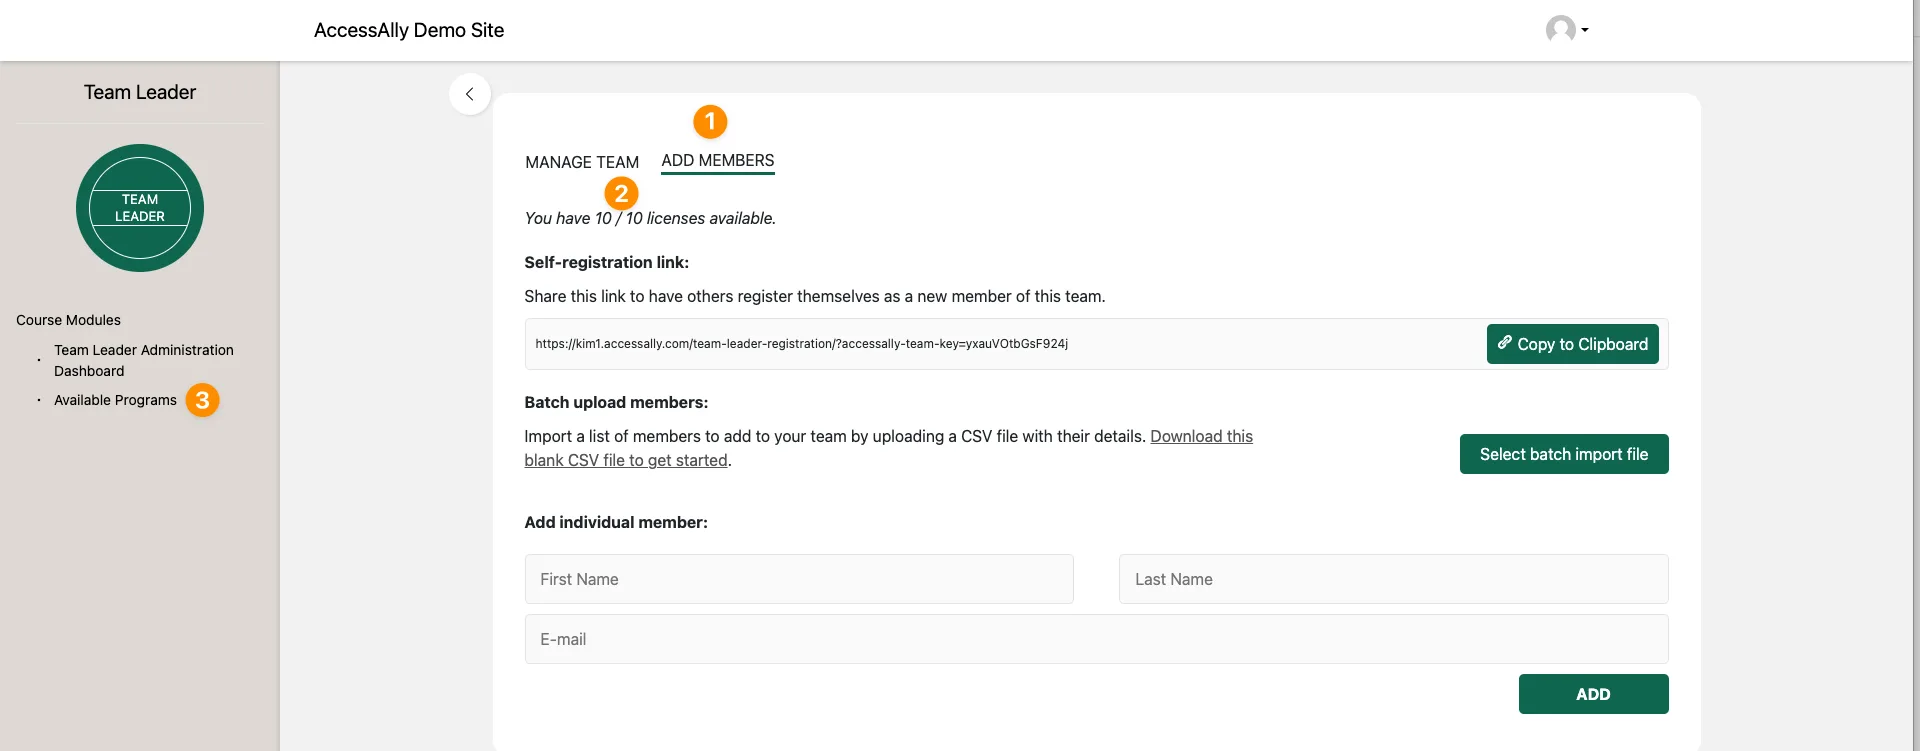
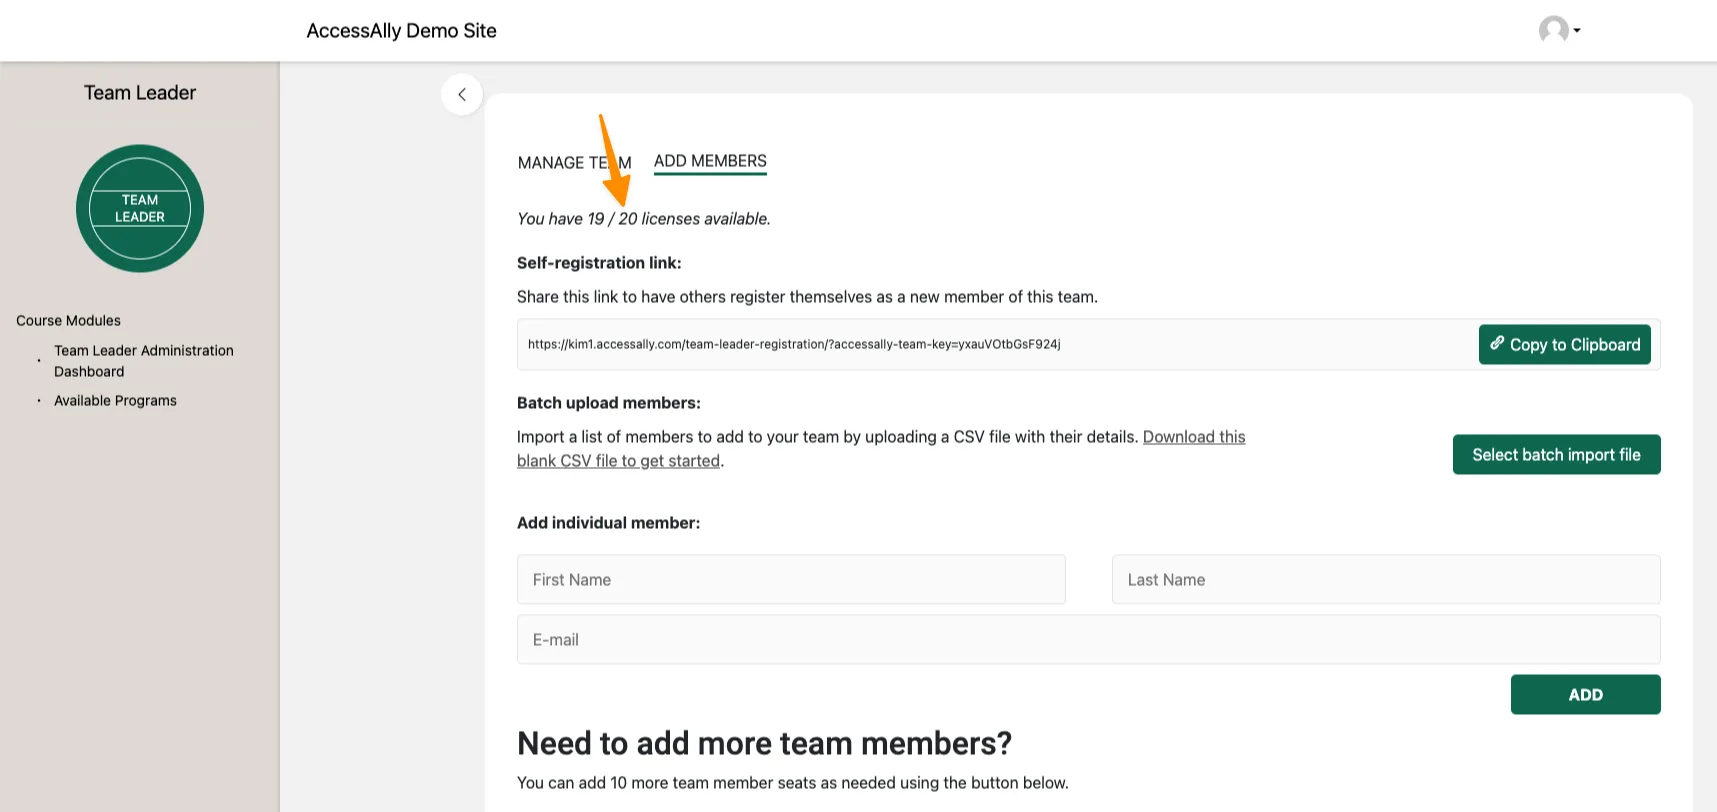
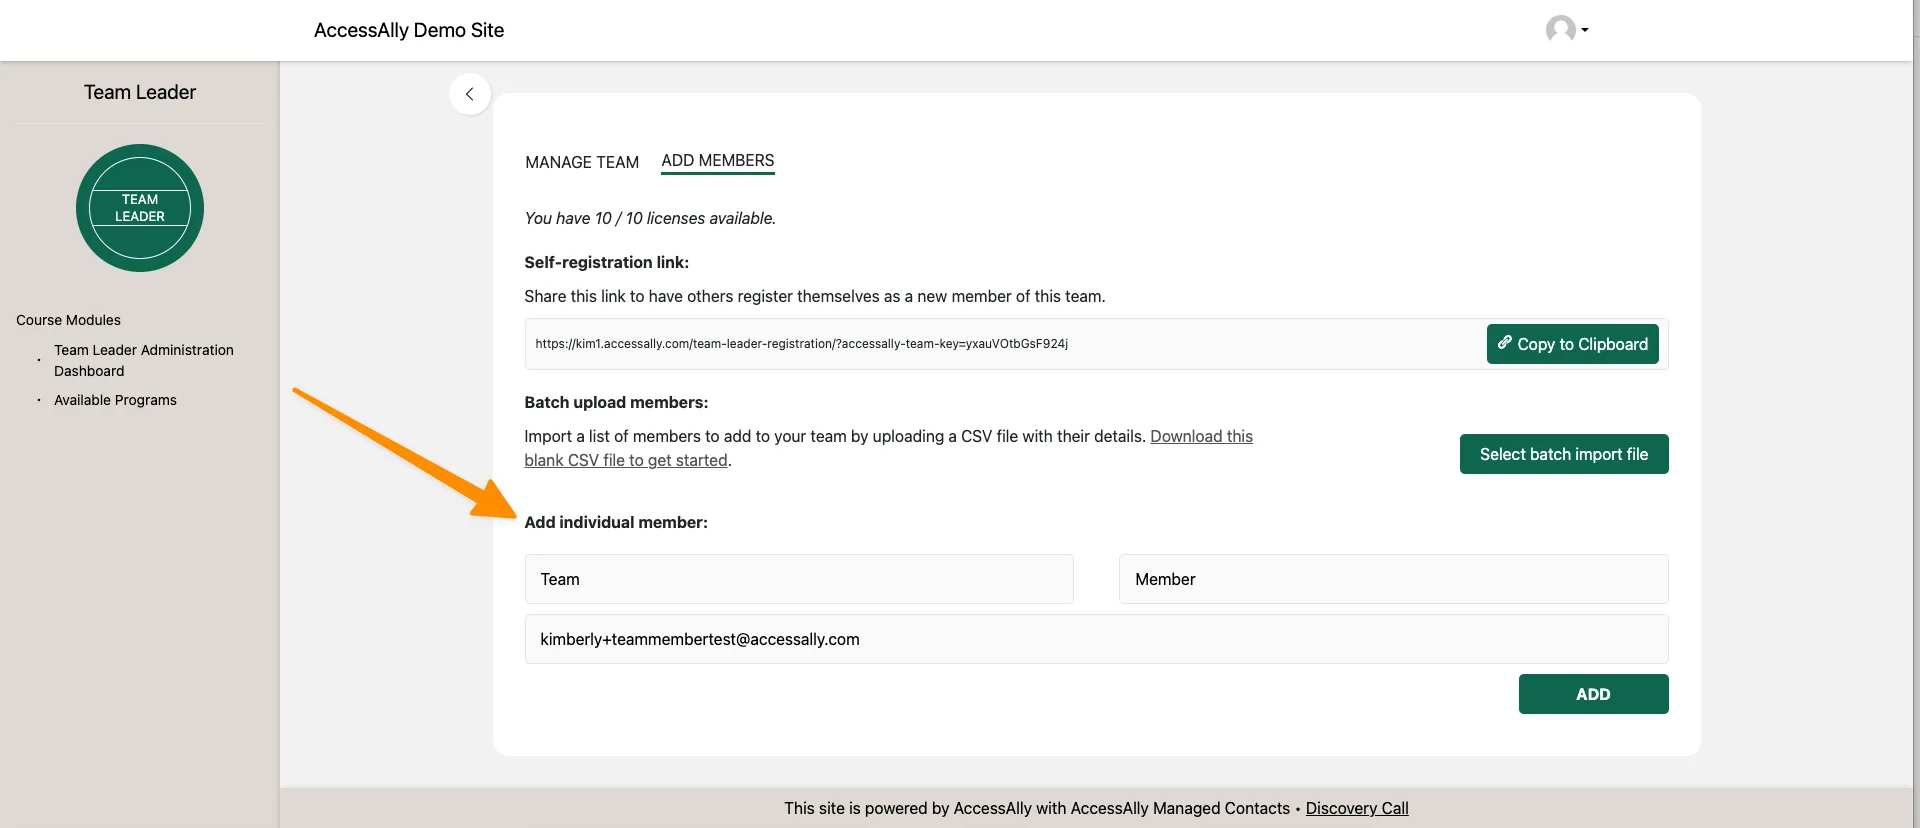
Step 3: Add 1-click order form to team administration portal
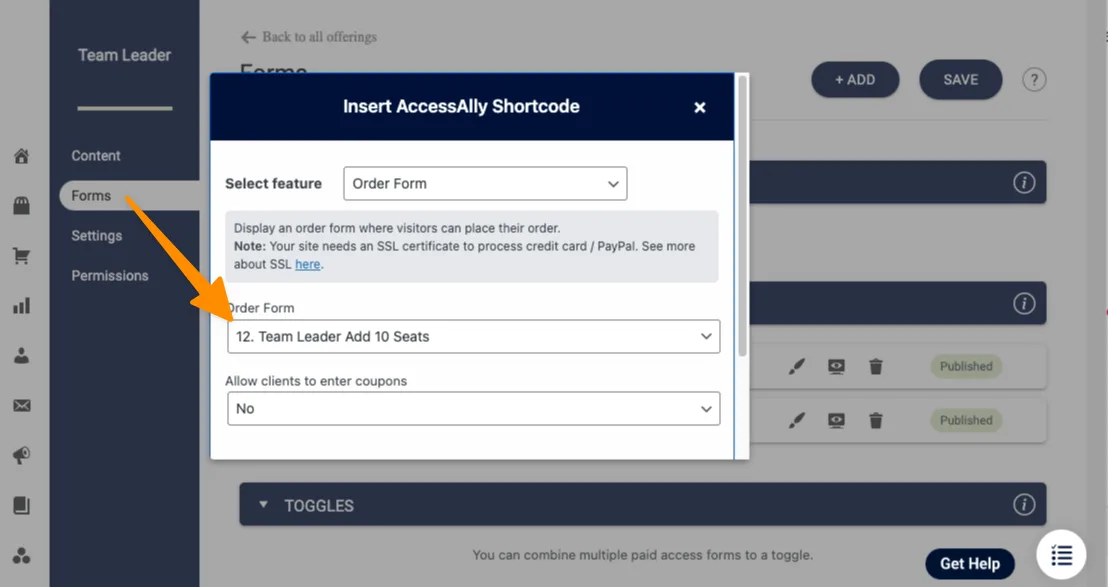
Go to AccessAlly > Offerings > Select your team offering and view the administration dashboard page. You can use the shortcode adder to add the order form to the page.
Here is the view of the 1-click upsell button the team leader sees. As a site admin you will not be able to see this button during setup because you’re not a team leader of this team yet. No worries – it really is here. You’ll test this so you can see it in the testing step.

Part 3: Review a la carte offering settings
Now it’s time to tweak the pages in your a la carte offerings. This is an important step that allows members of a leader’s team to see these pages with the team leader’s permissions.
You’ll do this one offering at a time and make sure to capture all pages within the offering.
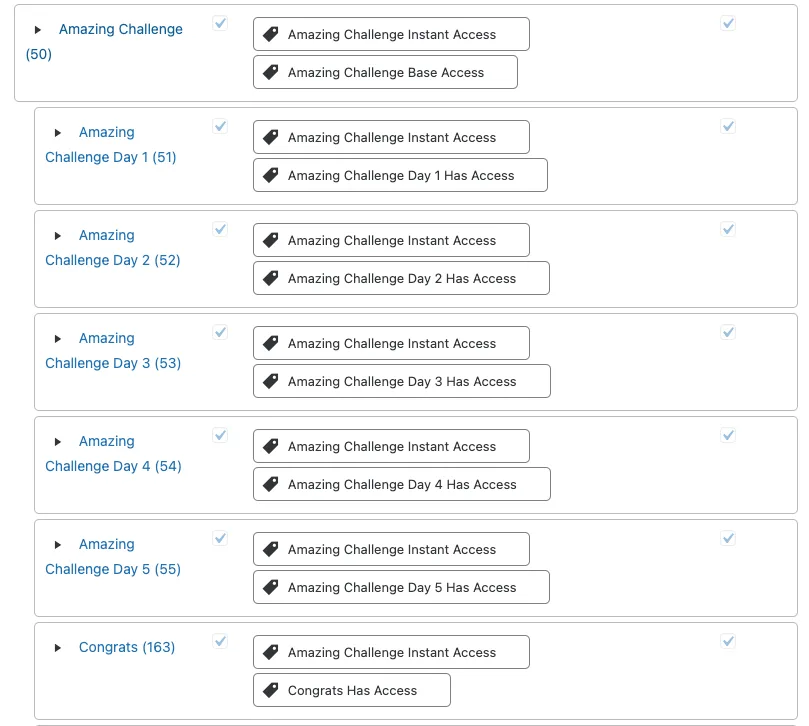
Go to AccessAlly > Members > Page Permissions > Find the first page in an offering. All pages in the offering will be nested in the view as shown in the Amazing Challenge example below.
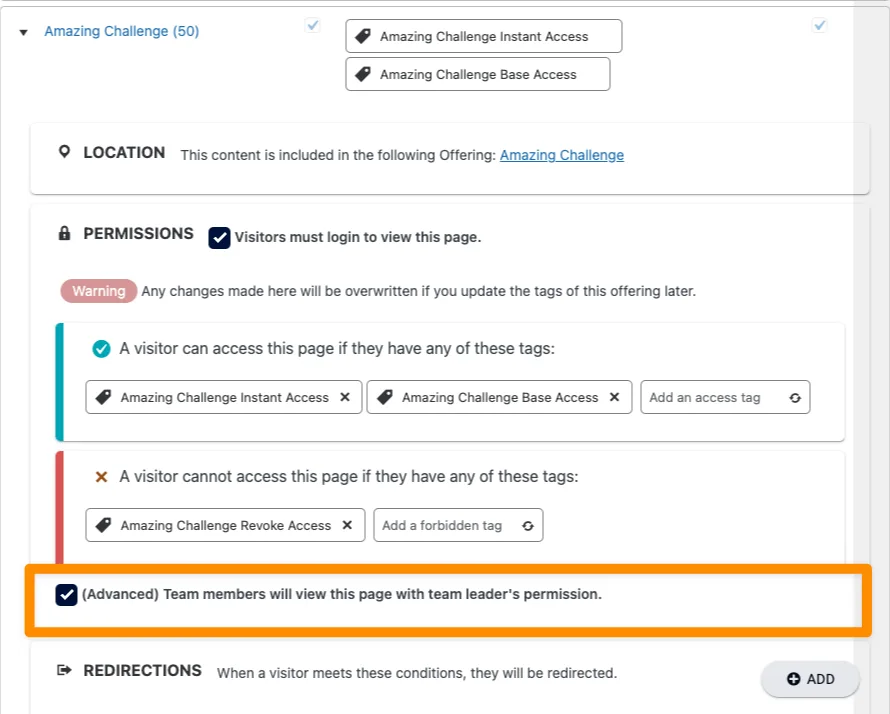
Open each dropdown and checkmark box by “(Advanced) Team members will view this page with team leader’s permission.” Save your changes.
- Repeat this step for all pages in the offering.
- Repeat all steps for each offering you’d like to sell a la carte.
Part 4: Pricing A La Carte Offerings
Now it’s time to create the a la carte order forms. These are added to the individual offering under the forms section.
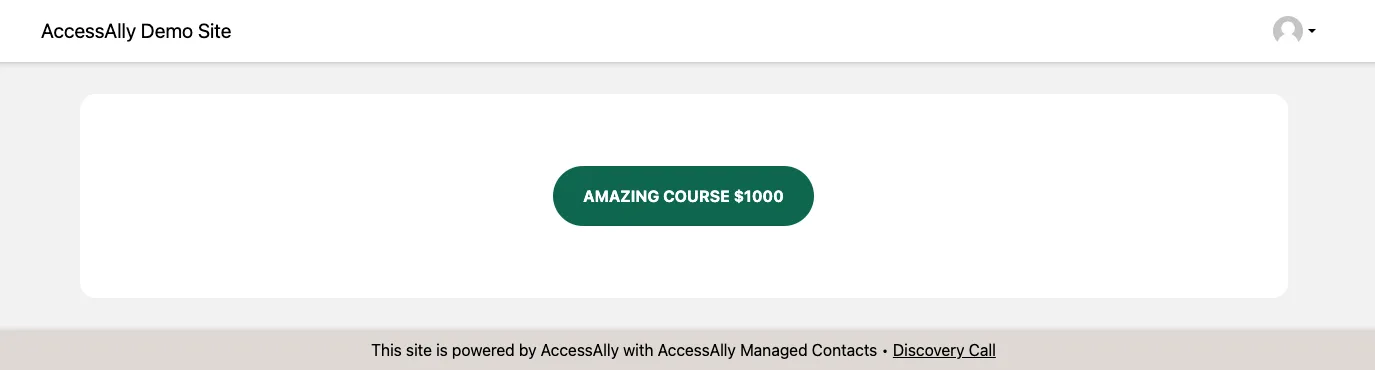
In this example Amazing Course will have a new order form added and it will be priced at $1000 for a team leader making a purchase.

Adjust order form details
This order form will be set to a 1-click upsell and available only from the team leader administration portal.
Click the “brush” icon by the order form to see these settings.
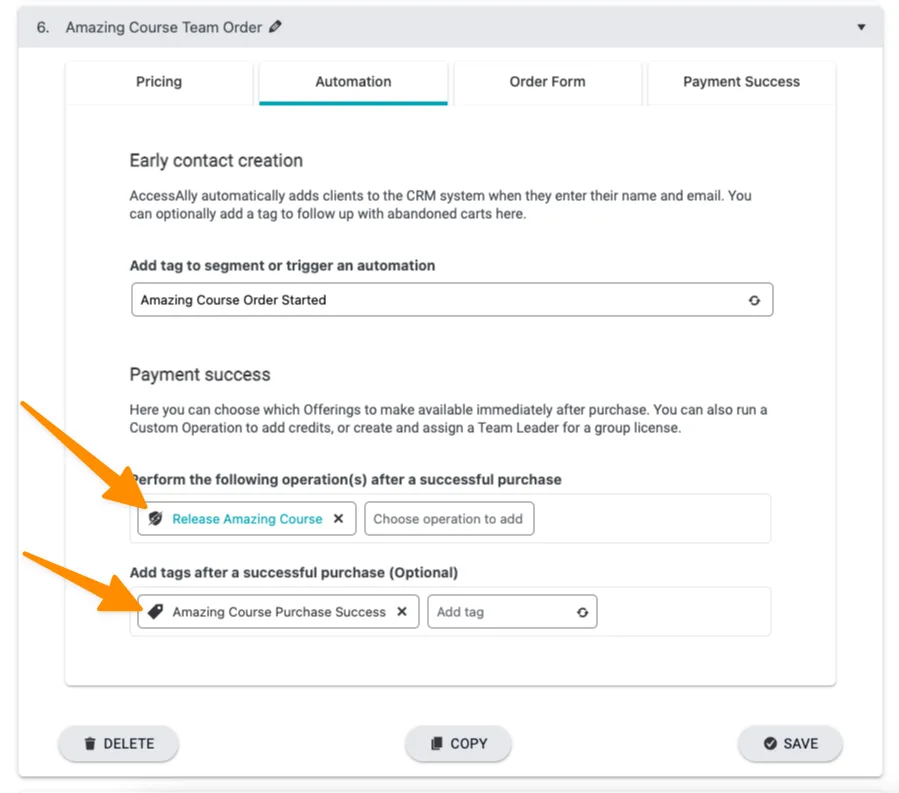
Step 1: Automation Tab
This is where payment access is determined for the team leader. The offering release is added here along with the purchase success tag.
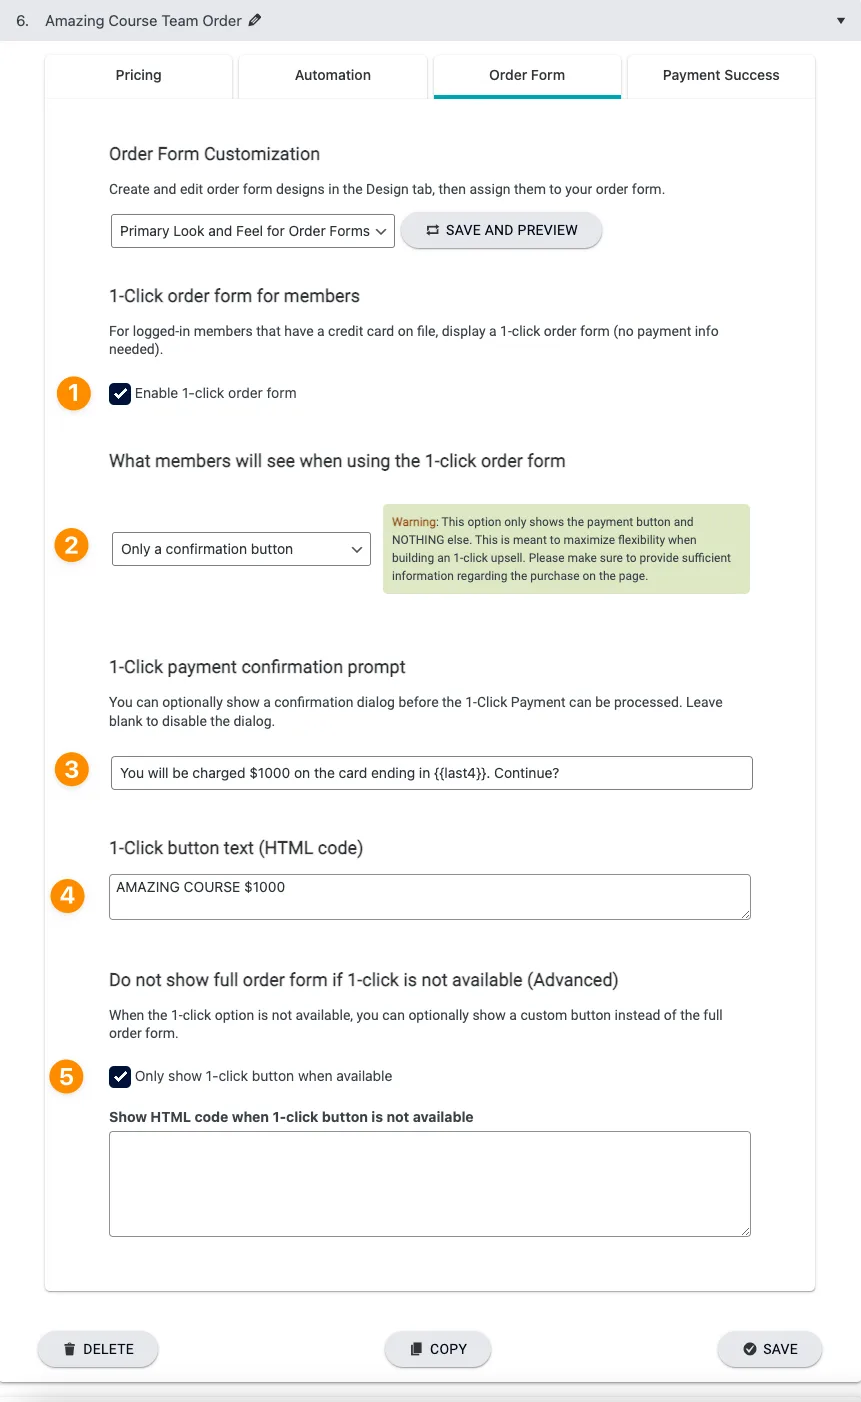
Step 2: Order Form Tab
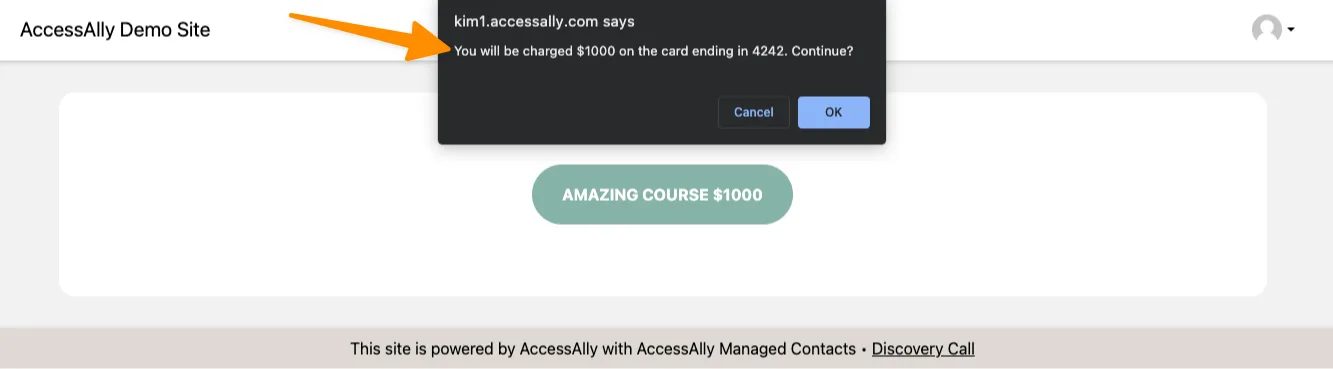
This order form is set to 1-click payment via Stripe to allow the team leader to see these as upsell buttons from the team administration dashboard page.
- Enable 1-click order form
- Show only a confirmation button
- Add wording for the prompt that appears when clicking the button about the upcoming charge
- 1-click button text for button wording
- Only show 1-click when available to prevent full order form from appearing in a page designed to show just the button.
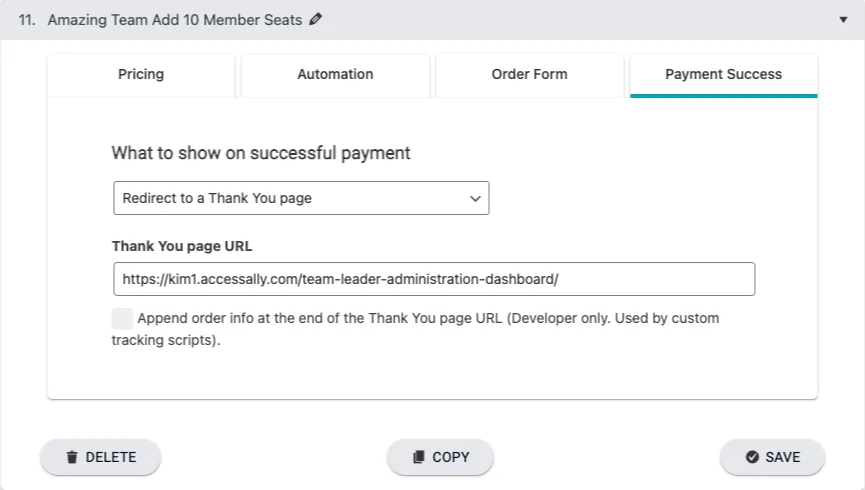
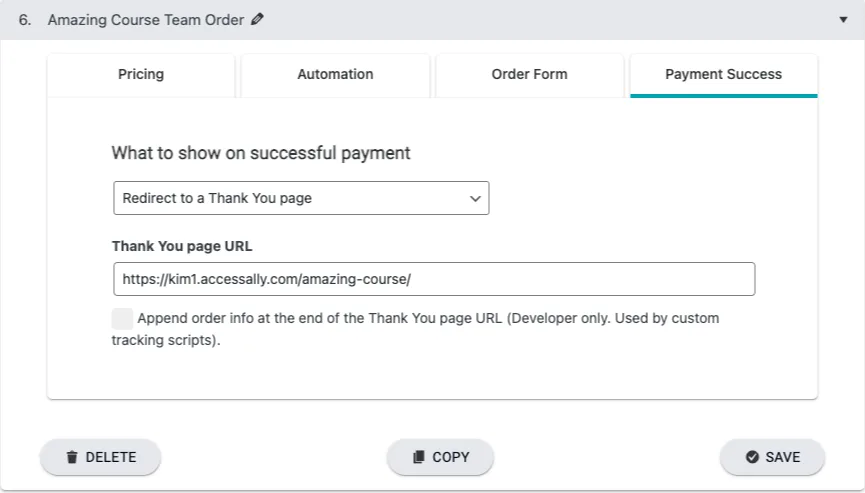
Step 3: Payment Success Tab
Upon purchase select the option to redirect to a Thank You page URL. This can be set to the first page (base page) of the offering purchased so the team leader can see the newly added offering. You may set this to the team leader administration dashboard if you prefer.
Step 4: Add 1-click order form button to team administration dashboard
For this step you could choose to create a new page inside the team leader offering to display all add-on options. This is great because you can add information about the offering like a description to go with the upsell button.
Go to AccessAlly > Offerings > Team Offering and add a new base page. Save the changes and use the brush to edit the page.
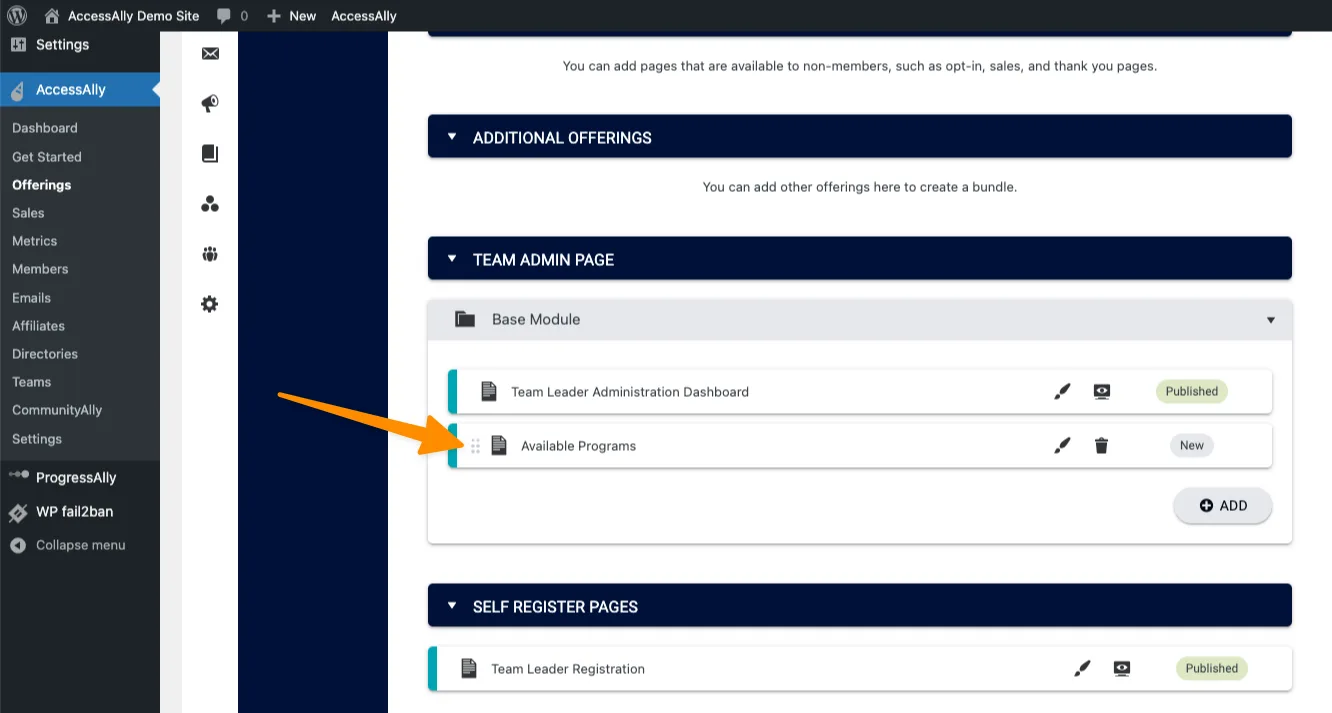
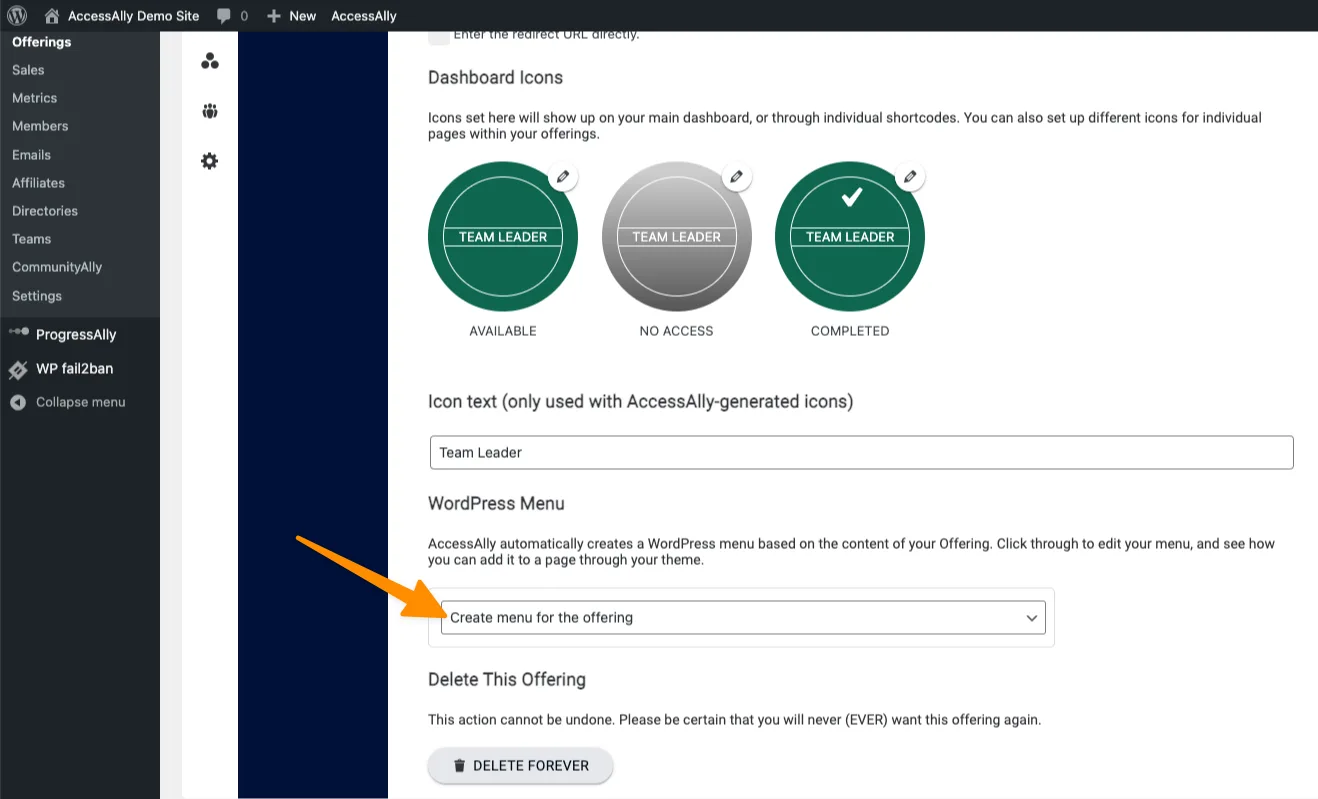
Next go to the settings tab (inside the same offering) and turn on the option for AccessAlly to create a menu for the team offering so this page can be shown to the team leader.
Add the order form shortcode to the page and save your changes.
You will not see the order form because you are not a leader on the team! No worries – it is there. You can make a test purchase using the team leader order form to see this option within the team.
Repeat for remaining a la carte offerings.
Part 5: Testing
We recommend testing the team leader and team member view to ensure everything appears correctly.
Step 1: Test team leader purchase of team center offering
Make a purchase of the team center offering. Upon successful purchase the:
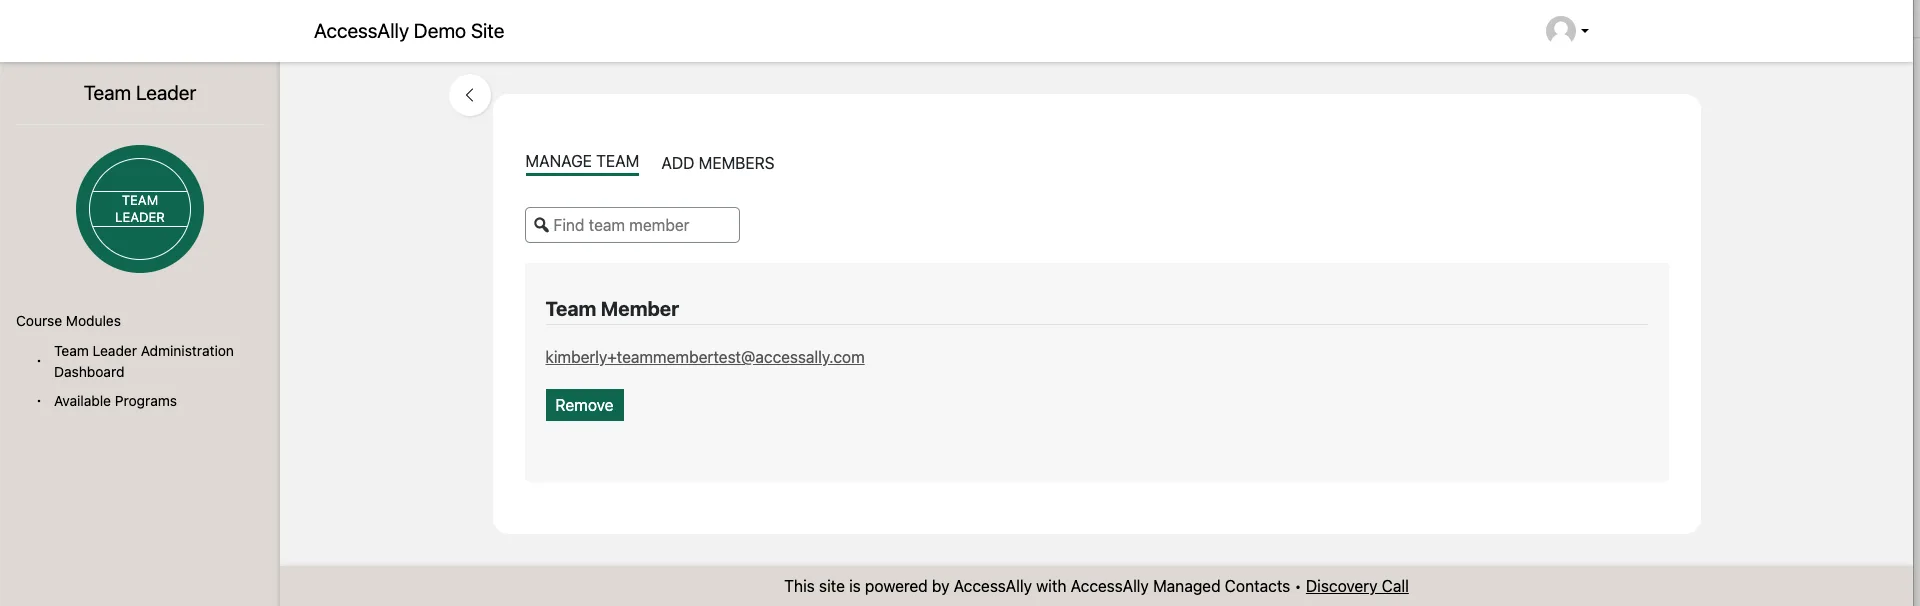
- Manage Team and Add Members tabs appear
- The correct number of team member spots are displayed
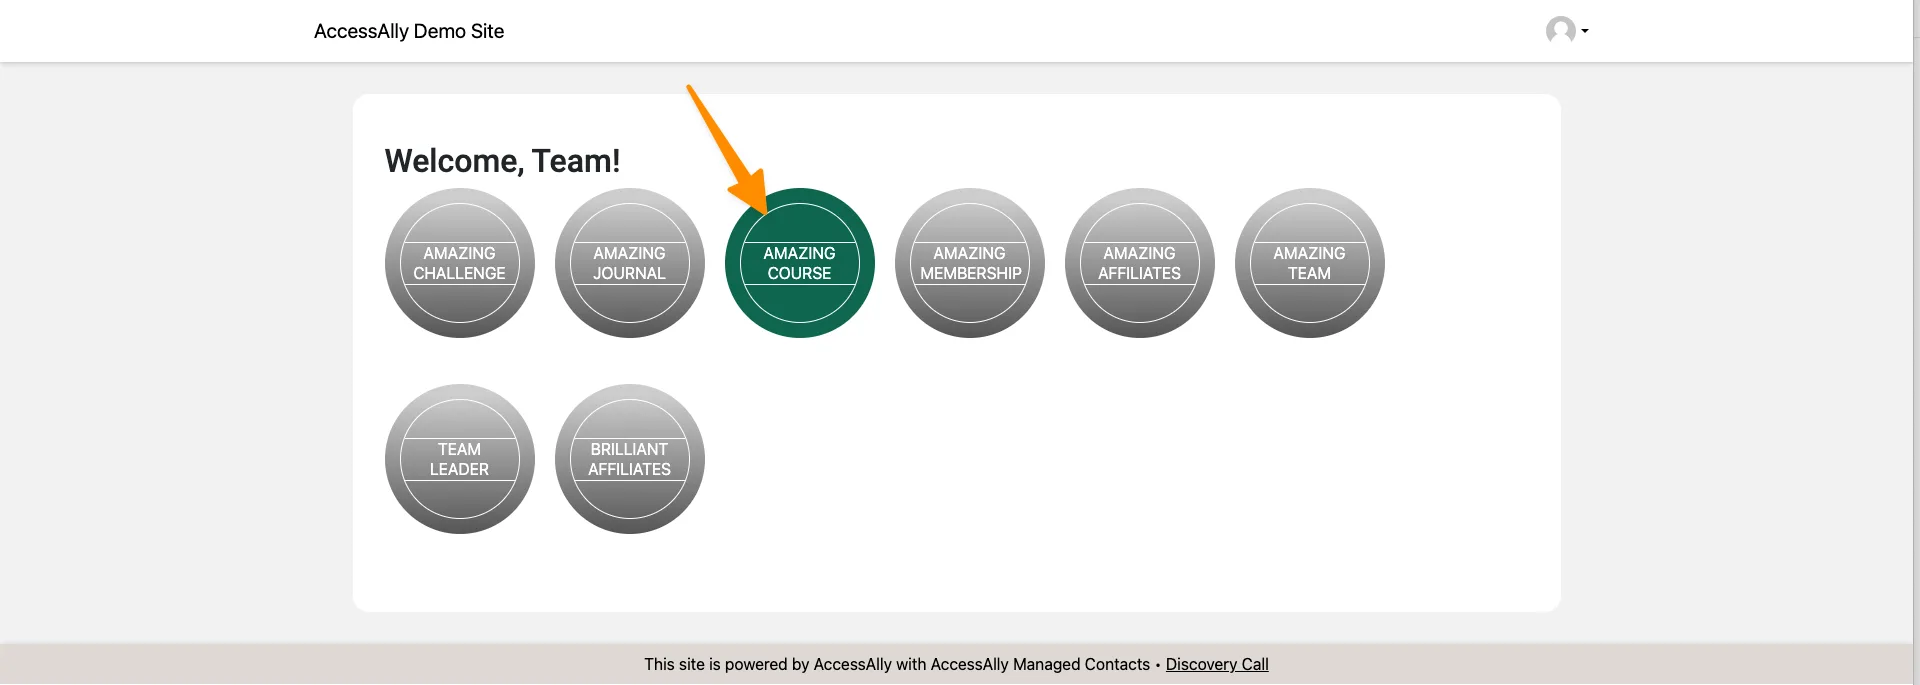
- The available programs (1-click upsells) page is visible
Step 2: Test team leader purchase of additional seats.
Click the additional team member seats upsell button and complete a test purchase using the test leader.
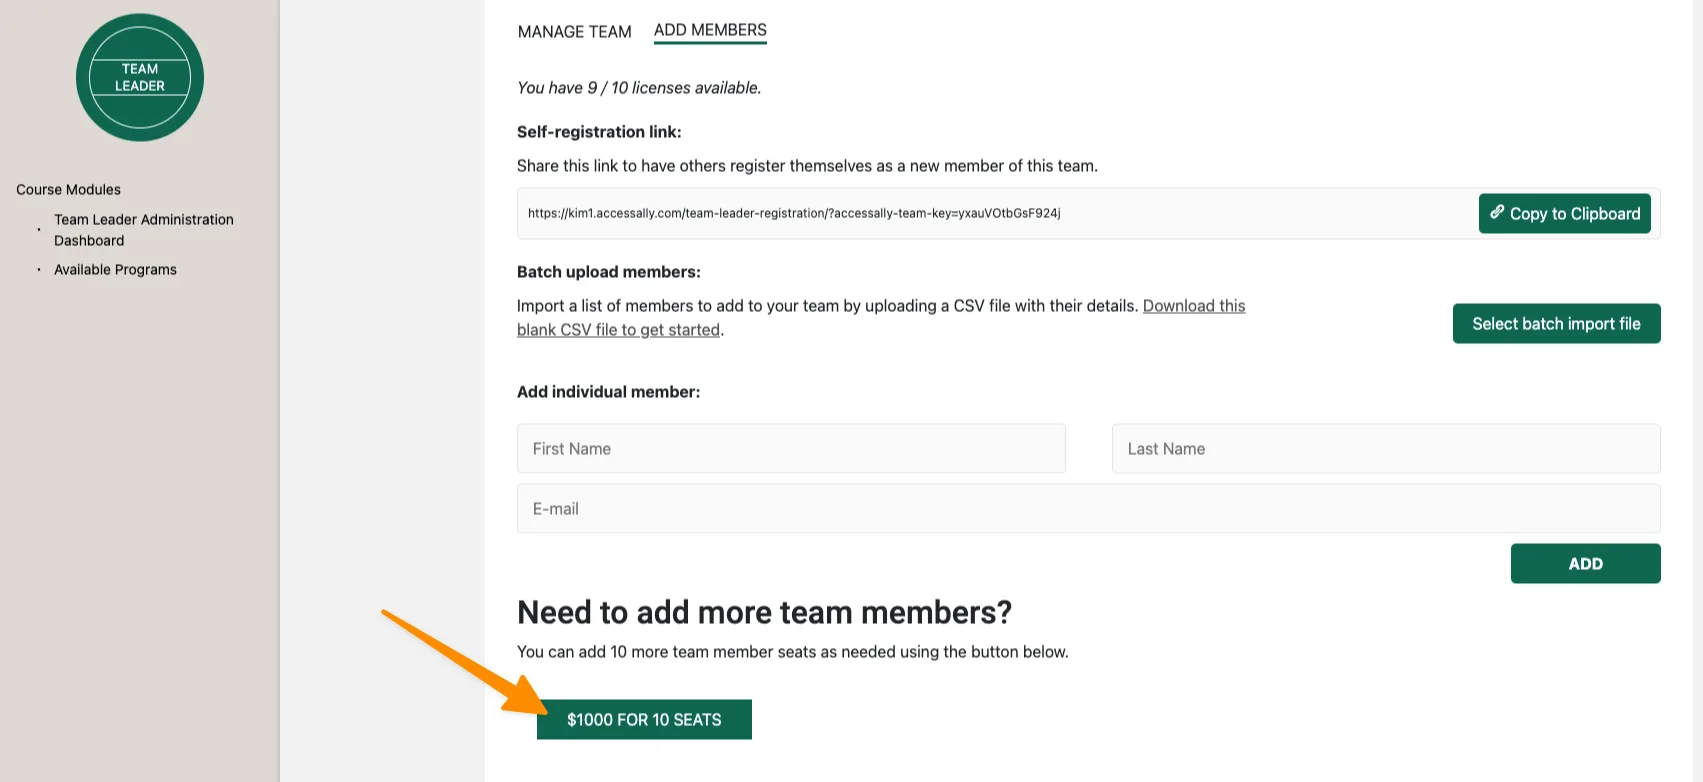
Confirm that the number of licenses has increase by the amount for your order form.
Step 3: Test team leader purchase of upsell offerings
Click the 1-click upsell buttons on the available programs page and make test purchases of those offerings.
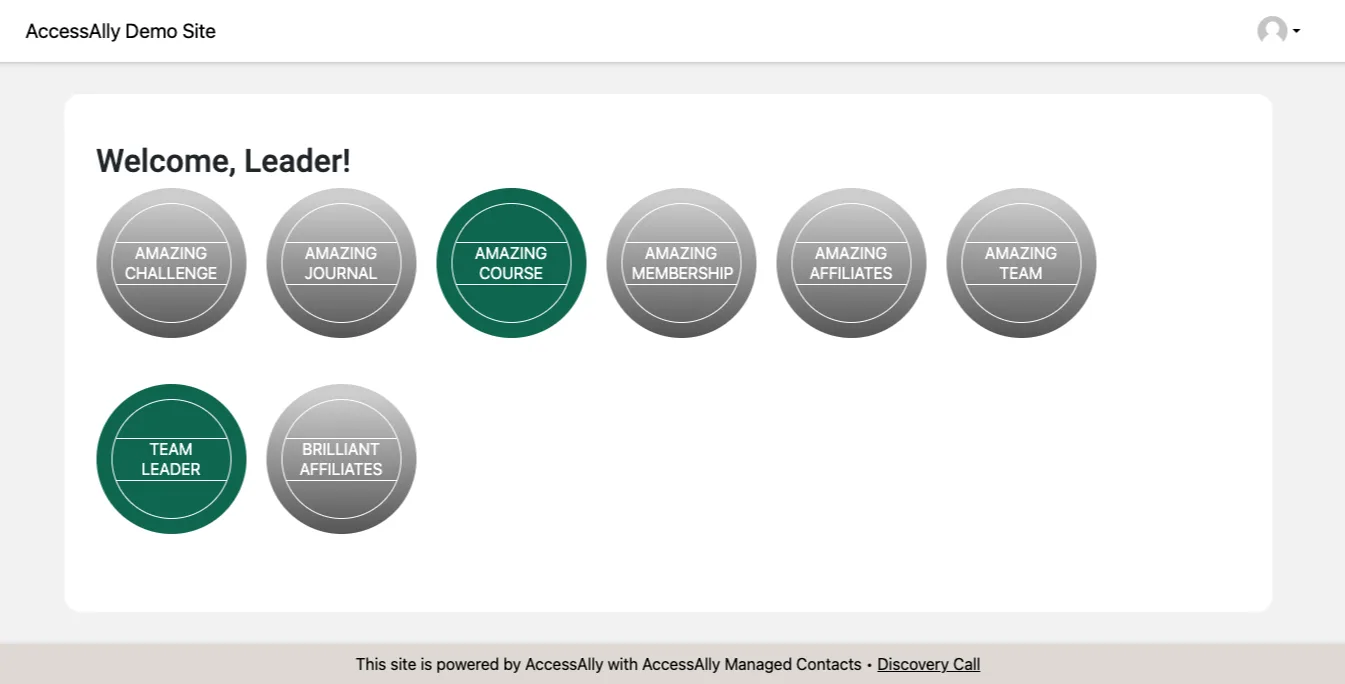
A successful test will show the team leader has access to these when viewing the AccessAlly Dashboard page.
Step 4: Test team leader adding team member
Add a team member to the team leader portal.
Verify the team member appears in the manage team tab.
Step 5: Test team member view of upsell offering
Using the User Switching plugin switch to the view of the team member. This member should be able to see any upsell offerings that the team leader has purchased from the AccessAlly Dashboard page on the site.
Other Use Cases for This Scenario
Here are a few additional ways you can use this scenario to deliver different experiences from your site. The steps are the same!
- Gifting courses – someone wants to gift one or more of your courses to friends, family, coworkers. Instead of a gift certificate – create a gifting portal!
- Sponsoring members – allow current members to sponsor future members by purchasing seats to courses that will then be given to others. With this scenario the site admin can choose and add the winners or the sponsor can!
